Great Crust without the Steam!
For what ever reason some ovens just don’t trap steam very well. This is true of professional equipment, but some home ovens behave this was as well. The reason to care…if you don’t trap steam in the oven for the first 10 minutes of baking you will end up with a dull, lackluster crust, even if you use a good baking stone (which is essential for great free-form loaves).
There are a couple different ways to achieve this, including the tried and true misting bottle. You use a food grade spray bottle and mist the bread every minute for the first 10 minutes. This requires you to stick close to the oven and open the door repeatedly to spray. A bit more work than I’m generally willing to do, but it will give you a nice result. Here is a much easier way:
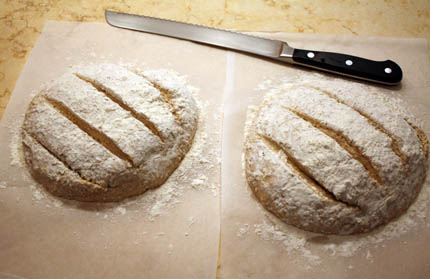
Start by forming two 1-pound peasant dough loaves, letting them rest, dusting them with flour and slashing them with a serrated bread knife. Both exactly the same!
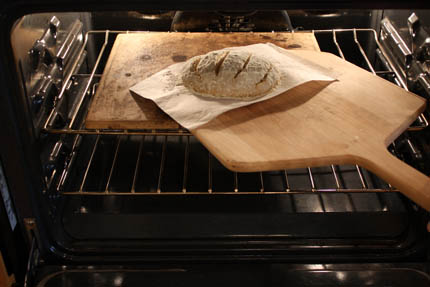
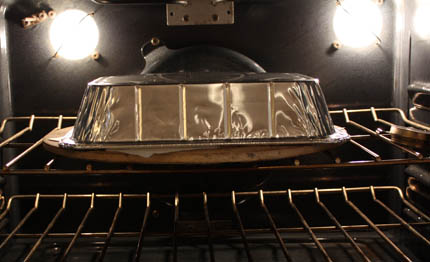
In this experiment, a double wall oven was used… so one loaf was slid off the pizza peel into the bottom oven with NO steam, just a preheated baking stone.
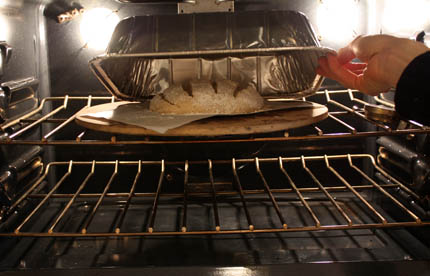
Into the top oven went the other loaf on another preheated stone; then an inverted disposable lasagna pan went over it. Make sure the pan has at least double the height of the unbaked loaf, so that the bread will have plenty of room for oven spring. You can do this same technique with a metal bowl or the lid to a chaffing dish, as log as they are tall enough and oven-safe. The pan should also fit on the baking stone, so that it really traps the steam from the bread.
There is no reason to add water, the moisture of the dough will do that for you! This is the same premise behind baking bread in a Dutch oven or a Cloche, but cheaper and less fuss.
After about 10-15 minutes carefully remove the inverted pan from the oven.
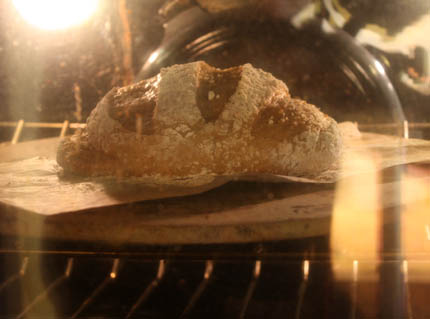
You can see the reflection of the light off of the doughs shiny surface. If you have baked on parchment paper you will remove that as well. Continue baking to allow the bread to color nicely.
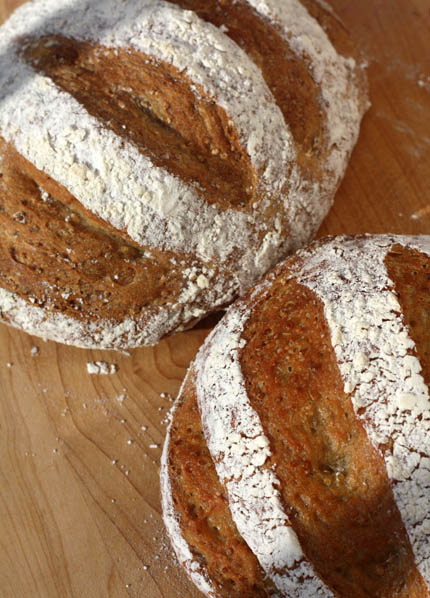
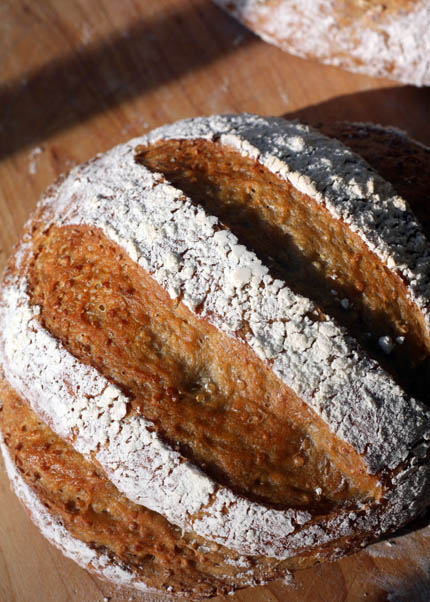
The top loaf was baked without steam and it is dull and doesn’t have a nice color to it. The bottom loaf was baked under the inverted lasagna pan and has a great shine and the caramel color that we want. Just that simple!
Note: BreadIn5.com is reader supported. When you buy through links on the site, BreadIn5 LLC earns commissions.
Jeff – don’t have convection. I’ll try baking longer. Worst thing I could do is ruin a loaf.. How about temperature? I’m baking at 450 using an oven thermometer to track the temp.
For small loaves like baguettes and rolls you can try 475. Otherwise 450 is fine and gives the effect you see in the pictures in our ovens.
Yes, I am using steam, placed a tinpan on bottom of gas stove, put a cup of hot water in it together with the bread, bake it until golden – not dark – brown. I tried baking for less but then the inside is not done. Tried 450 and 475 and 500 as temps. I use King Arthur’s flours.
I have a Gaggeneau convection-steam oven & want to try baking your breads in that. However, I don’t have a small baking stone. What do you recommend? Have you tried using such an oven for your bread? I love your book, which I won earlier this month from https://kalofagas.ca
Barbara R: The only thing I can think of is that King Arthur Flours consistently are higher in protein than counterparts. You could try a lower-protein flour, like Gold Medal Unbleached All-Purpose. I don’t imagine that KAF AP would have done this though, just KAF bread flour.
So you may be one of those people who prefers the crust brushed with a little oil or melted butter just before baking. That will soften the crust nicely– it’s a different style but delicious.
Barbara: Haven’t tried the Gaggenau and not sure what to say about the stone, but sounds like it won’t fit. How about one of these perforated baking pans? Like for baguette and others. They allow moisture to leave the bottom crust w/o needing a stone. They make other types other than the baguette one.
Guys, I just got your book 2 weeks ago and don’t think I’ll ever buy store bread AGAIN EVER. Love it!
Question about storing/transporting crispy crust breads – can you recommend any sources for cotton or paper bags?
April: I just use paper bags from the grocery store and haven’t been impressed with more newfangled ones with vented cellophane. If you leave them in any of those, especially if not fully cooled, they soften the crust. So I haven’t seen much value in buying ones.
Haven’t seen cloth ones anywhere but that sounds like a decent option.
I love the aluminum pan suggestion – too many potential problems with water or ice cubes (one dropped into my storage drawer into my cast iron pan and I had to reseason it!!) I’ve discovered that my gas oven will registar 450, but a thermometer set on the stone takes forever to reach temp. So, I’m preheating the oven at a higher temp and returning it to 450 – once heated, the stone and oven stay constant. I was having gummy bread problems, but getting the stone up to temp has solved that. At my husbands suggestion, I tried the upside down heavy gauge baking sheet instead of the stone – heats faster and is sure cheaper than a stone!! All this fancy equipment out there, but not required for a good loaf of bread.
Thanks for the suggestions Linda!
you guys are brilliant! i have never made bread and was inspired this week when a friend brought me a fresh baked loaf. i had purchased your book a while back but had not given it a try. last night i literally threw the dough together (i made the basic boule), hoping it would be ok. i baked it on a thin pizza stone but used this method and it was if my bread was kissed by the bread gods! sooooooo delicious we ate the whole loaf! seriously folks, if you have not given it a try run to the kitchen and whip up a batch. i think even my 4 year old could make this bread it’s so easy!…i can’t wait to try another recipe!
Thanks Dina– welcome to the site. Kissed by the bread gods? Can we quote you?
Come back anytime you have questions.
The first few times I tried the AB5 method, I saw a lot of steam escaping from the vent, so I tried to trap it with a wadded dishcloth. Apparently, the steam all condensed a little farther back, because it shorted out the board that controls the oven, broiler, and timer, which started beeping incessantly. And since it has its own power source, unplugging the stove didn’t help. It just kept beeping until we pulled the board. Luckily, we were able to replace the board, rather than the whole stove!
It turned out that using two cups of hot water provided enough steam to set the crust before it all escaped, but it’s nice to have another option now too. That would probably be a good option for summer, too, since it doesn’t add as much steam to the air.
Hi Jess,
This method will be a much easier and less noisy option for you!
Thanks for sharing your story, it will prevent someone else from going through that as well!
Zoë
Jeff
Interesting curve ball to my quest to get a perfect crust. My oven thermometer was showing wild swings in temperature (+/- 60 deg F) so I called in some help. The repairman had to tweak a calibration factor but he also told me that, using his calibrated thermometer, I had to shoot for 475 to get a true 450. I did that last night and the french bread had a beautiful crust that made lovely sounds after it came out of the oven. Fresh french bread is rapidly becoming a staple for dinner.
I did have something strange happen with my most recent batch of dough. It was my first using the bran enriched recipe. It rose fine in the bucket but yesterday when I pulled out the first section of dough the entire dough collapsed (just like when you punch down dough when making bread the old way). I haven’t seen that before. Any ideas why it happened?
Hi Paul,
What you describe is actually not unusual for our dough. It will rise in the bucket, then collapse and never rise in the bucket again. You will also notice that it doesn’t rise much when shaped and resting on the counter. When it goes into the oven you should have wonderful oven spring!
So glad you got your oven figured out!
Zoë
Hi,
Read and studied your fantastic book and tried the master recipe! The bread tasted very good and looked terrific,but…. the crust which looked ok was a bit tough and not really crisp. I followed the recipe to the letter. I used a cookie sheet as I don’t have a stone yet; could that be the problem? I ate the bread warm and cold ;no difference.What went wrong?
Yes, the stone makes a big difference in my opinion. Another way to avoid needing the stone would be to get the loaf off the cookie sheet as soon as it’s completely set (about halfway), and put it on an oven shelf.
The stone (or oven shelf) allows moisture to leave that bottom crust. For whatever reason, this not only crisps the bottom crust, but the entire loaf.
I have never tired the inverted pan method, but a friend of mine bakes her bread in her dutch oven with the lid on for the first ten minutes and she always has lovely, crusty bread.
Hi Kelly,
It is a brilliant way to go. In fact it will be my next post!
Thanks, Zoë
I’ve made several loaves of the basic recipe and they disappear within a day. After a friend told me about the errors in the book–bake in the middle instead of the bottom; raise the dough longer–the last two times I made the bread, the crust was not crusty right out of the oven. What happened?
Hi Bobbie,
Is it possible that these loaves were slightly larger and therefore needed more baking time. Is the crust on your loaves quite dark caramel brown when they come out of the oven. If not, they may need more time.
You should also note that the crust as the bread is cooling will get soft as the internal steam is released and then will crisp up again once the loaf is totally cool.
I hope this helps!
Zoë
Just wanted to say how wonderful your method is! I read about it in Mother Earth News but didn’t try it until the next month when readers raved about it. My brother came over for the weekend & I made up a batch of the boule. The two of us devoured the entire batch in one day, made the whole wheat the next day & I experimented & made my version of rye the next. Since then there is always a batch of one kind or another in the fridge. I’ve only had one oops when I took boule out too early & it wasn’t done in the center. I have ordered your book & can’t wait to try more! BTW my brother is a chef (although not a baker)& he thoroughly approves! Thanks for giving all us non-bakers the courage to bake real bread!
Re: Gaggeneau steam oven
Jeff – I have a perforated veggie grill pan I can try. Thanks for the suggestion.
Thanks Susan!
Barbara, let us know how it turns out.
Thanks for a really fun book! I have always enjoyed making bread, though none of it could ever have been considered artisan. When I first became excited about your method, my husband was not sure he wanted to start experimenting with something of such importance as BREAD, but after making small peasant loaves into bread bowls for a cream soup, he decided he liked this kind of experimenting. 🙂 I have two questions: the first is, when I tried the bagels, they were very flat and took much longer to get done than expected…not having bread flour, I had substituted unbleached all-purpose…was that the problem? The second question: I would like to be able to convert a roll recipe I already have to a stored dough method; as it is already a very wet dough, I think it would work. However, I didn’t know about the timing on how long to let it rest before baking…is it fine after it isn’t really cold anymore? Are there any other issues I need to be concerned about, or should I just try it and see what I get? BTW, the rolls I’d like to try (which have become such a part of my family’s history) started out being baked in a public school cafeteria by my great grandmother in the 40’s. I have to smile when I think about the unsophisticated beginnings of most really good food. 🙂 Thanks again for your help!
Hi Alesha,
The bagels do need a bit of extra body to keep their shape when boiled. Having said that, I’ve made them out of the master recipe with great success, so the bread flour isn’t 100% necessary. Here is a post I did on making and baking the bagels. See if it helps to figure out what went wrong. https://artisanbreadinfive.com/?p=423
You will just have to play with your great grandmothers recipe to see if it stores well. You are exactly right about how long to let the cold dough rest before baking. No longer cold and dense is the best indicator!
Have fun and please let us know how it goes!
Zoë
I am so anxious to try this bread.I have a batch made up in the refrigerator now but like some others I don’t have a stone (yet) I have a stainless steel dutch oven. Would that be best, or a cookie sheet?
The Dutch oven makes a nice effect (https://artisanbreadinfive.com/?p=552), but the cookie sheet plus aluminum pan cover described above works well too, and it a little easier. Try both and see what you think.
At last, a decent crust on my bread! I have been playing around with bread dough a lot over the last few months, using a breadmaker to mix and raise the dough, then hand shaping and baking in the oven, but the crust has always been soft and dull. Yesterday after googling artisan bread I found this website, and am embarrassed to admit that I have read an awful lot of it already. This morning I tried baking my neatly slashed loaf on a pizza stone, covered with a large stainless steel bowl for the first 10 minutes and success, my best loaf ever. The kids said it had a great chewy crust. This afternoon I have mixed up my first ever batch of your master dough (from your online recipe) and if it all goes well, will be trying to track down your book… doesn’t seem to be available in main bookstores here in New Zealand, so will have to find it online. The breadmaker is beginning to look a little redundant at this point, which will free up half a cupboard! I will have to bookmark your site I think as the comments seem to be full of bread fanatics like myself, searching for the perfect (and easy) loaf. Thanks.
Thanks Sharon! I know at least one on-line seller does business with our book in NZ, you should be able to track it down.
This is great! I’m certain this will add polish to my breads.
Can this method be used for pizza? I would like a method to bake pizza that mimics a brick oven without the expense of a brick insert. I am considering trying this method.
If someone else has asked this question and I missed it forgive me. I tried to read all the posts before asking the same question as someone else.
Stephanie: It’s worth a try, but probably not neccesary if you do the pizza at very high temp as we recommend. Plus you’d need a very big Dutch Oven. But I bet it would work. So would a cloche, which I will soon be posting on.
Wow. Thank you for the quick response. I actually was wondering if the method using the disposable lasagna pan over pizza would work because you a right about needing a very big Dutch Oven.
By the way I use the Lodge cast iron pizza pan instead of the stone. I used a stone for years and then I used the Lodge pizza pan last month for bread and pizza – very nice.
I love your book and cannot wait for the next book.
I used this technique several times making the boule recipe, however every time my dough does not rise beautifully as yours does in the oven, it does half of what your picture shows. Does it matter if in the first rise of 2 hours I left it too long? In the second rise I usually leave about another 2 hours. I remove from the refrigerator and slash and when I put in the oven on a parchment paper over the stone like you did, the bottom is paler than the top and side crusts. I have preheated the baking stone for 20 min at 500 C. What can I do to improve the crust and make it thinner or crispier? Mine is so chewy and hard to eat. The bread flavor is great.
Hi Jane,
I have forgotten my dough on the counter and let the dough rise for hours and hours, sometimes over night. That won’t hurt the dough.
I have a question about something you said. During the second rise, once the loaf is shaped, are you leaving it to rest for 2 hours on the counter or are you putting it back into the fridge?
Let me know and we can go from there.
Thanks, Zoë
Zoe,
Thanks for the quick response. I leave it to rest for 2 hours on the counter. The crust is hard like rock, it is crisp, but when you bite into it, it is hard. Not the crispiness that shatters when you bite. I bought a baggette at the farmer’s market today from Bay Bread Organic Bakery (Ssn Francisco area), to compare to my loaf crust , and I was able chew through it without worrying about my teeth breaking. Jane
Jane: Questions:
What kind of flour are you using?
Have you measured your oven temp?
Which method are you using to create steam in the oven? Very hard crusts are the result when there isn’t enough steam in the oven. Jeff
Jeff,
I am using Gold Medal All Purpose flour 2 parts to 1 part of King Arthur White whole Wheat flour. I warmed up the oven to 500C (I have a convection oven), 20 min, with a baking stone on it. I rinse the baking stone with cold water before putting it in the oven. I used the lasagna pan technique, and also with a pan in the oven adding 1 1/2 cup of water after the dough is placed on the stone. I have not measured the oven temperature, maybe this is one of the issue, as I do not see the oven rise as in Zoe’s picture. Thanks for the help. I will try to measure the oven temperature.
Hi Jane,
If you are using a dough that is partially whole wheat you will need to add up to an extra 1/4 cup of water to your dough, or it will be too dry. The whole wheat absorbs more than white flour.
I would be careful about adding water to your stone before baking. I’ve heard from others that theirs cracked after washing it and then baking at high temperatures.
I’m thinking that you meant to say 500F? Typically you will bake at 450F and if you are baking with a convection oven you want it to be 425F. I have a feeling this is why your crust is so thick.
You don’t need to add the steam if you are baking with the lasagna pan over the bread.
Zoë
what am I doing wrong?? I have tried several bread recipes – I bought your book and tried several times -with it only working once by some miracle on a tiny bit of dough – my dough rises the first time, but when I punch it down and shape it won’t rise any more – I end up with something resembling hardtack instead of bread! I use bread flour, bread machine flour, unbleached flour, active yeast, instant yeast, live yeast, kneading a lot – and not kneading at all but still same results
Hi Joanne: First off… don’t punch it down, that knocks gas out of the loaves. Second, don’t use bread flour, that results in a too-dry result and success with our method depends on the dough being wet… so the structure can’t resist the diminishing gas bubbles as the dough ages.
I think those are your problems, but in addition, try a longer resting time: 60 to 90 minutes, and see our post on too-dense results at
https://artisanbreadinfive.com/?p=141
Jeff, and Zoe,
Just want to say that I had success. I added more water, as Zoe mentioned (due to whole wheat flour), increased the time to heat the stone to 30 min (did not rinse in water before putting in oven). I also sprayed with oil, and covered with saran wrap during the final rest, so the dough was not so dry when I did the final slashes (CA air is very dry).
The crust is good when comes out, and remains good even after it cools, not like before, which was ok when out, and it was hard when it cooled. Thanks a lot for the help. I will now wait for your whole grains book anxiously.
That is so great Jane! thank you for letting us know!
happy baking and enjoy the bread!
Zoë
I want to report on an experiment I tried with some boule dough last Sat. I wanted to try Hot Cross Buns and use it as I had it mixed up and in the ‘fridge for a week. I pulled out a slightly larger than grapefruit sized piece and pushed it into about a 20″ x 9″ sized rectangle. Very little rolling with the roller. I then coated it with a thin coat of butter, some sugar mixed with cinnamon and orange zest and light raisins, soaked in water and drained; rolled it up like a cinnamon roll. I then cut it into 9 pieces and pulled a cloak over each of them, top and bottom and placed them in a sprayed non-stick square pan and let them rise for two hours. At that point I painted them with egg wash and baked them in a 375 degree oven for about 30 minutes. When I got them out, I brushed them with a coat of orange juice and powdered sugar and let them cool. Then I coated them again with the wash. I let them cool overnight and then added more sugar to make a frosting and made crosses on them and they were delicious!
I guess I was lucky, but the older dough was easy to push out, and I had no idea it would work, but the extra rise time doubled them in size and they were gorgeous as well as good.
Your dough is fabulous! It would have been better if I’d had challah or bioche on hand, but it worked just fine using what I had on hand!
Wow Pat,
those sound fantastic! Thanks for sharing it with all of us.
happy baking! Zoë
Hi – a couple of unrelated questions:
1) If I use a loaf pan and the lasagna pan should I still use the stone?
2) I will be moving soon and the new place has an electric stove. I used electric years ago. Just wondered if there are any alterations to the recipes that I should know about.
Thanx!
One comment on steam – I could never get enough steam from a tin pan, and then it occured to me that maybe a heavier setup would do better. I took an 11 inch cast iron fry pan and filled it with 10 2-3 inch river rocks. I put this in the oven (bottom shelf) before preheating for 45 minutes. After shoveling the bread on the stone (middle shelf) I pour 1 1/2 cups cold water in the pan and boy do I get steam! My oven is vented and I get plenty of steam for the first 8 minutes. At 8 minutes I remove the pan and liberally spray the loaf with my wife’s ironing spray bottle, then again at 16 minutes. The heavy duty pan also helps to retain oven temperature when I open the door for spraying. I’m sure there there are many ways to get a good crust, but this works for me.
Hi Suzan,
Depending on the dough, you may not need the stone or the steam. The directions will specify. If you use the lasagna pan method you will need a stone under it to trap the steam. otherwise all the steam will escape.
I use an electric oven and it produces excellent bread, you won’t need to do anything differently. Just make sure to use an oven thermometer.
Enjoy! Zoë
Hi Jim,
I’m glad you found the method that works best for you.
Enjoy your crusty loaves!
Zoë