Baking Bread in a Dutch Oven!
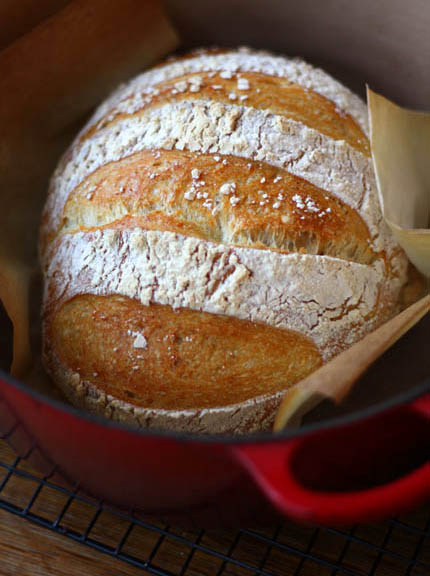
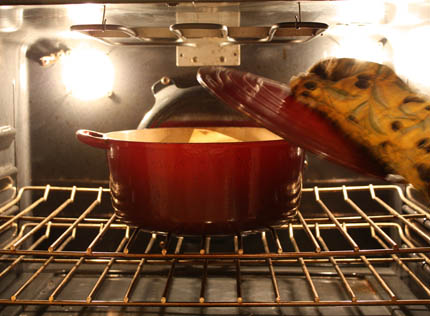
Here is yet another way to get a fabulous crust on your bread without using any steam in the oven. An unsophisticated disposable lasagna pan is an option but here’s another idea. Baking bread in a Dutch oven is a very old idea. All the iron-pot methods are based on the old European technique of baking inside a closed clay pot. Most people don’t have one of those, but enameled cast-iron pots are readily available—and they trap all of the internal moisture in the dough and that creates the steam you need to get a crisp and shiny crust. It really is fantastic and it works perfectly with our stored doughs from the book.
As you can imagine, the only drawback to baking bread in a dutch oven is that you are limited to a bread that is the shape of your Dutch oven. Luckily, Le Creuset has several shapes to choose from and I’m determined to try them all! The company even sells a special knob that can withstand the 500°F baking temperature of this method. All of these items (including the metal replacement knob) are available in Minneapolis-St. Paul at Cooks of Crocus Hill or nationally through Amazon (which offers a 7 1/4 quart pot, a 6 3/4 quart oval, a two-quart, and others.

Using a metal replacement knob is really essential to baking with this method, the hard plastic knobs will smoke at 500°F. Otherwise you’re limited to the maximum temperature recommended by Le Creuset (usually 450 degrees), and the crust won’t get as crisp.

Preheat the pot with the lid on to 500°F for about 20 minutes. I used a 7 1/4 quart pot to bake a 1 1/2 pound loaf of bread.
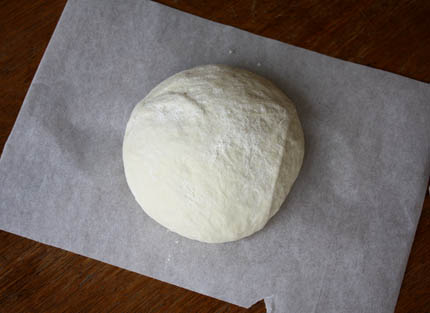
Shape your boule from any of the non-enriched doughs from the book and allow to rest on a piece of parchment paper as suggested in the recipe. What’s used here is the master recipe–let it rise for about 90 minutes. It’s easiest to get the dough into the very hot pot if you can drop it in right on the paper.
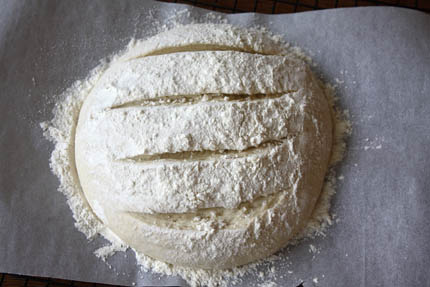
Slash the dough 1/4″ deep.
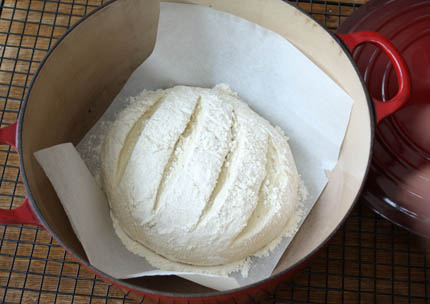
VERY carefully lift the dough and drop it, with paper and all into the preheated pot. This can be awkward the first time you do it. Take the pot out of the oven and rest it on a cooling rack so that it’s at a comfortable height to get the dough in without fear of touching the hot pot! It is very easy, but just be careful! Replace the lid and slip it back into the oven.
After 15 minutes of baking remove the lid. The dough only needs to bake in the steam for that amount of time. now it is time to get a lovely caramel color to the bread. Turn the heat down to 450°F and bake for another 15-20 minutes, depending on the size of the loaf.
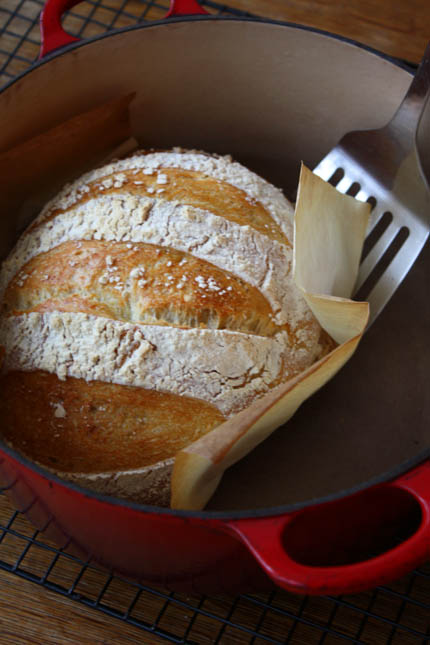
Once the loaf is nicely browned, carefully remove it from the pot with a spatula.
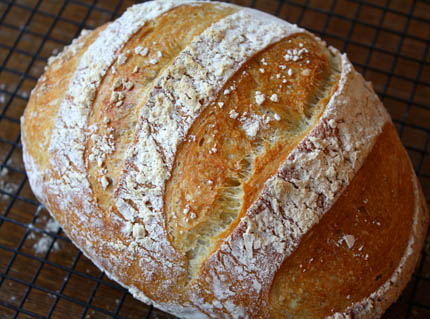
Peel off the parchment and allow to cool on a cooling rack.
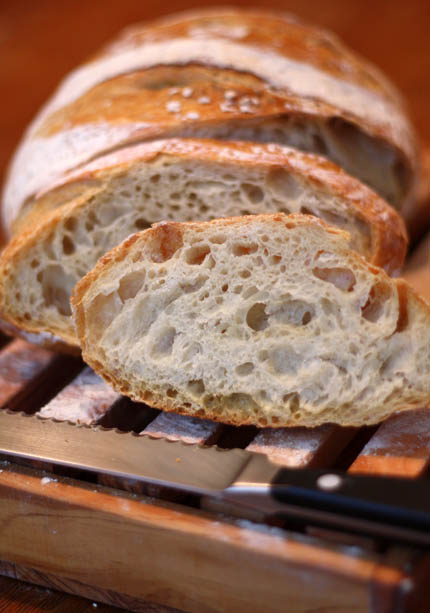
Once the bread is totally cool, cut and you can see how fantastic the crumb is!
Note: BreadIn5.com is reader supported. When you buy through links on the site, BreadIn5 LLC earns commissions.
Hi FG,
One more thought about the rye, what kind of rye flour are you using?
All the recipes were tested with Hodgson Mills or Bob’s Red Mill. If you are using anything else you will end up with a much wetter dough, because rye has very little gluten.
Still follow Jeff’s advice, but this may be part of the reason???
Zoë
I’m not planning to make cakes in the pots or use them for baking bread because I already have so many other options.
Tonight my husband was away and I tried using some of the Italian peasant dough for pizza. I preheated the oven with a baking stone to 475 deg. I rolled out about (by eye) 1/2 lb of the dough onto a small silpat sheet. I put the sheet on a peel and placed the dough in the oven for 5 minutes. I took the dough out pricked the bubbles, coated it with a thin layer of olive oil, some sliced grape tomatoes, sliced yellow and orange peppers, sliced pre cooked Italian sausage, shredded mozzarella and parmesan. I then returned it to the 475 oven for 10 minutes. It tasted very nice–the crust was thin and a bit crunchy and very flavorful–the balance between the crust and the topping was just right.
zoe, I used KAF rye mix which might explain why my deli rye tasted better after a longer rise.
I can try to use less water the next time, or treat it as I would (and did)a Lahey bread with an overnight rise and bake–because the taste is so delicious..
I tried Bittman’s method for a while but the dough is harder to handle, maybe because I need it wetter for high altitude/dry climate. Anyway, rather than buy an expensive pot, I went to a thrift store and found a covered stoneware casserole – I suspect it might have come from a crock pot – and it worked fine. Even covered pyrex bowls seem to work OK.
Zoe, the latest batch of deli rye looks perfect..I let it sit longer before putting it into the fridge..several hours–until it had clearly doubled. I let it sit there for a couple of days before touching it. When I took it out I did an envelope fold with light flouring before I stretched it into a ball and I let it sit for more hours until it was no longer cold and my finger made a slight impression when I touched it.I put the cornstarch mixture on it, slashed it and seeded it with the KAF everything seeds and then
I cooked it in a preheated pot for 1/2 hour, took its temp (it was just over 202degrees) left it in for a few more minutes uncovered..and it looks just right.
I am sure if I’d wanted to make it oval, it would have worked. too.
Hi Jeff, Zoe, and Clarisse-
Thank you my rye bread gurus !
My husband said this was definitely the best tasting rye bread I have made-now I just have to get the shape right. (And the glaze worked beautifully)
I used Arrowhead Farms organic rye flour,Zoe, which is whole grain, so I added the 2 tsps. gluten. . .maybe I should add a little more gluten? I’ll try drying out the dough a little more next time too, Jeff.
Clarisse, it ws very helpful reading your detailed description of the rye bread prep-do you let it rise on parchment in a skillet , a bowl, or ? The pizza sounds delicious – I’ve only used traditional white flour and olive oil crusts-but I may try it with a little bit of my next batch of peasant dough.
Thank you everybody !
For that loaf I followed a hybrid method –I put the loaf on a Wilton cake lifter that had been sprinkled with cornmeal..When the oven and pot were ready, I pushed the dough and plopped it into the pot.
The previous time I let it rest in oiled parchment paper inside a bowl and lifted it into the pot by the paper–I can’t tell that there’s any difference with the bread is baked..Whatever is easiest for you.
Hi Clarice,
I’m so glad this batch of rye came out to your liking! it sounds like you have arrived at a perfect system. I am going to try doing the oiled parchment paper, I’ve always just used flour.
I too have to look up the wilton cake lifter? This certainly sounds like something I need for zoebakes.com. 😉
Your pizza sounds outstanding!~
Zoë
Hi FG,
Fantastic!!!! So glad you enjoyed the loaf. I think if the dough is slightly drier it will much easier to get the shape you like. Or, you can bake it as Clarice does in the pot, but it will not be the traditional shape. But, it will taste great! 😉
Zoë
Zoe, the cake lifter is a metal square 8 in x 8 in that is used to lift layers up. It has a nice hand grip of plastic on one edge..a perfectly flat plate or tray that size with no edges would do the same thing.(The flat part of a traditional French tart pan that separates from the rim after baking would work, too.) It is perfect for the size of the loaves in your book..if you slightly tilt it over the edge of the pot you can just slide the bread in right side up..
Hi Clarice,
In all my years in the pastry kitchens I’d never heard of such a thing. We always used the false bottom of a tart pan or cardboard rounds. thanks for showing me something new!
Zoë
I used to use those, too, but then I saw this gizmo, decided it might work for your loaves and decided to get one.
Thanks for all the advice everybody ! On Friday I will use my last batch of rye dough, and after Passover I will make a slightly drier mixture. ( I will probably go into withdrawal-I can’t imagine not baking bread for an entire week 🙁
I just made an awesome looking bread-it’s too hot to cut yet, so we’ll see. . .
I used your basic boule dough
made with KA bread flour,
1/2 cup 7-grain cereal (from the bins at Whole Food or Bob’s red mill(not soaked-just dry)
1/2 cup sunflower seeds,
3Tbs. bran,
and a generous amount of fresh rosemary. This is a variation that I’ve often used with the Lahey dough.
I used about 1 1/4 pounds of your 5 min. dough in my 2 3/4 covered pot
I let it rise at cool room temp for 4 hours before baking it covered at 450 for 40 min., then uncovered for 20 min.
I did NOT preheat the pot, but let it rise right in the same pot I baked it in on greased parchment sprinkled with bran ( I did preheat the oven and the TOP of the pot.)
I sprayed a little water on the top of the loaf before covering it to bake.
I know its hard to believe, but it really seems to work well without preheating the pot and going through all the trouble of moving the formed loaf. My husband says he can’t tell the difference-and he is very fussy about crispy crusts.
Interesting— Zoe and I are both preferring the crust when these are pre-heated. Later this afternoon I’ll weigh in on the pre-heated (versus cool) covered clay cloche method, which pre-dates the enameled cast-iron pan.
Jeff and Zoe-
I don’t believe it ! This is truly one of the best loaves I’ve ever made. The crust is terrific, and the crumb is ALMOST as beautiful as yours. . .One little change- I realize I actually baked it in a Cuisinart 3 qt. pot , not the little Le Creuset 2 3/4. And maybe giving a little spritz to the loaf and preheating the TOP of the pot is making the difference, Jeff. I am probably creating more steam by these little steps. . .
Isn’t it fun to play with all these variations to find out what works best for you?How clever to preheat the top of the pot and spritz a little water on , FG.
Thanks, Clarice ! it just makes it so much simpler to let the bread rise right in the pot. I just can’t believe how wonderful this bread is-even tastier than the Lahey bread when I make it with Jeff and Zoe’s method.
Have you ever tried making rolls with some sort of covered method ? Maybe muffin tins ?
Hi FG,
Great news! I’m so pleased to hear it.
Yes, preheating the lid will help to get you a nice crisp crust. I will put that step in bold type so that people won’t miss it.
I have not tried misting the bread first, I will give it a shot.
You can do rolls under the a lasagna pan. https://artisanbreadinfive.com/?p=510
Thanks, Zoë
Hi folks, I have a question or two.. first is about the steps shown in this blog. You say to lift the loaf out of the dutch oven with a spatula, remove the parchment and let it cook on a cooling rack. ??? Is the loaf returned to the oven on a cooling rack?? Don’t remember seeing that in the book..
Also, I’m having similar problms with the dough spreading out too much.. probably too wet. I have a batch in the fridge for about 7 days now. IF it can’t be formed and hold reasonable shape, can I still incorporate more flour in that batch? If so, do I just mix it in and let it rest/rise or what? Probably making a mountain out of a molehill 🙂
I haven’t , FG. Aside from the lasagna pan, Zoe refers to, I noticed that someone had suggested using the tops of those buffet steamers (which I have). I thought when I got to rolls I’d try that.
(I’m just not going to be able to maintain passover breadless this year).
Bill: No, meant to read “let it cool on a cooling rack!” Sorry about that, fixed now. Yes, you can incorp more flour; ideally, you’d let it sit for a couple hours after the incorporation.
Other option is to do it in a loaf pan.
I tried it using a Staub enameled cast iron casserole. Staub is another French brand, but the metal handle comes standard on it.
Hi Zoe !
I love your lasagna pan idea! Maybe I’ll invert an old roasting pan . . .
Clarisse- I’m jealous- you even have buffet steamers-you must have the most incredible collection of fabulous kitchen equipment ever !
Bill- here’s how I get the finished loaf out of the pan:
Set the hot pot right on an unheated burner of your stove
Uncover it.
Place a cooling rack beside it.
With one oven mitted hand , tip the hot pot towards the cooling rack while you steady the loaf with your other oven mitted hand
If you use parchment, the hot loaf will tip easily onto the cooling rack upside down.
Simply peel off the parchment and turn your loaf right side up with your mit protected hands and allow to cool on the rack .
I know it can be hard to insert a spatula into the pot if its small. . .
Enjoy !
John and FG: Thanks for the tips…
Love your book!!! My husband and little girl say MMMMM the entire time they eat the bread. What flours can I substitute in your master Boule recipe to mix things up a little. I use the dutch oven method and it works perfect. I will be baking the bread for a large family gathering on Easter. We used to buy our bread from Breadsmith in MN, but now we will be having delicious home baked bread:) Thank you so much for writing this book.
I was also wondering what the best way to store yeast is. I bought a big container from Costco and I’m not quite sure how to store it.
Thanks Amy! In the book we have lots of recipes with rye, whole wheat, barley, and others. In our next book, on whole grains for the same method, we cover breads with lots and lots of whole grains. Take a look at this post– you need more water if you push the whole grains: https://artisanbreadinfive.com/?p=142
I refrigerate my yeast and have never had a problem with loss of rising activity. Sealed jar in the fridge is all I’ve ever done.
I just tried this method in my old cast iron dutch oven. It worked great! Love the bread!
A friend showed me the book and mine is on the way.
A question, do you have to use kosher or course salt and can you reduce the salt content? What about lite salt?
Jane
Hi Jane,
Here is a post about using salt: https://artisanbreadinfive.com/?p=139
You can use table salt, but you will want to decrease the amount.
You can also use lite salt with great results!
happy baking! Zoë
Love your webside. Maybe you covered this. Too many things to read right now.
My cast iron has the non-stick finish – is that OK to heat at 500 degrees?
Been using your book and have loved every recipe so far. Thanks. Ellie
Hi,
Will I get good results using my All-Clad stainless steel with aluminum bottom dutch oven?
Cheri
I’ve been using the dutch oven all along. Also I use sea salt instead of table salt or kosher salt. Also for the vermont cheddar, I crumble the cheese instead of shredding it. I look forward to the new book.
Ellie: check w/the manufacturer, but my guess is that you CAN NOT heat a non-stick pan to 500 degrees– I could be wrong.
Cheri: That sounds fine, maybe check with the manufacturer about maximum temp. Their website might be easiest way to check.
Diane: Sounds great…
Hi Jeff,
I checked with All-Clad and they say my MC2 dutch oven is safe up to 500 degrees, so I am going to give the dutch oven bread bake a try.
Would vital wheat gluten improve the rise of my rye bread? This last time the crumb and texture was wonderful, but the bread was too spread out/flat. I would like to see some height! Any suggestions anyone?
Cheri
Holy crumb!!! I found this method yesterday after mixing up a batch of the Peasant Bread dough from the book. I followed the suggestion of another baker and wrapped the knob of my Rachel Ray enamel cast iron dutch oven with aluminum foil. Totally fine! I would have taken a picture of how lovely this loaf was but…too late…family had the bread knife in hand. The crumb was definitely more dense than the picture but oh so good.
I have been using the basic dough recipe for pizza at least once a week. I have found that rolling the dough out and placing it onto cornmeal dusted parchment paper, then popping it into a hot oven on the stone for just a few minutes sets it up. Then after cooling a bit, I top it and it’s so easy to slide back onto the stone with a pizza peel to finish baking. Never have had a problem with soggy crust or over done. I wish I had checked back to the website sooner….so many great new ideas and recipes. Thanks Jeff and Zoe!!
Hi Cheri,
yes, you can certainly try adding a bit of vital wheat gluten and it may help the loaf to rise higher.
Hi Barb,
So glad you are enjoying the bread. If your bread came out a little denser than you like I’d let it rest a little longer before baking next time.
Thanks! Zoë
Cusinart has a pan heatable to 500 degrees with a metal handle and at a resonable price. Works great. Bought a 3 quart – good for the small size loaves I make.
Ellie: Perfect!
Great idea! I have an oval enamelled cast iron pot I inherited from my mother. It will be great for a slightly elongated loaf, or two boules side by side, which I often do by the regular method. The boules join slightly, like a nice bum!
I have a convection oven…is the enameled cast iron baking method viable in it? Or am I better off using an uncovered loaf pan?
Hi Gina,
The pot sounds perfect and your description made me LOL!
Hi Randy,
You can certainly bake with this method in a convection oven. Just be sure to reduce the heat as your oven suggests to reach the right temperature. Generally this means reducing by about 20-25 degrees.
Thanks, Zoë
Hi Jeff and Zoe,
I’ve had your book 2 1/2 months and have been baking bread twice a week ever since! I used to make bread in college, and tried the Bittman method recently, but your method is far and away the best. We’re in Los Angeles, used to make the trek to La Brea Bakery – haven’t been back there since I discovered ABI5MAD.
I haven’t got past the master recipe/ peasant/ deli rye/ light ww/ semolina yet because they are SO good. I started with 1 lb boules but my husband insists on larger sandwich loaves, so I’ve gradually worked my way up to a 9x5x3 loaf pan. This requires 2.5 -2.75 lb of refrigerated dough (that amount is just impossible to handle at room temp), and I have been letting it rest in the pan at room temp 2 1/2 – 3 hours before putting it in the oven for 65-70 minutes. The flavor is fantastic and the crumb is very good, but not as open as the smaller loaves. I tried a 12 hour refrigerator rest, baking at 475 F for 40 minutes and turning it back to 450 for 25 minutes when it looked like browning too much. The amount of oven spring was amazing, but the finished bread was slightly more dense than the room temp rise, so I’m going to try a 20 hour refrigerator rest next.
Not enough steam is always an issue for me as my oven vents too efficiently. I use the inverted lasagne pan method for boules and flatbreads and it works perfectly. I am wondering if I can using the ‘dutch oven’ method with my loaf pan. I have a Caphalon 12″ x 4.5″ hard-anodized aluminum braiser that is wide enough and tall enough for the loaf pan, and should be ok at 500 degrees.
Has anyone else tried this?
Hi Pam,
I haven’t tried baking a loaf pan in the Dutch oven, but if you have one that is large enough I think you should try it. When you do, please report back!
Thanks! Zoë
Hi Jeff and Zoe !
Mother’s Day is coming and I’m making my wish list. . .
What are your recommendations on peels and stones ?
King Arthur has a metal peel that looks very nice. . .or is there a wooden one you prefer ?
Both KA and William Sonoma have stones -do you have a favorite ? They both say that there’s are guaranteed against breaking.
I can’t wait for your new book – too bad it won’t be out until October !
I now have 2 buckets of your dough in the fridge at all times . You have really transformed our meals !
My favorite peel is the Sassafras, I’ve had the same one for years: https://tinyurl.com/czpque
For the stone, go for any half-inch thick one; we’ve gotten no complaints about the one on Amazon (Old Stone Oven brand): https://tinyurl.com/cly2rl. I’m not certain of the warranty on the Old Stone Oven. Another option is the Williams-Sonoma half-inch thick stone of the same size, which is lifetime guaranteed. I know it’s a good stone and that they don’t give you an argument when it breaks (recently returned one that cracked after 11 years of daily use), so SAVE YOUR RECEIPT. I’m guessing that the warrantteed one on KAF is terrific but I haven’t used it. Price is a factor of course.
Thanks for the kind words!
Hi jeff !
Thanks for the advice . . .it really helps !
Bad news from KA. Just when I was about to order the makings for your English granary bread ( which I used to buy all the time in London in the 70’s -it is SO wonderful !) They advised me that the malted wheat flakes are no longer available. Not just temporarily, it seems.
So, we will have to come up with some kind of substitute. . .I wonder if we could use some sort of malted wheat cereal. . .Maltex, perhaps ( but you’d have to buy an enormous quantity of it on Amazon -no one sells just one box anymore 🙁
Any suggestions ?
People have tried all sorts of things… I haven’t tried the Maltex but I’m guessing it will work. Or just books the malt sugar a bit. Or order the real thing from England (haven’t done that myself, I have to admit).
Tried the 9x5x3 loaf pan in a ‘dutch oven’ (12 inch round Caphalon braiser) after a 20 hour refrigerator rest, and it was AWESOME – the best sandwich loaf yet!!!
Outstanding caramelization, oven spring, crust, fantastic flavor as always, nice crumb, though not as great as Zoe’s.
I’m going to try a longer rest next to see if it won’t open up a bit more.
I also followed someone’s suggestion here about misting the top of the resting dough to make sure it didn’t dry out, and I think that helped too. I can’t find the original post or I would give them credit!
My husband was VERY enthusiastic about this bread.
I love your book, but I think I love your website even more – I have learned so much from reading about other people’s ideas and solutions.
Thank you for writing this book – it really has changed my life!
Hi Pam,
That is so exciting. I have yet to try a loaf pan inside the cast iron pot.
be careful not to over proof the bread by leaving it to rise too long in the refrigerator. Eventually the bubbles created by the yeast gas will collapse or the bread just won’t rise much in the oven.
Thanks, Zoë