Baking Bread in a Dutch Oven!
Here is yet another way to get a fabulous crust on your bread without using any steam in the oven. An unsophisticated disposable lasagna pan is an option but here’s another idea. Baking bread in a Dutch oven is a very old idea. All the iron-pot methods are based on the old European technique of baking inside a closed clay pot. Most people don’t have one of those, but enameled cast-iron pots are readily available—and they trap all of the internal moisture in the dough and that creates the steam you need to get a crisp and shiny crust. It really is fantastic and it works perfectly with our stored doughs from the book.
As you can imagine, the only drawback to baking bread in a dutch oven is that you are limited to a bread that is the shape of your Dutch oven. Luckily, Le Creuset has several shapes to choose from and I’m determined to try them all! The company even sells a special knob that can withstand the 500°F baking temperature of this method. All of these items (including the metal replacement knob) are available in Minneapolis-St. Paul at Cooks of Crocus Hill or nationally through Amazon (which offers a 7 1/4 quart pot, a 6 3/4 quart oval, a two-quart, and others.

Using a metal replacement knob is really essential to baking with this method, the hard plastic knobs will smoke at 500°F. Otherwise you’re limited to the maximum temperature recommended by Le Creuset (usually 450 degrees), and the crust won’t get as crisp.

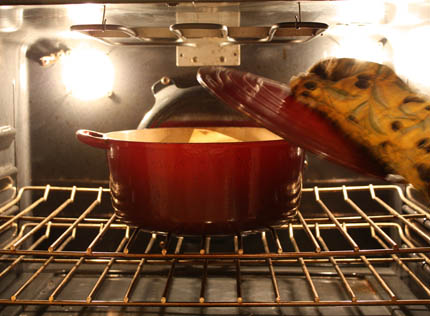
Preheat the pot with the lid on to 500°F for about 20 minutes. I used a 7 1/4 quart pot to bake a 1 1/2 pound loaf of bread.
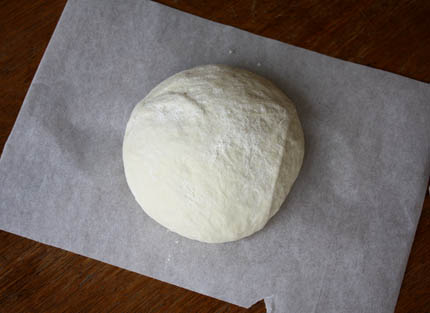
Shape your boule from any of the non-enriched doughs from the book and allow to rest on a piece of parchment paper as suggested in the recipe. What’s used here is the master recipe–let it rise for about 90 minutes. It’s easiest to get the dough into the very hot pot if you can drop it in right on the paper.
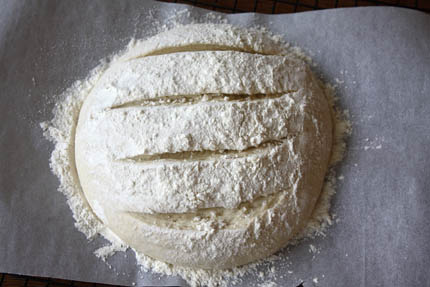
Slash the dough 1/4″ deep.
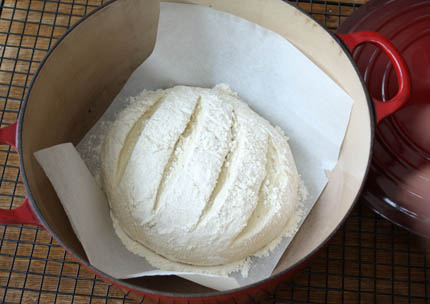
VERY carefully lift the dough and drop it, with paper and all into the preheated pot. This can be awkward the first time you do it. Take the pot out of the oven and rest it on a cooling rack so that it’s at a comfortable height to get the dough in without fear of touching the hot pot! It is very easy, but just be careful! Replace the lid and slip it back into the oven.
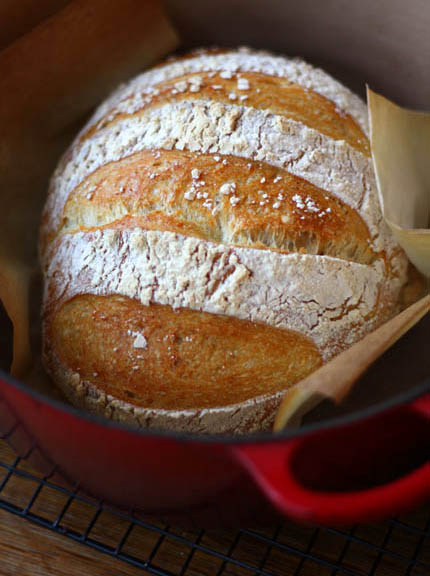
After 15 minutes of baking remove the lid. The dough only needs to bake in the steam for that amount of time. now it is time to get a lovely caramel color to the bread. Turn the heat down to 450°F and bake for another 15-20 minutes, depending on the size of the loaf.
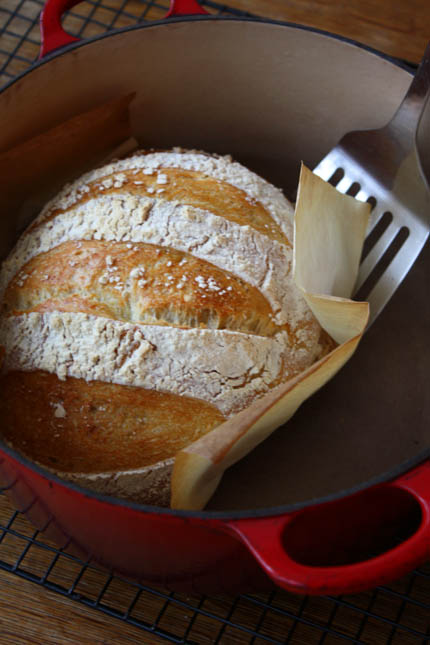
Once the loaf is nicely browned, carefully remove it from the pot with a spatula.
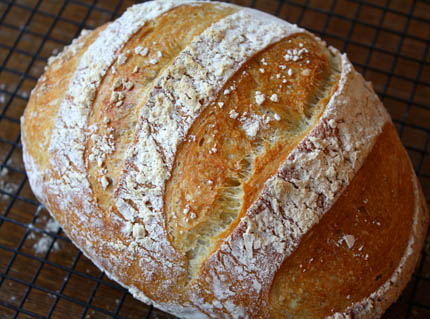
Peel off the parchment and allow to cool on a cooling rack.
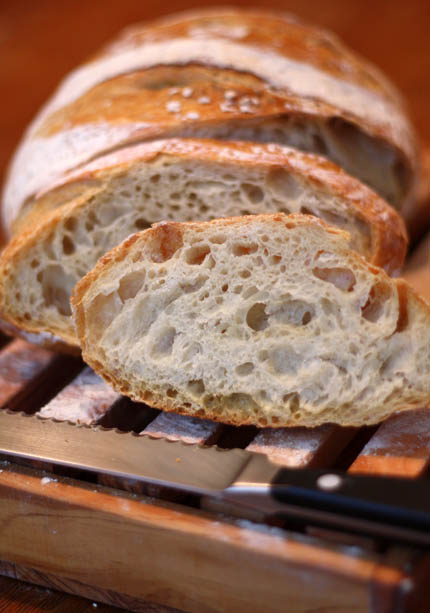
Once the bread is totally cool, cut and you can see how fantastic the crumb is!
Note: BreadIn5.com is reader supported. When you buy through links on the site, BreadIn5 LLC earns commissions.
Is this method discribed in your book? I didn’t see it anywhere in it.
Hi Debra,
It is described in our second book HBin5, but not in our first one ABin5. That is the beauty of the web, we can continue to add information that didn’t make it into the books.
Thanks, Zoë
Jeff & Zoe,
I’ve been making your wonderful bread (usually the European Peasant bread, but with a bit more whole grain flour) in my dutch ovens for nearly a year and a half. I love it!
I have a comment, and a question. As far as dutch oven size, I’ve found that I get more oven spring when the dutch oven fits the size of the loaf more closely. A larger DO leaves the bread a bit flatter. My favorite is my Lodge 5 quart for a 1-1/2 lb. boule.
My question: Since I have a stand mixer, and use it to mix my dough, it’s really no trouble at all to knead the dough for a couple of minutes. I have just tried this for the first time and I got more oven spring than ever, and a little bit better texture. If I do this, will the refrigerator life of the dough be shortened?
Thanks for changing my baking life!
Ann: Like you, I love the small Dutch. My observation is that I can use it to contain sideways spread if the dough has gotten toward the wetter side later in its life. Mine is even smaller than yours, perfect to contain spread in a 1-pound boule.
Nothing wrong with kneading BEFORE the initial rise, as you are doing. I sometimes do the same. Jeff
Hi did anyone try to bake it in a 6 quart oval dutch oven??
does the shape of the pan affect the quality of the bread?
sorry i know it a stupid question but i am new to this.
thanks
Dana: You can bake in a much-larger pan– the Dutch Oven in that case does not contain sideways spread but works beautifully. A smaller one (smaller than the width of the finished bread) DOES contain sideways spread, which is nice in case that your dough is on the older side (and has gotten “wetter). Or in case you happened to mix it up too wet.
The larger Dutch Oven works like a mini-oven within the oven; the smaller ones act like a loaf pan. Makes sense? Jeff
i love your book and since we live on a ranch, being able to bake decent bread is wonderful. i am a cook and not much of a baker so i have some questions. the bread tastes great but the crust is not just crisp but actually quite hard. is there any way to fix that. i have baked it just on the stone and also in the dutch over and it is still pretty hard. thanks ak
Arnette: the trick to getting a crisp (not hard) crust is to use steam, but you’re doing that– the Dutch oven method is good for that (see below for sites in our domain that can help you refine your technique). What flour are you using? It’s easiest to crisp a white-flour crust. Have you tested your oven temp with a thermometer– must do that; here’s a reasonable thermometer on Amazon: https://bit.ly/czmco2
Baking in a Dutch Oven: https://artisanbreadinfive.com/?p=552
Aluminum Roasting Pan for Crust: https://artisanbreadinfive.com/?p=510
Cloche baking: https://artisanbreadinfive.com/?p=566
My family just demolished my first loaf of ABin5. Used the standard recipe, but baked in a dutch oven. I think we are going to have to watch our waistlines.
I did have one issue with the parchment paper getting too brown which translated to the bottom of the bread. The top was very light brown, but the bottom was smoked from burnt paper. The paper fell to pieces when put in the trash and along the way there. Any thoughts? I’m thinking the oven was too hot. With my oven it’s erratic anytime it’s over 400, so it’s watch and hope every time.
We LOVED the cornmeal on the bottom. Does it work on top also? The flour was okay, but the bottom with the cornmeal was delicious.
Hi Cathi,
Are you using an oven thermometer to make sure your oven is at the right temperature? You can try reducing the temperature down by 10-15 degrees, but not too much. If the bottom crust is burning you may want to create a pillow of foil on the bottom of the pot that you will slide the parchment onto. It will insulate the bottom crust a bit.
Thanks, Zoë
Zoe,
Thanks for your reply. Yes, I use a thermometer. Just bought a new one to be sure. The oven will be at temperature and then change. Sometimes up, sometimes down. No apparent pattern. It’s definitely an oven that needs replacing, but the remodel is a few years off. It needed replacing 17 years ago when we moved in. I’ll try the foil pillow trick Tuesday.
Cathi: Well, there’s your explanation– must be getting too hot once you start up. Do the best you can till you can upgrade…
Yesteday i made the best batch EVER , i baked half a resepi with only 1 tsp yeast let it rise for 4 hours then stored it in the fridge for next day, then followed your instruction for the dutch oven ….and wooow best loaf ever , i made it with tomato soup and it was gone in minutes.
thanks a 1000 time Jeff and Zoe for this new hobby that i have now.
Hey Zoe and Jeff. I tried to search in the comments for my question but i couldnt find it. I own 5 lodge cast iron dutch ovens. You know, the heavy heavy thick suckers that you use charcoal to place on top and under. I want to use those but im afraid the thickness of them will somehow discourage the process of steam and a crackling crust.
All our DO’s are the 12 inch diameter ones.
Thanx in advance
Matt
Matt: It will work great– may take a little longer to heat up, but I doubt it. Try it exactly as we recommend and see what you think before modifying the preheat.
Thanx jeff. Im going to try it out. My only downfall is i do not own a gas grill. All mine are wood fired via lump charcoal, so a nice gradual preheat is gonna be hard. BUT i will try me best to follow your instructions.
Thanx
matt
Sorry Jeff. i posted the wrong dutch oven question. i wanted to ask this about the bread you made in the gas grill not the oven. sorry
Hi Matt,
The thickness of your DO shouldn’t effect the steam/crust at all. In fact the thickness may help to bake the bread evenly. If you are baking with wood the heat may not be as even as it would with a gas grill. You may want to make a pillow of foil on the bottom of the DO and then put the parchment and bread on top of that. This will help to prevent the bottom crust from burning.
Hope that helps? Thanks, Zoë
Thanx Zoe and Jeff for answering my question even though i posted it on the wrong dutch oven thread. haha. I will try the foil trick. i will also try to maintain the temps as best as i can. with the wood fire. ill take pics and post them on my blog and i will let you know how it turns out. i will try 3 different methods and let you all know how it works out. might come in handy for others.
once again, thanx for all the help
Matt
Hi, I have a steam oven and I would like to ask if I will need to cover the lid during baking? My oven is using the steam to bake so I am not sure whether I will need to splash water as mention in your book. Would appreciate your advice.
Jolene: Depends on what you mean by a “steam oven.” If you mean the new steam injected ovens, these are designed to replace the need for splashing in water, so you should be fine. You don’t really need the Dutch Oven technique in this case, or could just leave the lid off.
Hi Jeff,thk u so much for the quick response.Yes,I think I think U are right about my steam oven.In fact I hv never bake any bread before & I do not own baking stone & Dutch oven.Before I bake,can u suggest baking stone or Dutch oven is better?
Jolene: I think they’re equally good, assuming your oven captures steam. Yours is a steam oven in the first place, so I wouldn’t buy the Dutch oven till you’ve tried the open-loaf method with your steam injection. Could even do that on a cookie sheet before buying anything.
Hi Jeff, thank you for your advice. I will try & bake just using a cookie sheet and let you guys know what is the result.
Once again, thank you so much for the reply. 🙂
For the clay pot method, would it work with the stone as a base and a oven safe clay bowl on top?
Hi Lisa,
Yes, that would be a great way to do it. I have also used a stainless bowl, which is lighter and easier to lift off.
Thanks, Zoe
I brought your bread camping! We used a Lodge #10 dutch oven and cooked the whole wheat master recipe over coals. I coated the dutch oven with butter (probably could use oil to be healthier!) and shaped the loaf and let it rise in the dutch oven. I then prepared the coals and put 6 on the bottom and 14 on top. It took 45 minutes to bake (rotating oven and lid in opposite directions for even heat) and came out beautifully! The crust is softer than baking in the oven, but still wonderful.
Christine: I was hoping someone would write about this… it’s an old technique, I never had the nerve to try it. Thanks for writing!
le creuset metal knobs are for sale on their website (broadway panhandler also sells them) less than 10 dollars i think. or as they say, just google it…
many thanks for your good work here.
Superfancy: Thanks for the tip– and thanks for the kind words. Jeff
I’m having trouble finding my posted question from last week. Do I need to remember the exact page I posted it on, or is there an “all posts” page?
Hi Nina,
Here is the response I left over at “left the dough on the counter”…
That is odd. Did you use this same method with other loaves and not have this issue? Did you change the brand of parchment? Some brands have more of a waxy coating on them and they tend to stick more.
You can try adding more cornmeal under the loaf, but this may change the texture. The other thing to try is a silpat, the bread will never stick to it and you can reuse it over and over again.
Thanks! Zoë
I’ve used Mark Bittman’s recipe and Nancy Baggett ..I forget if that’s the name, author of ‘kneadlessly simple’ in my Lodge iron 4-qt pot (7-qt was not a success). So now I”m converting to YOUR method (more convenient in terms of timing, and gives lovely flavor to rye dough) I’m delighted to find it can be used for this method. BUT I”m puzzled – why the much shorter baking time for your dough? These guys give a good hour or more. And Bittman’s recipe in particular doesn’t use bigger quantities. I just tried your light wheat bread using your version of the Dutch oven method and was disappointed by the result. My dough seemed great, I was able to shape it etc, but when it came out, it looked nice but the crust wasn’t really crisp and the crumb somewhat doughy. Doesn’t that mean it needs more time?
Also – I did use the paper but I found the bottom of the bread was a little black. Would it help if I oiled the pot and then sprinkled flour in it and didn’t use the paper, do you think?
The rye bread (I have your book but followed what you say on line and used the smaller amount of rye flour) tasted delicious. Possibly that needed more time too, however.
By the way, I had refrigerated the dough for 24 hours and it had rested for 45 minutes. I made a whole loaf out of half of the recipe because I find your measurements rather small. It made one 1.5 pound loaf.
Perhaps I should add that when I used the other 2 methods, I found that in the NY summer the 1st rise could last no longer than 5 hours; so it couldn’t develop flavor the way yours can. Also, I like the way yours can sit any length of time in the ‘fridge and then takes 2 hours or so to bake – much easier with my schedule. So I really want to make it work.
Hi Tamara,
Thank you for trying the method. If you are making a loaf that is larger than 1-pound you need to increase both the resting and baking times. You will find this will greatly improve the interior crumb and also the crust when baked in a Dutch oven.
If the timing suits your schedule better you may want to try the refrigerator rise. Shape the loaf, place it on parchment, cover loosely and allow to rest the in the refrigerator for about 8 hours. Let the loaf sit on the counter while you preheat the oven and then bake as you normally would, increasing by about 10-15 minutes for larger loaves.
The black bottom on your bread could be caused by the placement in the oven? You may try moving the pot to a higher rack in the oven and see if that takes care of it. If not, you can make a pillow out of foil that rests on the bottom of the pot and then slip the parchment/bread on top of that. This is how we do it for the grill as well.
Hope this helps! Zoë
Hi…I’ve been baking breads of all kinds with this recipe since the first book came out. Seems like I tell everyone I know about how easy this is. Love all the new techniques…..I have one suggestion that has worked well for me. My enamel cast iron has a plastic type handle. I wrap it tightly in heavy duty aluminum foil and have had no problems with the knob melting on the grill or in the oven. Have been making wonderful pizzas!! Love the second book….waiting anxiouslsy for the next. And thank you for this site….so many ideas!
Forgot to mention….when I make pizza, it’s usually 2-3 or more. I prepare my dough by rolling it out thinly, then place it on parchment paper sprinkled lightly with cornmeal. Then I prick the dough with a fork to help with it billowing in the oven. I pre-bake each crust in a preheated oven for 3-1/2 to 4 minutes. Remove and cool on wire racks. Then, when everyone arrives, we make pizzas!
It’s so easy to transfer the pizzas to the stone when they are prebaked. It’s usually only 8-10 minutes and they’re perfectly done. I’ve experimented baking both prebaked and raw dough pizzas and get a much crispier yet chewy result with prebaked.
Hi Barb,
Thank you for both of your suggestions, I am glad to hear that you are having good results with the breads and pizzas. I love your idea for covering the knob.
I am going to prebake a pizza tonight, I’ve got 5 little boys coming for dinner!
Thanks, Zoë
Instead of trying to plot a risen dough over the sides and onto the bottom of a 500 degree F. dutch oven (not an easy thing to do), why not turn the dutch oven upside down? In other words, drop the dough on the inside of the cover and then place the dutch oven over it. I find this technique much easier.
Stu
I bought my Dutch Oven at Wal-Mart, it had a plastic knob. All I did was go to Lowe’s and buy a metal knob made for kitchen cabinets. Just make sure the bolt that holds the knob will fit through the hole in the lid.
hi Jeff,
I’m about to buy a Le Creuset 1.5-Quart Round Casserole with Lid. I wonder if it will work to bake for breads to make the crust crunchy. I wish I could get a dutch oven ,but it’s too expensive. 🙂
Coco: This is pretty much exactly what I use: a small one. This will work perfectly, and is small enough to contain and control sideways spread. It will work beautifully. Jeff
thanks Jeff 🙂
I have been using my 2 Rometopf clay bakers to bake your bread. I preheat them dry at 450 for 20 minutes and bake the bread covered for 20 minutes and uncovered for about 15 minutes until internal temp is 205. Works beautifully.
Haven’t used ’em, but the Romertopf look very high-quality. I have the Sassafras Cloche and have had great results, see https://artisanbreadinfive.com/?p=566
Hey, I do have some covered clay oven pots… If I wanted to use those, would I preheat or adjust the temperature?
BTW, your books have changed our lives and eased up my budget tremendously. I won’t buy pizza out anymore… twenty bucks a week saved right there, and crackers… Oh my heavens… so good…
Hi Heather,
Here is a post on baking in a clay pot: https://artisanbreadinfive.com/?p=566
Hope this helps! Enjoy, Zoë
Used this dutch oven method tonight and it was the best bread I have ever made!
Thanks for pointing out this post, Zoe and Jeff! You have so much going on, it’s hard to keep up with all your posts!!!
I was a bit nervous about putting the hot pot on the ceramic stovetop. Will try it on a cooling rack, or take out one of the baking racks for that use.
THANKS!
Judy
Judy.
I have been using my Lodge Dutch oven to cook bread in my gas barbeque! This is working great, and the lodge cast iron heats just fine empty. Then, when I plop in the bread dough it gets that nice oven spring, even with whole wheat flour. I do use parchment paper, and it works great. The use of the Dutch oven is pretty fool proof!
Great Tracy,
We love this method as well!
Enjoy, Zoë
Hi. Is is possible to use a cast iron dutch oven that does not have an enamel coating?
Hi Amy,
The cast iron dutch oven should work beautifully!
Enjoy, Zoë
Which HB5 recipe would you recommend trying this baking method with first? Would you lower the oven temp any? Sorry, if you answer this in the book–mine is ordered but hasn’t arrived yet. I’m planning ahead because I’m so excited! AND, I’m considering (for the first time ever) actually working my way through every recipe in the book. Love this site and your willingness to help us all! Thanks! Sue
Sue: Any of the lean dough recipes benefit from the dutch oven– try the Master in chapter five first, to get to know the method. Jeff
Please help me see what i did wrong. I followed the master recipe but when i took the dough out of the glass bowl i mixed it in, it was rather wet towards the bottom of the bowl – almost looked like a little pool of water as i poured it out. Could i have fixed it then or did i just put too much water and its too late to fix it? It qas extremely sticky – i couldnt have “folded” it if i tried ( i did try). Thank you so much.
Anya: Which recipe are you talking about– from which page in the book? Jeff
I realized i used the New York Times article which i thought i got on this website but after looking for it here i couldnt find it. I guess the NY Times article led me to this site. Well i might try again – i am just a beginner.
Anya: Depends which NYT recipe you meant– are you sure it’s ours. Others may be too wet to store, ours is a little drier. We were in the NYT in 11/2007, is that the article you have?
I just found this method for bread and can’t wait to try it!
I just want to clarify the directions-
mix the dough, let it rise for about 2 hours (do I have to do this in the fridge?), shape it, let it rest for 90 minutes, then bake it in a dutch oven. And then I can store the left over dough in the fridge for up to 2 weeks.
Is that correct? I’m looking into buying the book but I want to try it today.
I tried to read all the comments before mine to see if my question was answered but there are too many comments!!
Hi Cait,
So glad you are going to give it a try. Here is another post that may clear up some of your questions: https://artisanbreadinfive.com/?p=1616
Store the left over dough for up to 2 weeks and use as you need.
Thanks, Zoë
I have the Lodge enamel dutch oven and was able to replace the knob with the LC and it fit perfectly. I also have an old cast iron chicken fryer with lid that I use to bake my bread in and love the way it turns out in that as well…I use parchment paper in both!
I have the Emile Henry 4.2 quart flametop dutch oven which is lighter in weight than Le Creuset or any of the cast iron pots. The bread baked in this pot comes out spectacularly. I’ve been using the Jim Lahey recipes but I use your technique of proofing the dough on parchment and then dropping the dough into the pot parchment and all. Works perfectly.
Thank you for sharing your love of baking and this incredible method of making bread. I found it about a month ago and have had great fun experimenting with different ways of baking the bread. I used my Dutch oven since I figured it worked with the “no-knead” method which I had been using. The only thing I didn’t think of was to take off the lid the last 10 minutes. I will do that tomorrow and also use parchment for the first time. I already make all my own hot dog and hamburger buns with another recipe, so I will probably never buy bread again. Once again, thanks so much.
Joy: So glad it’s working well for you, thanks for the kind words. Jeff
Hi,
I have been reading all of the comments and am ready to bake my first loaf of the basic recipe. In the baking with Cast Iron directions it says to preheat the pan for 20 minutes at 500*, place the parchment with the bread in the pan and bake for 15 minutes, turn the heat down to 450* and continue to bake for another 15-30 minutes. My loaf is 1# and am using a 7-8 qt. dutch oven. My question is do I really bake it covered at 500* for the first 15 minutes?
Love this site and am hoping for great bread. Thanks…Nancy
Nancy– that’s correct. Jeff
Thanks for these EXCELLENT directions! Since I am constantly on the go, sometimes I have to leave my risen breads to be baked by another family member. This step ALWAYS fails; the bread is either underdone, overdone, miserably slashed, terrible. The technique in this post allowed me to leave a risen loaf (basic boule recipe) with my husband to slash and bake and it turned out PERFECTLY! Thank you – and I can’t tell you how much I’m looking forward to the flatbreads book!
Thank you Jennifer,
So glad you’ve got your husband baking with you!
Cheers, Zoë
Well, I baked my first loaf in my Dutch Oven as suggested and it has the most wonderful taste. But….I think my bread knife is not sharp enough! I let the loaf cool on a wire rack for two + hours and had a terrible time cutting through the top crust and an even worse time getting through the bottom crust. The loaf came out crispy and a beautiful color and did indeed sing as it was on the cooling rack, so I think it did as it was supposed to. So…could you suggest the bread knife that would improve my slicing ability? Otherwise, maybe I should butter the top when it comes out of the oven for a softer crust? Any suggestions would be appreciated. Nancy
Hi Nancy,
Did you enjoy the crust or did it seem to thick? If the crust seemed to thick you may want to check your oven temperature with an oven thermometer. Both the thermometer and the knife that we recommend can be found on the left hand side of this post in an Amazon box.
Thanks, Zoë
Zoe,
The crust was crispy on the outside and good to the taste but it was indeed thick. I think that is why it was so difficult to slice.
I have a Whirlpool electrice range that and in the manual, the directions for Oven Temperature Control, says it is important to NOT use a thermometer to measure oven temperature because opening the oven door may cause burner cycling to give incorrect readings. It goes on to say, The oven provides accurate temperatures; however, it may cook faster or slower than your previous oven, so the temperature calibration can be adjusted. It can be changed in Fahrenheit or Celsius. It then goes on with the instructions for adjusting the oven temperature calibration. I hesitate to make any changes. Do you think I should try the thermometer even though it says it may cause inaccurate readings?
Thank you for your help with this.
Nancy
Nancy: Haven’t heard this before. I can’t imagine why you couldn’t use a thermometer after a full pre-heat to see if the oven’s up to temp. Check the temp after 40 minutes, just the once. If there’s a big discrepancy between the oven’s readout and the thermometer, I’d start wondering if this system is all that great. Consider a re-calibration at that point, or just do it in your head– if it says 450 but the thermometer reads 400, up the temp by 50 degrees next time. Jeff
Thank you Jeff and Zoe. I will do as you suggest.
Nancy
When I used my cast iron dutch oven, there was a tremendously awful amount of off-gassing. It was so unfortunate: Instead of the lovely smell of bread, we got volatile organic compounds instead. The house smelled terrible. I thought that scrubbing the pot very well would help. Will it still off-gas without any seasoning? If so, what’s the remedy?
Joy: what brand of dutch oven are you using, and is there any chance that your oven is running way to hot? Check with something like https://bit.ly/czmco2
We’ve never experienced this with enameled cast-iron; I have a feeling that you’re using a traditional black pan well seasoned with oil? And that it’s the burning oil that you’re smelling? If that’s all it is, just scour the pan well. But then, that’s going to mess up your pan-seasoning, so go easy.
Plain iron shouldn’t off-gas.
Was cruising down the highway on may to play golf in Fla. and heard splendid table public radio channel advising new bread baker to buy your book. I loved the concept and ordered the book – tried the next day and it was awesome. Love the idea of cooking in creuset pot to simply the steam element and will give that a go. my mom was from france and so enjoy a good bread – this is as close as to proper bread that I’ve had especially out of my oven. thanks for a great book and ordering your 2009 healthy bread book as well. no more bread machine for me!
Hi Jeanine,
Thank you so much for trying our method, we are so thrilled you are baking and enjoying the bread!
Cheers, Zoë
I read this post and went shopping for a cast iron pot (I’ve been wanting one anyway, this post pushed me over the edge). Just wanted to let anyone else looking for a budget buy know that I found a really nice one at Costco of all places, lidded 6 quart dutch oven for $40, enameled inside and out, and comes with a metal knob instead of plastic. Brand is Kirkland Signature. Hope that helps someone else!
Spectacular!
What type of parchment paper do you use for greater than 420 temps? My Reynolds brand says it only is good to that temp.
Hi Laura,
Almost all of the parchment paper has this same temperature warning. I have always used it to bake bread at 450°F or even hotter with no problems. They must give such a low temperature as a legal precaution. If it makes you nervous you can try using foil, but you need to use cornmeal to prevent it from sticking.
Thanks, Zoë