The New Artisan Bread in Five Minutes a Day Master Recipe! (Back to Basics updated)
This is one of the site’s most popular posts. Why? It answers many of the questions that you asked, with the answers incorporated The New Artisan Bread in Five Minutes a Day. Thank you all for making this new edition possible–readers are where the new ideas come from. If you’re having trouble getting this recipe to turn out the way you’d like, check out the troubleshooting tips on the FAQs page here.
For the Master Recipe…
If you’re new to the site, welcome, and thank you for trying the bread. The updated edition (2013) has lots of material that wasn’t in the original Artisan Bread in Five Minutes a Day (2007):
—More color pictures, there are 40 now (compared with 8), and 100 B+W instructionals
—A gluten-free chapter
—An expanded Tips and Techniques section
—Weight equivalents for every dough–for those of you with digital scales at home (optional!)
—Instructions for adjusting yeast and salt to your taste. And we decreased our standard yeast amount to 1 tablespoon (previously used 1.5 tablespoons for four pounds of dough).
—And 30 new recipes, including crock pot bread, a whole wheat variation that lets you increase the whole grain, rolls, panini, and more. About 130 more pages than our first edition.
As we bake through the basic Master recipe from NewABin5 we’ll try to answer some of the most frequently asked questions. The goal is to create a large batch of dough that stores in the refrigerator for up to two weeks. That’s why our method saves you so much time– all the mixing and prep is divided over four one-pound loaves.
Master Recipe from The New Artisan Bread in Five Minutes a Day: The Discovery That Revolutionizes Home Baking:
3 cups (1 1/2 pounds/680 grams) lukewarm water (you can use cold water, but it will take the dough longer to rise. Just don’t use hot water or you may kill the yeast)
1 tablespoon granulated yeast ( you can use any kind of yeast including products labeled as instant, “quick,” rapid rise, bread machine, active dry, or even fresh cake yeast (which isn’t granulated)*. You can also decrease the amount of yeast in the recipe by following the directions here. Or you can bake with a sour dough starter, see instructions here.)
*If you use cake yeast you will need 1.3 ounces (37g).
1 to 1 1/2 tablespoons Morton Kosher Salt (adjust to suit your taste or eliminate it all together. Find more information here)
6 1/2 cups (2 pounds/910 grams) all-purpose flour (the recipe’s tested with typical supermarket flour. If you use a higher protein flour check here)
Mixing the dough:
In a 5 or 6 quart bowl or lidded dough bucket (the lid is sold separately), dump in the water, and add the yeast and salt.

Because we are mixing in the flour so quickly it doesn’t matter that the salt and yeast are thrown in together.

Dump in the flour all at once and stir with a long handled wooden spoon or a Danish Dough Whisk which is one of the tools that makes the job so much easier!

Stir it until all of the flour is incorporated into the dough, as you can see it will be a wet rough dough.

Put the lid on the container, but do not snap it shut. You want the gases from the yeast to escape (you can put a little hole in the top of the lid so that you can close the lid and still allow the gases to get out. It doesn’t take much of a hole…

Allow the dough to sit at room temperature for about 2 hours to rise (it may take longer). When you first mix the dough it will not occupy much of the container.

But, after the initial 2 hour rise it will pretty much fill it. (If you have decreased the yeast you will have to let it go longer than 2 hours.) DO NOT PUNCH DOWN THE DOUGH! Just let it settle by itself.

The dough will be flat on the top and some of the bubbles may even appear to be popping. (If you intend to refrigerate the dough after this stage it can be placed in the refrigerator even if the dough is not perfectly flat. The yeast will continue to work even in the refrigerator.) The dough can be used right after the initial 2 hour rise, but it is much easier to handle when it is chilled. It is intended for refrigeration and use over the next two weeks, ready for you anytime. For the first two days of storage, be sure to leave the lid open a crack, to allow gasses to escape. After that, you can usually snap down the lid on plastic contains without problems, because they’re usually not entirely airtight. BUT, DON’T SEAL GLASS CONTAINERS OR THEY MIGHT SHATTER. The flavor will deepen over that time, developing sourdough characteristics.

The next day when you pull the dough out of the refrigerator you will notice that it has collapsed and this is totally normal for our dough. It will never rise up again in the container.

Dust the surface of the dough with a little flour, just enough to prevent it from sticking to your hands when you reach in to pull a piece out.

You should notice that the dough has a lot of stretch once it has rested. (If your dough breaks off instead of stretching like this your dough is probably too dry and you can just add a few tablespoons of water and let it sit again until the dough absorbs the additional water.)

Cut off a 1-pound piece of dough using kitchen shears* and form it into a ball. This video shows the technique for shaping this very wet dough.
Place the ball on a sheet of parchment paper… (or rest it on a generous layer of corn meal on top of a pizza peel.)
*Sewing Shears can be nice because of the long blade. I just dedicated a pair to the kitchen.

Let the dough rest for at least 40 minutes, (although letting it go 60 or even 90 minutes will give you a more open hole structure in the interior of the loaf. This may also improve the look of your loaf and prevent it from splitting on the bottom.) You will notice that the loaf does not rise much during this rest, in fact it may just spread sideways, this is normal for our dough.
You can also try our “refrigerator rise trick,” shaping the loaves and then immediately refrigerating them overnight. By morning, they’ll have risen and are ready for the oven after a brief room-temp rest while the oven preheats (click for instructions).
Preheat the oven to 450 degrees F. with a Baking Stone* on the center rack, with a metal broiler tray on the bottom (never use a glass vessel for this or it will shatter), which will be used to produce steam. (The tray needs to be at least 4 or 5 inches away from your stone to prevent it from cracking.)
*(or Cast Iron Pizza Pan– which will never crack and conducts heat really well. Be careful to dry it after rinsing with water or it will rust)

Cut the loaf with 1/4-inch deep slashes using a serrated bread knife. (If your slashes are too shallow you will end up with an oddly shaped loaf and also prevent it from splitting on the bottom.) If your dough is collapsing when you make the slashes, it may be that the dough has overproofed or your knife it dull and dragging the dough too much.

Slide the loaf into the oven onto a preheated stone (the one pictured below is cast iron) and add a cup of hot water to the broiler tray. Bake the bread for 30-35 minutes or until a deep brown color. As the bread bakes you should notice a nice oven spring in the dough. This is where the dough rises. To insure that you get the best results it is crucial to have an Oven Thermometer to make sure your oven is accurate.

If you used parchment paper you will want to remove it after about 20-25 minutes to crisp up the bottom crust. Continue baking the loaf directly on the stone for the last 5-10 minutes.

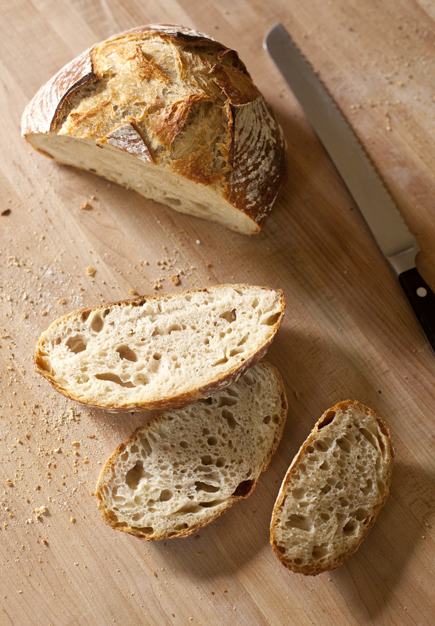
Allow the loaf to cool on a rack until it is room temperature. If you cut into a loaf before it is cooled you will have a tough crust and a gummy interior. It is hard to wait, but you will be happy you did! Make sure you have a sharp serrated bread knife that will not crush the bread as you cut.

If you have any leftover bread just let it sit, uncovered on the cutting board or counter with the cut side down. If you cover a bread that has a crust it will get soggy.
Enjoy, have fun baking, and check out the FAQs page if you’re having trouble getting the bread to turn out the way you’d like.
Note: BreadIn5.com is reader supported–when you buy through links on the site, BreadIn5 LLC earns commissions.
I tried my first master recipe from Healthy Bread in 5 minutes. I baked the Hearty Whole Wheat Sandwich Loaf from p. 62. It looked beautiful when baked but after cooled, when cut into it, it has a yeasty fermented smell to it and seems too moist. After going over the process, I realize that my dough was not stretchy when I pulled it out of the container – it just broke off off. I’ve seen comments on the site to add water to the dough, but that seems like that would have made this loaf worse. Also, I’m wondering do I need more flour, but wouldn’t that have made the dough too dry? Can the rest of my dough be salvaged or do I need to start over?
Definitely don’t add more water if you’re finding it too moist– possibly do the opposite– work in more flour, or use a little more in the next batch. Our results are moister than typical, so you need to bake fully– are you sure your oven’s the right temp? Check with something like https://ow.ly/8CVPU Also, assume you used vital wheat gluten, otherwise these recipes will be too wet (VWG absorbs water).
About the yeasty fermented smell– that’s sourdough, which is part of our appeal, and most people enjoy that (though not all). To minimize that, consider the low-yeast version of the recipes (page 49). Or don’t store as long before freezing the dough.
About “… just broke off,” what flour brand are you using? And vital wheat gluten (which improves stretch).
I’ve been using a thermometer to check internal temperature. 200 seems to be a good target. Instant read digital works well and only requires a brief time out of the oven.
You’re book is on it’s way but I couldn’t wait to try a loaf or two. I made the dough yesterday but couldn’t get to my mom’s to borrow her baking stone so after it rose for 2 hours I popped it in the fridge. I pulled it out today and when I went to make a loaf the dough didn’t stretch as nice as yours. It stretched a little then broke, I could pull chunks off. Was I supposed to let the dough warm up before grabbing a chunk?
Hi Leslie,
Thanks for giving the method a try! What brand of flour are you using?
Zoë
I have this problem as well. I’ve done the HBin5 master recipe using King Arthur brand flours, Bob’s Red Mill vital wheat gluten, and red star yeast. I had to cook everything much longer and still felt like the bread came out sort of gummy with a very hard crust. I’m trying a brioche dough now with a brand new bag of wheat gluten and hoping for better results. Very frustrated. 🙁
Hi Jenny,
If your dough is breaking and doesn’t have a nice stretch, it is often one of two things. It can either mean the dough is too dry or the dough is very cold. I have 3 refrigerators in my house and they all run slightly differently. When I store dough in the basement refrigerator it is so cold that the dough breaks off instead of having a nice stretch. I compensate for this by letting the bread rest for an additional 15 to 20 minutes when it is shaped. The longer rest will also result in better baking because the dough is not so dense.
If you don’t think it is the temperature, then try adding a bit more water.
Are you using a baking stone?
Thanks, Zoë
Need to know if there is a way to make it Gluten free
Hi Michele,
We have a GF book coming out in October. Here is a recipe you can try in the meantime: https://artisanbreadinfive.com/2010/01/05/gluten-free-crusty-boule
Thanks, Zoë
Tried the gluten free recipe. It looked to wet so added a bit more of the flours. It tasted good, even my husband liked it but I made the loaf way to small. Mine did not stretch at all but it tasted really good. And I haven’t cell across any commercial breads that I would eat. Thank you
Hi Michele,
So glad to hear that! Which recipe were you using? If it is from NewABin5, you should check out our correction page: https://artisanbreadinfive.com/2013/10/01/corrections-to-first-printing-of-the-new-artisan-bread-in-five-minutes-a-day-2013
Thanks, Zoë
Love the recipe!
When I baked it on grease proof paper, the paper stuck to bottom of bread. The bread was great, but had to cut the bottom crust off! So I tried without paper and baked it on a floured non-stick baking sheet but the loaf baked on to the sheet and had to be scraped off.
Am I doing something wrong with the recipe or is it just the wrong baking equipment? Thank you!
Hi Kelli,
I think that grease proof paper may be coated with something that makes it repel grease. This is different than plain parchment paper, which is not coated. What brand are you using?
Thanks, Zoë
I made my first bath today. I loved the texture and taste of my bread, but I think I would prefer the crust to not so as crunchy. How do I do that? Mine also stretched but broke off, and the bread was a little gummy, but I like it that way. I may have just overlooked it too, it was pretty small. I already ate it!!
Which recipe are you working from (which book, page number)? Meanwhile, check our FAQs tab above.
I am using the Master Recipe in the new book, that’s starts on page 53. I will check the FAQ, that may answer it. Thanks!
Certainly everything on the “Dense crumb: What am I doing wrong?” FAQ could be an explanation, but all that material is in your book as well, in Chapter 4. What kind of flour are you using, and are you measuring flour by weight or by volume? If it’s by volume, you need to measure like we do; see video at https://artisanbreadinfive.com/2010/04/28/how-we-measure-our-flour-using-the-scoop-and-sweep-method
You’ll get larger holes if you let the dough age a little longer…
I don’t have a scale to weigh the dough. How many loaves are in this one recipe??
Four one-pounders. Those are relatively small and easier for beginners to work with.
Why is it that whenever i attempt with a mix of seeds & grains (chia, flax, sunflower, millet, buckwheat) that my bread gets soooo very dense and wouldn’t rise no matter how long I let it sit? Is there a specific ratio (wt or cups)to flour that I must follow? I’ve tried adding gluten powder but it is still so very dense. I don’t like plain white bread, and prefer adding a bit of rye and more wholemeal than plain white flour, to get texture and chewiness in my bread. Please please do advise. It is very frustrating to have heavy dense breads! Thank you!
Hi Delia,
Do you have our Healthy Bread Book? If so, you should try making the Betsy’s Seeded Loaf on page 147. You can add the kind of seeds you like, but keep the total amount the same that you find in the recipe.
Thanks, Zoë
The Betsy’s Seeded Loaf is my favourite bread in the book. I would like just a little bit more rise so my children would eat it. Do you have a suggestion for that? Thanks.
Hi Steph,
You can try adding a bit more vital wheat gluten to the dough, but that will require also adding more water. Try adding two more tablespoons of each to the batch, you may need 3 tablespoons of water. If you were to increase the amount of white flour and decrease the whole wheat, that too would give you more stretch to your dough.
Thanks, Zoë
Jeff: If I want to bake and send someone a loaf of one of your breads, any suggestions for packing. It would be shipped from the West Coast to the East Coast of the US.
Thank you in advance…
PS: Made my first bread this weekend – the rye bread.. it was an outstanding success. I can’t believe how easy it was!!
Hi Sylvia,
Breads make with white flour tend to stale the fastest. If you pick a loaf that has whole grains or is enriched with fat, sugars, and/or eggs will last a bit longer. Our breads don’t have any additives, so they will not last more than a couple of days. You will want to bake a loaf that doesn’t have a crisp crust, since you will need to wrap it in plastic, which will ruin a crisp crust.
Thanks, Zoë
I’ve been researching and researching for reasons why my loaf is not rising. When the loaf did more spreading than rising during proofing I started weighing the flour. That helped and I wasn’t too concerned when it rose very little because you mention that’s ok, but I have never seen any real oven spring. I feel like I’ve tried so many things, but with very little success. I’ve tried weighing my ingredients, using 1 T yeast instead of 1 1/2, allowed for 90 minute rising time and even longer since I live in a humid South Carolina, tested my yeast…I know it’s supposed to be a wet dough, but even after refrigeration and thoroughly sprinkling the dough and covering my hands I still have a very difficult time forming the ball quickly because it’s still so sticky. I may be forgetting other things I tried, but would be grateful for additional input or if you could point me to a place to read about that maybe I’ve missed. I have wondered if it makes a difference if the flour is bleached or unbleached. I have intentionally tried the Gold Medal flour you’ve used and it seemed a little better, but still not the rise it should have. Thanks for all you do! My bread always tastes good even if it’s “short”. 🙂
Hi Laura,
It may very well be the shaping. Here is a video on how to shape wet dough: https://artisanbreadinfive.com/2010/03/08/new-video-shaping-the-ball-from-a-very-wet-dough
Let me know if that helps. Thanks, Zoë
This is not a link to the shaping video
You’re so right, sorry: https://artisanbreadinfive.com/2010/03/08/new-video-shaping-the-ball-from-a-very-wet-dough
In the video you did on TCL you showed that bread can be done in Crockpot. I just took mine out after one hr on high setting and while it is starting to form a crust on top it is nowhere nearly done. Has not even started to brown. What have I done wrong.
Hi Bobby,
The “baking” time will really vary depending on the crockpot you have. It can take as little as 45 minutes and as long as 2 hours. Here is a post about using the crockpot:https://artisanbreadinfive.com/2012/05/29/crock-pot-bread-baking-fast-bread-in-a-slow-cooker
Thanks, Zoë
Your recipe gave me some of the most beautiful bread i’ve ever seen!! Thank you!
Fantastic!
I’ve tried many different flours – Gold Medal, Pillsbury, Virinias Best, etc, an it can’t get my breads to brown. Biscuits included. I followed this to the T, ended up baking for 40 min, and still have a creamy colored crust. Usually everything comes out – just never the right color. Any advice, or is my oven to blame?
Could be. Have you checked the oven temp at the time you put the bread in, using something like https://ow.ly/8CVPU ?
Longer preheat needed? Are you using a stone? Are you capturing steam? Which recipe/which book/page number are you using?
the cast iron pizza stone by Lodge on Amazon states oven safe up to 400 degrees. The recipe says to preheat to 450.
Can you please clarify/correct if needed. I love cast iron, but would hate to buy this item only for it to break.
Boy, so would I.
The manufacturers err on the safer side, so… I guess you should do whatever the manufacturer says, or face the reality that it might break. They’re conservative about this. Before you make a decision, I’d contact the company and ask them specifically about maximum temp. Sometimes the information you get from a third party like Amazon is filtered through too many sources and there can be errors and misstatements.
I have this and cook pizza on it weekly, I set my oven to 500 and leave it in there for over an hour.
Fantastic. Don’t know if you know about our Pizza book: https://www.amazon.com/gp/product/0312649940/ref=as_li_tf_tl?ie=UTF8&tag=arbrinfimiada-20&linkCode=as2&camp=217145&creative=399349&creativeASIN=0312649940
Lodge cast iron pizza stone on Amazon states safe up to 400 degrees. Your recipe calls for 450 degrees.
which way is right? please explain/clarify. Thanks
see my answer above…
I own your first 2 books and have started measuring by weight, which works great. Unfortunately, I have the original abin5, which does not have the weight table. I’m usually fine with the one in hbin5, but not for all ingredients. Do I really have to buy the first book again just for a table? Could I buy a PDF table from you??
Thanks!
Hi Laura– so sorry, we don’t have a .pdf table for sale, and our publisher will kill us if we put too much material here on the website. One clarification though– The New ABin5 doesn’t have a conversion table like HBin5, it just has weights included for the total amount of each ingredient in each dough recipe. So it’s all through the book.
Hi, I will be using bread flour for my loafs. Do I still need vital wheat gluten? for the above recipe which asks for 6 1/2 flour and 3 cup water, how much vital wheat gluten I need to add? Also, would it matter if I use 2/3 spoon sugar just for the taste to my dough?
Thanks
Hi Sara,
The only recipes that call for vital wheat gluten are in our Healthy Bread book. The whole grains tend to be heavier and don’t store well without the additional vital wheat gluten. There is no need to add it to any of our other recipes.
Thanks and enjoy, Zoë
Hi there!! Thank you so much for all of your help! I cannot get my dough to double in size during the 2 hour rise.. I am using all purpose non bleached flour and red star yeast out of the jar. Do you have any tips to get my dough to rise? Thank you!
Hi Whitney,
Is the dough rising at all or just not doubling.
Thanks, Zoë
Zoe, thank you for getting back to me so quickly! I have a 6 qt container and the doughy mixture sits below the 2 quart mark. It rises about 1/3rd of the way between the 2 and the 4 marks. I appreciate any tips you may have! Thank you so much.
Hi Whitney,
The yeast is working, just slowly. Your water may be a bit cooler, which means the dough may just need a bit more time to fully rise. Some of our readers actually prefer the taste of the bread made with cool water, but they just have to wait a little longer.
Thanks, Zoë
I’m wondering if there’s any reason to not pull more than a pound out to make a loaf? The one pound size is just too small for my family. I’d really like to make a 2 pound loaf, but don’t want to mess it up and end up with a huge hockey puck. Does it really matter?
Go to our FAQs tab above, and click on “Larger loaves: What adjustments are needed?”
absolutely terrific – am enjoying bread making so much!
just a question how long can you leave a bit of the dough in the fridge in the container to use as a starter?
I did not make another batch and now it is in the fridge for 2 weeks.
thanks for your reply
MB
Which dough are you talking about, which book, which recipe, what page number? Answer depends on that…
yes so sorry –
From the Artisan Bread in Five Minutes a Day ( 1st edition)
Basic Boule bread mix
again thanks for responding –
MB
Hi MB,
You can leave the dough for a long while, depends on conditions, but if you see any mold you need to throw it away.
Thanks, Zoë
Hi guys, great job you have done 🙂
New beginner here and I went to some bread lessons, (traditional kneading). Lucky I found your site and now want to try your great way of no knead bread. But have a couple of questions.
Can I use plain white flour and cut your ingredient by half? And if I use fresh yeast will it still work? what portion?
I live in Asia, everything is smaller and less space including fridge and bucket/utensils etc lol
thx and looking fwd to bread making
Angie
Depends on the recipe, some call for whole wheat, which book are you using, which recipe, what page number? You can certainly halve the recipes, and you can use fresh yeast (though you need twice the volume to get the same rising power).
Your recipe sounds exactly like Jim Lahey’s recipe for No-Knead bread published in the NY Times in 2006. All you did was double the quantity. So who had the recipe first? You or Lahey?
Our book came out a year before Jim’s, but Susanne Duniway’s “No Need to Knead” came out in 1999, and wet, no-knead dough’s been around a lot longer than that– neither Jim or we are the inventors. Our dough isn’t quite as wet as Jim’s– re-check your math. The other thing is that our dough is stored– which doesn’t appear in any other recipes– and that’s the source of the time-savings.
Thanks. I’m glad to know you didn’t plagiarize.
Whoops, left the dough out for 4 hours instead of 2. Do I have to throw it out?
Which dough, from which of our books (page number)?
I have made the master recipe countless times. For the most part it comes out great. I use parchment and a baking sheet. Every so often, the parchment is deeply blackened and the bread starts to burn. I don’t vary from the recipe, always use water on a different shelf, etc. Any ideas?
Hi Mary,
Are you using a baking stone under the baking sheet or just going straight onto the oven rack.
Thanks, Zoë
I just love making this and your herb rolls in the crockpot. Is The New Artisan Bread in Five Minutes a Day available in stores in Minnesota? I am in Fergus Falls and also shop in the Cities and Fargo.
Thanks for the great recipes.
Hi Mary,
You can find our books in most retail book stores and online!
Cheers! Zoë
I love this recipe!
It is so incredibly easy and flexible. I have altered it numerous times, all with great results. I made a version where I added a bunch of rosemary and garlic spice mix, and another version with a bit of brown sugar and a bunch of cinnamon. All I have to do is add a tad more water every time I mix in another dry ingredient. Each time the dough rises just fine (it takes longer with those extra ingredients, I find), and it is super sticky and stretchy, as it should be.
It is easier to use this dough after it has been refrigerated – it will keep the dough from sticking to your hands, and it will keep the dough in a loaf-like shape. Also, you can only add the slashes across the top if the dough is cold (and it’s worth it). But I am often impatient and will take a hunk of it after the rising period and shove it straight in the oven. Each time I do that, it looks like a blob of shapeless nothing on the pan, but it always rises into a free-form delicious loaf (though not as tall).
Re: specifics, I use whatever type of all-purpose white flour is on sale at the grocery store and always get great results. I also use Fleischmann’s Dry Active Yeast, because it was on sale. I have a bottle of it and so far haven’t tried anything else. I use a large, plastic Folgers container to mix everything in and just stabbed a few holes in the lid. I mix everything with a silicon spatula that bends nicely under and between the folds of the container. I never let the dough rest after I pull it from the container and shape it – I always put it in the oven right away. I’m sure that it would be even better if I waited! I put parchment paper on a metal tray to bake. I have made everything from mini-loafs (for hamburgers!) to large loafs and other than adjusting the cooking time, everything turns out great.
This recipe is amazing, many thanks!
Fantastic Susie, thanks for sharing your system with us…
I do not have a baking stone, can I still bake the bread? If so, how?
Thanks!
Heavy duty baking sheet like these are good: https://www.amazon.com/Metallic-Commercial-Traditional-Uncoated-Jelly-Roll/dp/B003YKGRPK/ref=as_sl_pd_wdgt_ex?&linkCode=wey&tag=arbrinfimiada-20
… they don’t need to be pre-heated. Other tips on our FAQs tab. Which recipe from our books are you doing (recipe/page number)
I make this bread all the time, its amazing, total game changer, all of my friends are obsessed. Stale bread is an oxymoron, i cant even keep it around long enough for it to be good french toast…i actually havent tried because ill end up eating the whole thing alone Thank you!
Thanks for the kind words!
Can i use whole weat flour instead ?
Thanks
You can’t just swap in WW. There are many WW options in Healthy Bread in Five Minutes a Day, on Amazon at https://bit.ly/3wYSSN. Some also here on the web, use the search bar above.
thanks, the bread was wonderfull
Well I made the dough, but it only filled that container (I have the same one) by about half, so I only think I’ll get two loaves out of it. I used the recipe from your book, so I used 1.5 tablespoons of yeast. I know my water was the right temperature, and I weighed out the flour. So what did I do wrong? Can I show you the picture of how much dough I got after letting it sit for two hours? (not sure how to do that, it’s at my FB page, here:
https://www.facebook.com/photo.php?fbid=10206020360815151&set=a.10201558371988219.1073741832.1445019007&type=1&theater
Here’s how the bread turned out:
https://www.facebook.com/photo.php?fbid=10206021956495042&set=a.10201558371988219.1073741832.1445019007&type=1&theater
I have yet to eat it… letting it cool.
The bread was wonderful! I had it with homemade goulash soup and we broke it up (didn’t slice it) and dipped it into the soup. My Gods, what a treat. I feel stoned on food right now.
Hi Joy,
I’m so glad you enjoyed your first loaf! It is quite okay if your dough doesn’t rise much more than it did. It may depend on the temperature of the water and/or your kitchen. It sometimes just takes a bit longer to rise. My dough will often continue to rise even after I’ve refrigerated it, but it’s just fine if it doesn’t. Based on what you’ve shown me, your dough is great!
Cheers, Zoë
Hi Zoe, I asked you this on Twitter and you said I should post here so post here I shall!
As I said there, I have had some trouble with the shape of the loaf. It looks good while it rises but then when I go to slash it loses it shape and flattens out. I thought perhaps I wasn’t slashing deep enough, but I’m not sure that’s it.
It tends to cook to the new shape and never seems to open up or get very dark on top.
Taste is good and the crumb is a good texture, it’s just the crust and shape.
Any ideas?
Hi David,
This is much easier, thanks for posting the question again.
There are a couple of things that come to mind from your note.
1. Sometimes the issue is how the dough is shaped, so take a look at this video: https://artisanbreadinfive.com/2010/03/08/new-video-shaping-the-ball-from-a-very-wet-dough Let me know if your dough looks similar to what Jeff is using?
2. Are you baking on a stone? If so, how thick is it and how long are you preheating it? Do you use an oven thermometer? Gas or electric oven?
Thanks, Zoë
Thanks, Zoe. So I watched that video and it looks like I’m doing mostly the same thing only mine is sticking to my hands more. I feel like I’m using a ton of flour but after I shape it seems to stick to my hands as i’m putting it down. Too little flour to in the original mix?
I’m using a stone, yes. Pizza stone. Like this one: https://bakingbites.com/2010/09/how-do-i-use-a-baking-stone/
Preheating for a good 40 minutes while I let the shaped dough rest. I haven’t been using an oven thermometer but it’s an electric oven.
After 35 minutes It’s not very brown, for what it’s worth. Thanks again!
Hi David,
It could be that your dough is too wet. How do you measure the flour? If you use cups, you should do scoop and sweep or use weights. Don’t spoon the flour into the cup or your dough will be much too wet. What brand flour do you use?
The stone looks great and a 40 minute preheat should be just fine for that thickness. I would get an oven thermometer, it sounds like maybe your oven runs a bit cool if it’s not browning at 35 minutes. Until you get the thermometer, try raising the temp to 475°F.
Thanks, Zoë
Thanks for that advice. I have used a few kinds, most recently White Lilly, although my next batch will be Gold Medal. I use the scoop and sweep, but I’ll be more careful with this next time.
Hi David,
Are you using White Lilly all-purpose or bread flour? I believe that the all-purpose flour is a low protein flour, which will account for your soft dough and may also explain the difference in your crust. Let me know how you do with the gold medal, I have a feeling it will be a different experience.
Thanks, Zoë
Hi Zoe and Jeff
I wanted to thank you, I just tried my first loaf, as an Italian I have to say this bread is impressive for something baked in a standard oven, it reminded me of the flavour of the bread I used to eat when I was a kid from the neighbourhood bakery.
I was a little worried as the dough didn’t reduce in volume after the initial rise, it stayed up for the three days I kept it in the fridge but the results were great.
Thanks again,
Paolo
Hi Paolo,
Thank you for the wonderful note, we are so thrilled you are enjoying the bread! It isn’t unusual for the dough to keep its rise in the refrigerator. Each batch may behave differently, since the conditions may change every so slightly.
Thanks, Zoë
Hi guys, I just baked my first loaf using the master recipe from the original book, cut in half, for my first attempt. Overall it went pretty well except for one problem. The top crust looked pretty good, but the bottom is much lighter and the crumb looks kind of dense right there at the bottom too. I don’t know if I needed to bake longer, or pre-heat longer, or my measurements were off.
I tried to use the scoop & sweep method, though I was measuring out of the bag and was actually worried the dough was too dry but that didn’t seem to be the case. I did use gold medal bread flour because I had it on hand and it was that or the bag of bleached AP. I’ll be using unbleached AP and using your weight conversions in the future. Because I used bread flour I followed the instructions to reduce the flour by 1/4 cup for 6 cups in that case so I left 1/8th out of my halved recipe based on the original calling for 6 1/2.
I have a gas oven and pre-heated it for 20 minutes as directed. I had a half sheet pan for the water on the bottom and used an Emile Henry “flame” series pizza stone to bake on (coincidentally the same you guys reviewed in your stones article here). I’m suspecting my dough was too wet. I had to bake the 1 pound loaf for about 35 minutes vs. 30 to hit around 200 inside when I checked the temp. So I’m not sure if maybe I just needed more pre-heat?
My other thought was the dough was too cold still when it went in? It had about a 45 minute rise but the kitchen was about 68-70 degrees as we’d had all the windows open due to carpet drying after being cleaned so I thought maybe it went in too cold as well? I do have an oven thermometer on the way to check the oven, but I do know with the old dial style that I was using if I say set the oven for 425 it would only be around 325 when it “beeped’ that it was pre-heated and would take 10-15 minutes more to get to 425 for example. Any ideas what I can do to fix this? Oh, I used a good coating of flour on my peel as I don’t have any cornmeal and it looks like a thin layer stuck to the dough. Could that have interfered with the browning?
Hi Charles,
Thank you for all the detail, it really helps us to figure out the issue.
Here is a video on handling very wet dough, which will help the shaping: https://artisanbreadinfive.com/?s=shaping+wet+dough Does your dough look even wetter than this?
1. Let the dough rest for 60 minutes, especially if you thought it still seemed quite cold when it went in the oven.
2. Allow the baking stone to preheat for at least 30 minutes. The Emile is pretty thin, so 30 minutes is usually enough, but the longer the better. The bottom crust will be pale and the bread won’t have a nice “oven spring” if the stone is not properly preheated. This combined with the longer rest time should take care of your issues.
3. A gas oven often leaks all the steam, so you may get a better result baking in a Dutch Oven or Cloche.
DO: https://artisanbreadinfive.com/2009/03/11/baking-bread-in-a-dutch-oven
Cloche: https://artisanbreadinfive.com/2013/12/08/baking-in-a-cloche-plus-a-big-holiday-baking-package-giveaway-signed-copy-of-thenewabin5-gold-medal-flour-red-star-yeast-and-an-emile-henry-cloche
4. Using the bread flour is great, so feel free to use it up.
5. Using parchment paper will help you slide the loaf into the oven and eliminate any flour residue on the bottom.
Thanks, Zoë
Thanks for the quick reply Zoe. I don’t think it was wetter than that video. Overall I think it seemed similar to what I’ve seen in the other videos. It sounds like the pre-heating might be my problem. Also I did watch a video last night showing the different ways to create steam and noticed in Jeff’s oven in that example the stone and the steam pan were one rack lower than where mine were at. So maybe I should try one rack below the center one as well.
Your comment about the longer rest definitely makes sense. I’ll try that next time it’s cold like that in the house and also try the longer pre-heat. The book said 20 minutes and “your oven won’t be fully to temp but that’s ok” (something along those lines) so that was why I went with it and put the dough in at that point. I did notice in one of the videos I watched you guys mentioned 30 minutes of pre-heating though and of course up above you mentioned it’s fine to go even longer.
Anyway I’ll try these little tweaks and we’ll see. Not sure how tonight’s will go. I weighed the dough ball yesterday to exactly 1 pound out of the half batch of dough, the remaining amount was only about 12-13oz though.
Hi Charles,
In our revised edition of the book we suggest at least a 30 minute preheat. We changed our minds because most folks are using thicker stones that really don’t get up to temp in 20 minutes and it will have a big effect on the rise of the bread and the crust.
The dough does make a scant 4 pounds, so if you are weighing the loaves, you will want to use about 15-ounces, not a full pound.
Thanks, Zoë
Would it ruin the bread if I used something lighter than a baking stone or cast iron? I can’t use those things without a great deal of pain to my wrists, hands, and fingers.
Sure! My favorite is a thick-gauge baking sheet like https://www.amazon.com/Chicago-Metallic-Commercial-Traditional-Jelly-Roll/dp/B003YKGRPK/ref=as_li_wdgt_ex?&linkCode=wey&tag=arbrinfimiada-20
It doesn’t scorch as much as thin baking sheets and gives results that are closer to what you get with a stone.
Hi guys, I posted a question about a month ago having problems getting the bottom of my bread dark & crunchy like the top. I’m still not sure what is going on. It’s gotten better but I’ve also figured out I need around 45-50 minutes for a 15-16oz round loaf to get dark enough on the outside and get enough water out of the inside.
I bought a high quality oven thermometer (liquid type vs. the normal spring based) and tested it as accurate in boiling water. After a 45-60 minute preheat with my pizza stone and the water pan in the oven it’s definitely at 450 degrees. Today’s batch was rested after forming for about 45-50 minutes. It seemed very wet/sticky even after liberally coating with flour and I tried to shape into smooth balls. This batch of dough was about 10 days old though. I’d mixed up the whole thing and not had a chance to use it until today.
I tried using cornmeal on the peel this time as well. I thought I had a good thick layer but after the rest I had to push the loaves off onto the stone resulting in some misshapen loaves.
I wonder if my baking times are somehow related to using a gas oven? I’ve heard that burning natural gas actually gives off a bit of moisture and wondered if that could be the problem. I tried baking in a well preheated dutch oven once as well and it also took much longer to get the crust done.
Ok, I think something is off with my flour/water ratio or something. Either not adding enough in the cloaking part, or possibly in the mixing part. I’m going to try weighing the flour next time with the 5oz/cup measurement you guys provided on another article. It’s weird because it’s very hard to get all the flour mixed in when creating the dough originally so I almost thought I was measuring too much when trying scoop & sweep.
However after thoroughly cooling today’s loaves, even the dark loaf (50 minutes baking) was still tacky/sticky inside after cutting it. Do I just need to let these sit and rest before baking for a longer period to rise more and come more to room temp? I’ve not had this tacky/sticky crumb problem when using the recipe I got from a bread making class at a local culinary school but of course it requires lots of kneading etc. vs. your method.
Well, first off– expectations: this dough is definitely wetter than what you get with the traditional method that you got from the culinary school. So the result is going to be a little different too–the crumb is moister (that effect lessens if you let it cool completely after baking– two full hours before cutting).
That said, you have a little leeway to make a slightly drier dough. If weighing doesn’t solve the problem, just use a little more flour in the batch and see what you think. But stick with weighing once you start tweaking–it’s a much more accurate way to test and refine recipes.
Thanks Jeff, I’ll keep in mind that it has a moister crumb normally. I guess I didn’t realize it should be like that. I’m assuming it’s also normal for the formed dough to be sticky as well still? I can’t seem to ever get it to form what looks like a nice smooth ball like in the videos you guys have. It always starts getting stickier as I keep pulling the dough around.
Keep sprinkling flour as you go and you should be able to work with it…
What to do if I want to make a all whole wheat NO KNEAD bread in high altitude.
Hi Sandy,
All of the same rules would apply for the whole grain breads as I talk about in this post: https://artisanbreadinfive.com/2008/02/10/qa-high-altitude-baking Which book are you using? If you have the healthy book, I would add a bit more VWG to the dough, that will give it more stregth. You’ll need to also increase the water to compensate for the extra VWG.
Thanks, Zoë
I tried the master recipe. The first loaf I baked, I added soaked, dried cranberries and walnuts. I dont think I waited long enough for resting period, as it turned out very dense. For my second loaf that day I added jalepeno and cheddar chunks as inclusions. This loaf waited extra 30 minutes while the first loaf baked and had perfect open crumb structure to it and the flavor was there. I did not refrigerate. I used the dough after initial 2 hour rise. Thank You! My in- laws are very impressed with my bread.
Hi Jessica,
After you add things to the dough an extra rise is the best bet for an open crumb.
Enjoy! Zoë
I have been making this dough for a while and having success. But I encountered a new problem in a recent batch of the master recipe.
I had just finished a previous batch, and reused he scraps to kickstart the next batch. Let the dough rise for a few hours, put it in the fridge and waited 2 days before using.
I had the container cracked open just a little (as instructed) and when I pulled it out to use, I noticed it had a leathery dry crust on top, that was a tinge yellow. The Underneath is what I normally see, wet, pliable dough.
What happened here? Can I just remove the “crust” and use underneath safely?
Good afternoon
I was given the US version of ABin5 some years ago. I live in England (part of he United Kingdom). Simply couldn’t get even the ‘Master’ Recipe to work – tried three times. Put it down to there being nothing called ‘Morton Kosher Salt’ or ‘All-purpose Flour’ in any of the supermarkets here (Even ASDA owned by US Walmart don’t know of a straight UK equivalent). Also – we don’t use cups – we use weights – UK (Imperial) Pounds or Metric.
We actually do have corn, but feed it to chickens, we really don’t have maize (an even less English-use word). We do have something called cornflour – used to thicken sauces.
So I was pleased to see a UK version of the book is available – but not keen to spend £14 ($20+) on something which didn’t work in the past (once bitten, twice shy). So I was equally pleased to see a link in the British write up to a ‘method and a sample recipe’.
https://artisanbreadinfive.com/2011/01/06/five-minute-bread-british-version-of-our-1st-book-on-sale-today-in-the-u-k-one-of-the-top-50-ways-to-feel-good-this-year#more-2698
The site actually says … quick daily baking (click here for more on our method and a sample recipe – 2 pounds equals 910 grams, by the way).
Great … so I clicked where it said – to find a recipe detailing clearly USA ingredients, in cups, and of the 4 ingredients just the one (all-purpose-flour ?!?!?!?) detailing 6 1/2 cups = 2 pounds.
OK – so I can now just about work out I need 910 grams of American all-purpose-flour (whatever that is) but just how much water in England (3 cups) is simply not explained
We must be terribly simple in the UK, but perhaps you would humour me and just tell me answers to these 5 questions to translate my US master recipe into Queen’s English.
1 – what ‘English’ flour should I use. Our supermarkets supply ‘Plain’, ‘Self Raising’ and ‘Strong Bread’ but little else beyond the colours white / brown / wholemeal and various gluten free alternatives. All-purpose-flour … No.
2 – How much of the correct (?) flour for the basic recipe – both in Imperial pounds & ounces and in metric grams would be helpful.
3 – How much water – in Imperial Fluid Ounces and in Metric centilitres.
4 – How much salt – in (fraction of) Imperial Ounces and in grams
5 – How much granular yeast in ounces (or fractions) and in grams.
Please advise. I will then follow the directions I already have and will photo and advise you of the results.
Blessings from England (wasn’t it Churchill who said of US/UK – two nations divided by a common language).
Oh – I am also happy to proof read ‘English English’ for you because your friends at Ebury clearly don’t know what it is – as you say at
https://artisanbreadinfive.com/2011/01/06/five-minute-bread-british-version-of-our-1st-book-on-sale-today-in-the-u-k-one-of-the-top-50-ways-to-feel-good-this-year#more-2698
“So, what’s new in our British edition? Well, our Americanisms are pulled out, so now corn=maize, and cornmeal is polenta.”
Hmmmm – This is not really ‘English’ as I know it … in England
As I said, we don’t have ‘maize’ in England and polenta is not in most English Kitchens although it is getting more common and quite small quantities are available in the big supermarkets.
Blessings again – Paul
Hi Paul,
Your assessment of our “English” book is curious, since everything you desire to know is in there. We do use “plain” flour, there’s no mention of all-purpose, nor kosher salt, and all the measurements are in imperial ounces and/or metric weights. The British editor who worked on the book was kind enough to point out that corn is for chickens and made all the appropriate changes to reflect what someone from the United Kingdom would have on hand. The bread should turn out well despite the editor’s choice of words.
Thanks, Zoë
Thank you !
This is perfect for pinching a bit here and there for a super quick flat or stuffed bread in the skillet 🙂
Great looking recipe. I did a search for bread one can make in a crockpot and this one appeared. Didn’t realize it wasn’t for a crockpot until I got to the end of the recipe. Live and learn. Will try it anyway since it looks so good!
I do not have a baking stone. I use an air-bake cookie sheet (which is awful for baking cookies!) It works perfectly! I have been using it since I saw your article in Mother Earth News (years ago!), and couldn’t wait to try it. I have bought your books for friends, and suggested them to many others. Everybody loves them! I can’t go to a social event without running into a loaf of your bread! Life is grand! Thank you!
Thanks for the kind words, Beth. I have one of those for cookies, and I hate it for that. Maybe I should try it for bread.
I am going to make this today, it looks wonderful. I don’t have a large plastic container though. I’m wondering, if I make this in a very large bowl, whether I could put it into a smaller container once it has “settled”? I don’t have a lot of room in my fridge, so it would be helpful if I can!
Hi Rena,
Yes, a bowl is just fine. Cover it with plastic wrap and let it sit. You can transfer to a smaller container once you take some of the dough out.
Thanks and enjoy! Zoë
Amazing Bread!!!!!
Hi, I don’t have a pizza stone or a cast iron skillet… Is it possible to put this directly on an oven rack? Anything else I can do instead?
Hi Reshma,
It would be best to bake the bread on a cookie sheet, since the dough needs to sit on something in the oven until it is set up.
Cheers, Zoë
Bonjour Zoé et Jeff
Pensez vous éditer vos livres en français cela serai super?belle journée .Brigitte
Hello Zoe and Jeff
Think you publish your books in French it will be great? Beautiful day .Brigitte
Quel dommage! Cookbooks translated into European languages tend not to do well in Europe, unless the authors are television stars as well–or have what the marketers call a “platform” from which to tout their book. We just have this website, and while it’s been a wonderful way to reach readers all over the world, we haven’t been able to interest a French publisher.
That said, don’t ask me why, but we have editions in Chinese and Japanese, and one in Britain (modest sellers, all).
Do the recipes have the nutritional information for a serving size
Hi Judy,
They do not, but here is a way to do that calculation: https://artisanbreadinfive.com/2009/12/14/nutritional-information-for-whole-wheat-flaxseed-bread-or-any-other-recipe-in-our-book-using-the-usda-national-nutrient-database
Thanks, Zoë
Finally got up my courage(no confidence in self!) to try your original (clipped from the newspaper, fall of 2013-“No Knead Artisan Free Form Loaf”) recipe. All loaves of my first batch had a bitter, almost metallic edge to them, using fresh generic white flour and a just-beyond-the-expiration date jar of freshly opened yeast. So….the other day I tried two just-bought packets of yeast and subbed in 2 cups of whole wheat flour for 2 of the white. The first loaf was divine! Now comes #2 loaf baked the next day, again with a bitter bite. Thoughts, ideas?
??
Try the decreased-yeast version, see https://artisanbreadinfive.com/2007/12/19/low-yeast-version-of-our-master-recipe
Much more about flavor adjustments in our actual books though. You may just not be a fan of our sourdough effect, which is absent in Day 1 loaves, and grows every day after that.