The New Artisan Bread in Five Minutes a Day Master Recipe! (Back to Basics updated)
This is one of the site’s most popular posts. Why? It answers many of the questions that you asked, with the answers incorporated The New Artisan Bread in Five Minutes a Day. Thank you all for making this new edition possible–readers are where the new ideas come from. If you’re having trouble getting this recipe to turn out the way you’d like, check out the troubleshooting tips on the FAQs page here.
For the Master Recipe…
If you’re new to the site, welcome, and thank you for trying the bread. The updated edition (2013) has lots of material that wasn’t in the original Artisan Bread in Five Minutes a Day (2007):
—More color pictures, there are 40 now (compared with 8), and 100 B+W instructionals
—A gluten-free chapter
—An expanded Tips and Techniques section
—Weight equivalents for every dough–for those of you with digital scales at home (optional!)
—Instructions for adjusting yeast and salt to your taste. And we decreased our standard yeast amount to 1 tablespoon (previously used 1.5 tablespoons for four pounds of dough).
—And 30 new recipes, including crock pot bread, a whole wheat variation that lets you increase the whole grain, rolls, panini, and more. About 130 more pages than our first edition.
As we bake through the basic Master recipe from NewABin5 we’ll try to answer some of the most frequently asked questions. The goal is to create a large batch of dough that stores in the refrigerator for up to two weeks. That’s why our method saves you so much time– all the mixing and prep is divided over four one-pound loaves.
Master Recipe from The New Artisan Bread in Five Minutes a Day: The Discovery That Revolutionizes Home Baking:
3 cups (1 1/2 pounds/680 grams) lukewarm water (you can use cold water, but it will take the dough longer to rise. Just don’t use hot water or you may kill the yeast)
1 tablespoon granulated yeast ( you can use any kind of yeast including products labeled as instant, “quick,” rapid rise, bread machine, active dry, or even fresh cake yeast (which isn’t granulated)*. You can also decrease the amount of yeast in the recipe by following the directions here. Or you can bake with a sour dough starter, see instructions here.)
*If you use cake yeast you will need 1.3 ounces (37g).
1 to 1 1/2 tablespoons Morton Kosher Salt (adjust to suit your taste or eliminate it all together. Find more information here)
6 1/2 cups (2 pounds/910 grams) all-purpose flour (the recipe’s tested with typical supermarket flour. If you use a higher protein flour check here)
Mixing the dough:
In a 5 or 6 quart bowl or lidded dough bucket (the lid is sold separately), dump in the water, and add the yeast and salt.

Because we are mixing in the flour so quickly it doesn’t matter that the salt and yeast are thrown in together.

Dump in the flour all at once and stir with a long handled wooden spoon or a Danish Dough Whisk which is one of the tools that makes the job so much easier!

Stir it until all of the flour is incorporated into the dough, as you can see it will be a wet rough dough.

Put the lid on the container, but do not snap it shut. You want the gases from the yeast to escape (you can put a little hole in the top of the lid so that you can close the lid and still allow the gases to get out. It doesn’t take much of a hole…

Allow the dough to sit at room temperature for about 2 hours to rise (it may take longer). When you first mix the dough it will not occupy much of the container.

But, after the initial 2 hour rise it will pretty much fill it. (If you have decreased the yeast you will have to let it go longer than 2 hours.) DO NOT PUNCH DOWN THE DOUGH! Just let it settle by itself.

The dough will be flat on the top and some of the bubbles may even appear to be popping. (If you intend to refrigerate the dough after this stage it can be placed in the refrigerator even if the dough is not perfectly flat. The yeast will continue to work even in the refrigerator.) The dough can be used right after the initial 2 hour rise, but it is much easier to handle when it is chilled. It is intended for refrigeration and use over the next two weeks, ready for you anytime. For the first two days of storage, be sure to leave the lid open a crack, to allow gasses to escape. After that, you can usually snap down the lid on plastic contains without problems, because they’re usually not entirely airtight. BUT, DON’T SEAL GLASS CONTAINERS OR THEY MIGHT SHATTER. The flavor will deepen over that time, developing sourdough characteristics.

The next day when you pull the dough out of the refrigerator you will notice that it has collapsed and this is totally normal for our dough. It will never rise up again in the container.

Dust the surface of the dough with a little flour, just enough to prevent it from sticking to your hands when you reach in to pull a piece out.

You should notice that the dough has a lot of stretch once it has rested. (If your dough breaks off instead of stretching like this your dough is probably too dry and you can just add a few tablespoons of water and let it sit again until the dough absorbs the additional water.)

Cut off a 1-pound piece of dough using kitchen shears* and form it into a ball. This video shows the technique for shaping this very wet dough.
Place the ball on a sheet of parchment paper… (or rest it on a generous layer of corn meal on top of a pizza peel.)
*Sewing Shears can be nice because of the long blade. I just dedicated a pair to the kitchen.

Let the dough rest for at least 40 minutes, (although letting it go 60 or even 90 minutes will give you a more open hole structure in the interior of the loaf. This may also improve the look of your loaf and prevent it from splitting on the bottom.) You will notice that the loaf does not rise much during this rest, in fact it may just spread sideways, this is normal for our dough.
You can also try our “refrigerator rise trick,” shaping the loaves and then immediately refrigerating them overnight. By morning, they’ll have risen and are ready for the oven after a brief room-temp rest while the oven preheats (click for instructions).
Preheat the oven to 450 degrees F. with a Baking Stone* on the center rack, with a metal broiler tray on the bottom (never use a glass vessel for this or it will shatter), which will be used to produce steam. (The tray needs to be at least 4 or 5 inches away from your stone to prevent it from cracking.)
*(or Cast Iron Pizza Pan– which will never crack and conducts heat really well. Be careful to dry it after rinsing with water or it will rust)

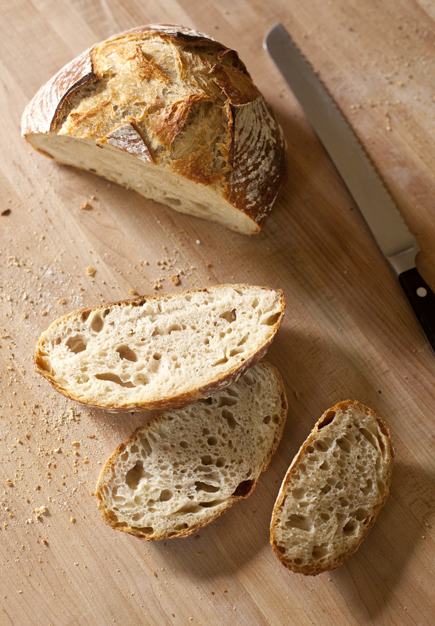
Cut the loaf with 1/4-inch deep slashes using a serrated bread knife. (If your slashes are too shallow you will end up with an oddly shaped loaf and also prevent it from splitting on the bottom.) If your dough is collapsing when you make the slashes, it may be that the dough has overproofed or your knife it dull and dragging the dough too much.

Slide the loaf into the oven onto a preheated stone (the one pictured below is cast iron) and add a cup of hot water to the broiler tray. Bake the bread for 30-35 minutes or until a deep brown color. As the bread bakes you should notice a nice oven spring in the dough. This is where the dough rises. To insure that you get the best results it is crucial to have an Oven Thermometer to make sure your oven is accurate.

If you used parchment paper you will want to remove it after about 20-25 minutes to crisp up the bottom crust. Continue baking the loaf directly on the stone for the last 5-10 minutes.

Allow the loaf to cool on a rack until it is room temperature. If you cut into a loaf before it is cooled you will have a tough crust and a gummy interior. It is hard to wait, but you will be happy you did! Make sure you have a sharp serrated bread knife that will not crush the bread as you cut.

If you have any leftover bread just let it sit, uncovered on the cutting board or counter with the cut side down. If you cover a bread that has a crust it will get soggy.
Enjoy, have fun baking, and check out the FAQs page if you’re having trouble getting the bread to turn out the way you’d like.
Note: BreadIn5.com is reader supported–when you buy through links on the site, BreadIn5 LLC earns commissions.
Hi – I just made my first batch of dough and loaves this week. I have a pound of dough left in the bucket. My question is, if I want to make more dough should I add the yeast, or only the flour and water? Will the remaining pound of dough act like a starter?
Thanks so much! Just started your show, Zoe Bakes, and loving it…getting into baking for the first time!
Hi Beth,
I am so thrilled you are watching the show! Here is a post that may be of help when working with dough that’s left in the bucket. It is possible to add another batch to a full pound of dough, but it may be a lot for the bucket to handle. https://artisanbreadinfive.com/2015/05/20/fresh-bread-made-with-older-dough/
Thanks, Zoë
I have made this a few times and so in love with the process but the bread keeps coming out extremely dense. Any tips on how to get a lighter more airy bread?
Check this out: https://artisanbreadinfive.com/2008/02/10/qa-dense-crumb/
what kind of flour are you using
Hi Edward,
We tested all the recipes with Gold Medal Flour, but here is a post about others: https://artisanbreadinfive.com/2008/02/10/qa-flour-and-water/
Thanks, Zoë
My dough is extremely wet and flat. Much more moisture than I see in the picture. I tried with Gold Medal and King Arthur.
How did you measure the flour? It just sounds like you need more
Hello! Thank you for this tutorial My question, which sound a bit dumb, is after it has risen for 2 hours and you put it in the refrigerator, do I tighten down the lid on the container, or do I continue to keep it ajar. Thank you in advance!!
Kris
First off, don’t use glass jars with a threaded lid which, which can shatter if you’re not very careful. Many plastic lids don’t make an airtight seal so you can tighten them right away. Almost all of them can be fully tightened after about 2 days. Leave them open a crack before that
I love this recipe! It’s so versatile. I’ve been making this bread for a month now, always making the new dough in the tub without washing it in between. The flavor has improved with doing this, like a sourdough starter. My question is if I should wash out the tub sometimes (maybe once a month?), or if it will continue to safely build a strong flavor if I keep making dough in the same tub, without washing in between. Love this recipe, and the show! Thank you!
I can’t really comment on the safety except to say that so long as there are no eggs and butter, things should go well. I’d wash it once a month.
I don’t see any sugar to feed the yeast in this recipe. Is that an error or does the recipe not need the sugar?
No error, the yeast can live on the complex carbohydrates in the flour!
Love the show Zoe. From the episode for Easy Breads, I want to make the dough and copy your breads as well but I’m not sure about oven temperature and how long to bake the bagette and epi. 475 seems really hot for such a small loaf. Thanks.
Hi Jeanette,
Thank you for watching! The baguette only bakes for about 20-25 minutes at that temperature, so it will be crusty and caramel brown.
Enjoy, Zoë
We are so loving your show! The Bread episode makes this process look so easy and I’m planning to give a go this week! Your explanations are very clear and you make us feel like we are sitting right there in your kitchen with you! Your tours of the bakeries are always interesting. Keep up the great work!
Hi Kaylar,
Thank you so much for watching, I am thrilled you will be baking the bread, it really is just that easy!
Cheers, Zoë
Why is there no sugar in this recipe?
Hi Kathy,
The starch from the flour actually turns to sugar and is enough to feed the yeast. You can use sugar to speed up the process or if you like sweeter bread, but it isn’t necessary.
Thanks, Zoë
Can I use this same technique with my sour dough starter? Thank you.
Hi Bridgette,
Here is a post that may help: https://artisanbreadinfive.com/2020/04/20/easy-sourdough-starter-with-new-troubleshooting-tips/
Thanks, Zoë
What gluten-free flour would you recommend using with this recipe? My daughter needs to be gluten-free and I’m trying to find an easy but good gluten-free bread recipe. I watched your show Zoe Bakes Bread on the Magnolia Network and this seems like something I might be able to do, if only with gluten-free flour.
Thank you
Hi Elane,
Thank you so much for watching. We have an entire book dedicated to gluten-free bread. We haven’t found a commercial GF flour blend that makes a loaf that we love, so we blend our own flour. The Better Batter brand is the closest we’ve come, but I suggest you make a small batch to make sure you like the results. It is best to use our recipes that are formulated to GF.
https://artisanbreadinfive.com/2010/01/05/gluten-free-crusty-boule/
https://artisanbreadinfive.com/2014/11/03/master-recipe-from-gluten-free-abin5/
Thanks, Zoë
Thank you for your response. I want to order your GF bread book, but want to make sure that “Gluten-Free Artisan Bread in Five Minutes a Day: The Baking Revolution Continues with 90 New, Delicious and Easy Recipes Made with Gluten-Free Flours” Hardcover – October 21, 2014, is the latest version before I order from Amazon.
Thank you, Elaine
Hi Elaine,
Yes, that is the latest one!
Enjoy, Zoë
Thank you so much for sharing this recipe and technique! I have made this twice and each loaf is better than the one before. The best was a boule brushed with olive oil and sprinkled with oregano, feta cheese and Greek olives. The family just sat and ate the whole thing. This recipe gives the pleasure of fresh bread every day without being stuck in the kitchen all day.
Looking forward to experimenting with new flavor combinations in the batches to come.
Hi Rebecca,
We’re so glad you’re enjoying the bread, love your flavors!
Enjoy, Zoë
Can you make regular loaves of bread with this dough
Sure, assuming you mean loaf-pan breads. See another post on that, but there’s much more in my books:
https://artisanbreadinfive.com/2010/10/04/loaf-pan-breads-work-beautifully-with-our-method-free-giveaway-of-terrific-bread-pans-and-other-baking-equipment-from-red-star-yeast/
What temperature is the Boule baked at? I’ve gone over the show several times and still didn’t catch the temperature that the dutch oven was preheated at and the bread is baked at.
Scroll down in the post you’re commenting on, it’s right there. Let me know if you don’t find it in case something’s wrong with this web post!
Oh my goodness, so freaking good!! I saw it on the show and made the dough an hour later. The dough sat in the fridge for about 40 hours before I got my hands into it today and it’ll probably all be gone by the end of the night. I made baguettes and the first one was gone within 10 minutes. It’s so moist on the inside and you get that nice chewy crust. I think this will definitely be made on a weekly basis!
Hi Kerstin,
I’ve so glad you saw the show and enjoyed the bread!
Cheers, Zoë
Im in a predicament! I made my dough. Pretty sure the measurements were correct, but it looks so much drier than the “zoe photo” dough. I need to fix quick or toss and start again
Hi Robin,
It may be the kind of flour, but you can always add more water and make it a bit wetter.
Thanks! Zoë
I am planning on making this (I used to make it when your first book came out). Assuming the dough has had its initial rise and is now stored in the fridge, am I able to make fruit buns incorporating raisins and dried cranberries? From the video, no kneading is apparent, just the shaping of the dough. Can I take a hunk of the dough, knead the fruit into it and carry on with the rest of the instructions?
Hi Elsie,
Yes, you absolutely can, you’ll just want to add some time to the rest time after you shape the loaf to make sure it rises enough after kneading.
Thanks, Zoë
I would love a printable recipe for this bread. Any idea where I can find that?
Hi Cindy,
All of our recipes are in our books and many of them are here on the website! The recipes on this site are not printable as of now.
Thanks, Zoë
Bless you. I’ve wanted to make artisan bread. But it always seemed so difficult compared to the home style soft crust I’ve made for years. You showed me how easy it is and I can’t wait to make granddaughter’s favorite cheese bread and mine with dried fruit for breakfast.
Thank you. I’ll not miss future programs.
Hi Kathryn,
We’re so glad you enjoy the bread!
Cheers, Zoë
Hi Zoe and Jeff
I watch your show faithfully and love it. I made the bread recipe almost exactly the same as you posted except that I substituted bread flour for all purpose.
When I went to make the loaf, and I let it sit for the last rise, it just didn’t rise very much at all. Is it because I use the bread flour?
Hi Michele,
Thank you for watching and for baking the bread. The bread flour has more protein, which means it will absorb more water and make a dry dough. If you use bread flour, you need to increase the amount of water in the dough. Here is some more information on flour and making substitutions: https://artisanbreadinfive.com/2008/02/10/qa-flour-and-water/
Thanks, Zoë
Yay! I was just looking for this and wondering what was going on with my dough. When I made a boule the very first time prior to receiving my book, it was so beautiful! It rose fantastic, but then I started mixing bread flour with my AP, and the dough has been wetter and not rising as well. But it tastes fabulous. It is funny, it has reminded me of working with Einkorn which I want to try again. I have the berries to grind, but I’ve just been nervous about it since it doesn’t have the gluten structure of regular flour.
Hmm, surprised by that, since bread flour absorbs more water than AP. Well, keep experimenting!
Can I use a Cast Iron pan for baking instead of pizza stone?
Hi Adriana,
Yes, you absolutely can. It will dictate the shape of the loaf you can make, but it will conduct and radiate heat very well.
Thanks, Zoë
I have your original book and love it. My wife is a nurse and culdnt understand how her co worker had the time to make home made bread. But we have made a life style change. Do you have any suggestions for people on whole food plant based life styles. We can only have whole grains, no oil or eggs, (flax see eggs are OK) and no dairy except plant based milk like almond milk. The oil is my big concern.
Hi Phil,
There are several breads in our Healthy Bread book that will fit your new dietary needs. Some of our readers have used egg replacers successfully, but we haven’t tested them ourselves. You can try replacing oil with water or dairy-free milk, but the texture of the bread may be different. I recommend making small batches of the dough to make sure you like the results.
Thanks, Zoë
I love your show. Please tell me you have more shows coming. I have two of your cook books and love them! Will be giving some books for gifts.
Thank you Linda
Thank you so much, Linda,
We just finished shooting season 2. I’m not sure when it will air, but I am hoping soon and that I’ll get to do a season 3!
Thanks for the note and happy baking! Zoë
My loaves don’t seem to bounce as much as yours. I’m using a French All Purpose Flour (Francine) because a friend who is sensitive to gluten can eat. I’m going to try American All purpose next time and see how it goes. This is an amazing recipe and really takes very little time to make. My bread container is only four cup, but it held the top raise. I might need to get a bigger one if I switch flour!
Hi Ruth,
Flour really changes from one location to another, so the protein content may be different than what we’ve tested it with. If you have access to American AP flour, try that and see if you have more success.
Thanks, Zoë
First, my dough isn’t as wet as yours. I’m not sure why–I’m using unbleached Gold Medal all purpose with the basic dough recipe (I haven’t moved on from that–I just bought the book a couple of weeks ago) and I cover my container in the fridge (I use one of King Arthur’s dough buckets). Maybe it’s the season…or maybe it’s my water? My water is very hard and has quite a high pH — maybe there’s some dough chemistry happening there? Anyway, my dough is far more handleable than your video. Not truly dry, but not as wet as yours. And the dough seems to pull apart when I’m trying to cloak it, making it look shaggy. By the way, after watching your video on gluten cloaking, I’d say that the book isn’t super clear. It’s a longer process with more handling than the book suggests. My dough wasn’t turning into the pretty, smooth balls that the pictures show, so I had to come here.
Yes, the videos make it much easier to see technique– text can be unclear. I’m guessing that your measurement of flour or water are off. Weighing ingredients, both flour and water are a more accurate way. If you’re using cup-measures, be sure to use a liquid cup-measure for the water, and the scoop-and-sweep method for the flour (see this video on that, at https://artisanbreadinfive.com/scoopandsweep). If all else fails, just add a little more water next time, try 2 tablespoons and then go from there.
Thanks for the response, Jeff! I weigh my ingredients for pretty much any baking I do now (the pandemic gave me plenty of time to obsess over how to bake “right” 😉 ). And I’ve done two batches with the same results, so it seems unlikely that it’s a matter of being off in my measurement. I might just try adding a little extra water. Of course, about the time I do that, I’ll end up with a too wet batch because the flour is wetter or something. 😛 I did a loaf today after watching the video, and it seems a bit better. But it still suffered from having a rough spot that appears to be a break in the gluten cloak. No amount of trying to rebuild the cloak over that spot seemed to help. And the bread kind of burst out of there during baking. It will still taste good, but it certainly isn’t a beautiful loaf.
See what you think with the wetter dough. If you’re not already doing it, go for a 90 minute resting time before baking.
Hi, I’d like to use my standard Remoska to bake a loaf. Is that even possible?
Thanks
I’m afraid we’re not familiar with this product here in the United states. If the manufacturer recommends bread baking with it, my guess would be that our dough will work in it also.
I took the plunge and tried it – it turned out beautifully.
Excellent!
Love this recipe! I have two dough buckets I usually keep in my fridge now and I haven’t purchased a loaf of bread from the store in 5 months. I’ve made several loafs from it and all different sizes. I’ve also tried several different yeasts and redstar definitely has the best rise. I can’t find the red star platinum yeast anywhere though. Would love to try that.
Thanks for the kind words! Try this link to find a store nearby that sells the Platinum product: https://redstaryeast.com/find-a-store/ . Or contact Red Star at https://redstaryeast.com/contact-us/ (tell them I sent you!) fyi— Red Star/Lesaffre provides yeast samples for recipe testing, and sponsors BreadIn5’s website and other promotional activities.
Hi! Did this recipe recently change from grams to pounds? Trying to find the grams version!
The full detail on that recipe is in The New Artisan Bread in Five Minutes a Day (on Amazon at https://amzn.to/17Rw23Y) — the gram equivalents appear in the web-version.
Can I bake this in a preheated Dutch oven? Love your show, Zoe!
Hi Raechel,
Thank you so much! Yes, you sure can! Here is a post about doing just that: https://artisanbreadinfive.com/2009/03/11/baking-bread-in-a-dutch-oven/
Enjoy, Zoë
Convection or Conventional oven for the bread? I have convection, so I adjust bake times. BTW…..I need more episodes!!! Love your show!
Both work, but convection, in some ovens gives more Browning, and shorter baking times.
How many 1 lb. loaf would the full recipe make? I am sure you’ve answered this question before, but your feed is very long and I cannot find your previous answer!
If you do it exactly as written, it makes 3.6 pounds of dough, so you get four 0.9 lb loaves (before baking’s water loss). If you want more generously sized loaves, you can proportionally scale up all the ingredients.
Zoe or Jeff,
I’m so ready to make my first loaf but I have 1 question. When I refrigerate my leftover dough, should the top remain loosely on the container or can it be place snuggly on the container?
For the first two days of storage, be sure to leave the lid open a crack, to allow gasses to escape. After that, you can usually snap down the lid on plastic contains without problems, because they’re usually not entirely airtight. BUT, DON’T SEAL GLASS CONTAINERS OR THEY MIGHT SHATTER.
Can this recipe be baked in a dutch oven?
Yes, type Dutch Oven into this websites search bar
I love this bread so much! Have you tried making it in a Dutch oven? Would it work okay?
Sure… Input “Dutch oven” into this site’s search bar.
Can the basic recipe be halved? I have a smaller refeigerator so space is limited.
Sure can!
I have been baking your bread for years and your pizzas…have made so many recipes from your cookbooks- LOVE the cinnamon rolls. With that being said, have you ever tried baking your bread in an air fryer? I know using basic recipe I’d probably only use 1/2 of the dough due to size of my Ninja XL Foodi Grill but was just curious if anyone has ever tried it that you know of? Many thanks….Happy fall!
And to you also! I don’t have an air fryer, and readers have not weighed in on this, to my surprise. Is it would work about the way it does in crockpot? Assume you have that recipe?
I have been making this successfully for the last few weeks and gotten through a bunch of batches of dough. Recently i started using less yeast and letting it rise longer and I’m noticing the dough seems more “moist” and dense before the initial rise, after the rise, after baking, etc. I’ve also noticed the crust is not as crispy…more soft.
Neither of these things are necessarily bad, but just wondering if those changes are because of less yeast? Or do you suspect something else changed?
Thanks!
Hmmm. I haven’t heard this before, but I can’t connect it to the yeast dose. I’d just go with the amount that gives the bread you prefer.
I have been baking Zoe and Jeff’s breads (baguettes, boules, mini baguettes, pain d’epi, dinner rolls, etc.) for quite sometime now – learned how on The Great Courses/Wondrium – with great success and I am 100% hooked! Now I am following the Mediterranean diet, so I just tried my hand at the 100% whole wheat bread from “The New Artisan Bread in Five Minutes a Day” (2013) … and while the loaf didn’t seem to rise as much in the oven as the master recipe loaves, my husband and I just cut into it – it’s delicious! Not at all dense/heavy as I expected, but still nutty whole wheat flavored. I will keep on baking more whole grain and other breads – thanks, Zoe and Jeff!
Fantastic, Lynne, so glad you’re enjoying. Much more whole grain stuff in my other book focusing on that in particular, at https://artisanbreadinfive.com/healthy
Just made my first loaf, only half a recipe in case it was a disaster. Turned out well, I think. I made it same day after a 2 1/2 hour rest in fridge. Question: I keep my home cool, as in 64 degrees and it was about 30 outside. It’s obviously too cool for good rest/proofing. Any suggestions? Put in warmed oven? Thanks.
You could just have it spend more time in your cool homes. Room temperature environments, maybe doubling or tripling the proofing time. Another option would be to put it in an unheated oven with the light on, which sometimes warm things up or with a pan of hot water on the bottom shelf, but again no heat on.
Very interesting. I really like the tutorial. I will truly start using your dough all the time from now on. Thanks a lot. I have been baking bread quite a bit, but this additional tutorial/knowledge is a wonderful thing.
How many loafs do you get in 1 recipe ?
For small ones, slightly less than 1 lb each.
Jeff,
Can you use Almond flour to make it Gluten free? Just wondering
Well, Peter Reinhart has spoken well of my books (https://artisanbreadinfive.com/2009/11/15/thanks-peter/), and I’m all too happy to speak of his. Here’s why–my recipes really won’t work with a 1:1 swap for nut or legume flours to avoid wheat and gluten. Peter is the dean of American bread-bakers, and he did a whole book on this, The Joy of Gluten-Free, Sugar-Free Baking (on Amazon at https://amzn.to/3tNYxPX). It’s not mostly bread, but there are a few. I’m not certain that they’re yeasted–might be quick breads.
I’ve been baking with this recipe for a few weeks now primarily using a preheated and well seasoned cast iron skillet. I’ve recently started to notice that there is black material (presumably the seasoning/coating) peeling substantially off the underside of the skillet. I’m concerned that this is from the steam’s effect on the skillet, being placed directly underneath it and all.
Has anyone else experienced this and can confirm it happens to cast iron? Perhaps I should switch to a baking stone after all, but I didn’t want to have to buy another item for my kitchen for this recipe. Thanks for any advice!
I haven’t personally seen this, but I wouldn’t be surprised that the seasoning is peeling, especially if it wasn’t all that well-adhered in the first place. One option would be to keep re-seasoning it, Lodge has a nice post on this at https://www.lodgecastiron.com/discover/cleaning-and-care/cast-iron/all-about-seasoning. And I have more about stones at https://artisanbreadinfive.com/2010/08/24/pizza-stones-which-creates-the-best-crust/
I have ordered the newest 5 minute bread book & 6 quart container, but will not receive until after Christmas; the same with the platinum yeast. I have a dough whisk that is a little different but worked great on my first attempt. I had a 3 quart container that I mixed up half the recipe last evening and refrigerated until this afternoon and made a boule. I am so exited, it turned out so nice and rose really well even with my old standby yeast. I don’t know if there is a way to upload a photo, but I have tried so many times to do this and failed, so this makes me feel so good. I was trying previously with fresh milled einkorn with a sourdough starter, and I would really love to be able to make a boule with that dough if I can. I have researched and didn’t see einkorn mentioned in any of your books, so if I am successful using this method, I will be ecstatic.
Ah yes, einkorn. I thought about seeking it out for the whole-grains book (“… The New Healthy Bread in Five…”), but it wasn’t commonly available, and there weren’t that many requests for it here on the website. My guess is that einkorn will behave approximately like regular whole wheat, but with not quite as much rise. It might need the addition of vital wheat gluten (like in the basic recipe from “Healthy Bread,” at https://artisanbreadinfive.com/2016/10/30/our-new-book-healthy-bread-in-five-minutes-a-day-is-released-tomorrow-get-yourself-some-vital-wheat-gluten-and-make-our-whole-grain-master-recipe/
Glad you’re having success with the recipes…
Thank you so much for this information Jeff. I will get some vital wheat gluten and try that. It’s funny, I just made bread a couple of days ago and tried to use my Banneton proofing basket and it was way to wet of a dough and reminded me of trying it with Einkorn. Maybe because I used almost half bread flour with AP, that was why it was so wet? Lots to learn.
Hmm, surprised by that, since bread flour absorbs more water than AP. Well, keep experimenting!
Can you use this dough for Dutch oven baking as well?
Sure can, just type the words “Dutch Oven” into the Search Bar above for instructions, but much more in the books, at https://artisanbreadinfive.com/buying-our-books
If I wanted to use this dough for a focaccia, would that work/would I need to add anything to the dough?
Yes, go ahead and type focaccia in the search bar above. Much more in the books
Hey, just a quick question if you ever made the dough after 14 days has passed? I made my dough and used part of it, then went traveling. Now that I’m back, I want to use up the last of the dough. Curious your thoughts on how long you can really store it before it needs to be tossed.
I’ve used it at up to 30 days, but at about 3 week mark, most people other than me found it too sour tasting, and the rise isn’t great. One thing you can do with it is freeze it in small amounts and use it to start off a new batch with sour flavor.
Thanks! Hard to be to sour for me too. I like your idea of freezing for use later. Brilliant. I baked what I had left and the kids and I devoured it.
Fantastic!
Hello, I would like to make and bake the bread in my RV oven. It doesn’t have a temp up to 450*. Can the bread be baked at a lower temp? I do have a pizza stone.
Sure, you’re just going to have to increase the length of baking. The crust won’t crisp, but it’ll still be good
I was really pleased the way my first loaf came out – until I got to the center. The ends had nice big holes and a nice crumb. The middle of the loaf was quite dense with practically no holes. Followed the recipe to a T. Used 1/2 T instant yeast; let it rise at room temp 4 1/2 hrs; in the fridge overnight; out the next morning and let it rise 70 minutes; baked 37 minutes at 450°.
Have you been through the troubleshooting tips here on the website? Click on Questions/FAQs above.
What is the temperature/cooking time if we want to use a Dutch oven?
(I used to recipe from the show and my dough is in the 90 min rest period when I realized I didn’t know the baking temperature)
Thank you!
Type the words:
“baking bread in a dutch oven” … into my Search Bar above and you’ll get to a post with details. Much more in the books, at https://artisanbreadinfive.com/buying-our-books/
I am using a local stone-milled all-purpose flour that weighs 120 grams per cup, and has ~11% protein. Should I still use 910 grams of flour, or should I adjust the weight to 780 grams, based on this particular flour’s weight per cup? Should I add extra water?
Are you measuring in the flour the way I do? See this video: https://artisanbreadinfive.com/2010/04/28/how-we-measure-our-flour-using-the-scoop-and-sweep-method/
I typically weigh the flour, should I use 910 grams of flour, regardless of what type of flour? Or should I use the scoop and sweep method?
Ah, thank you! That’s very helpful. If you’re weighing, that’s always the first choice, and prevents these problems where cup measures differ. Depending on your technique. Continue to weigh it, and assume you can start with the exact same weight as the recipe. That said, if this is a high protein flour (11% is borderline), you probably going to need a little more water. Go to my fax page above, under the questions tab, and choose the question, as you scroll down, that addresses using different types of flour
So, I have written in before asking about using Einkorn with the Master bread recipe. I decided yesterday to grind the berries I had in a jar and use this method with ½ the master recipe. I took it out of the fridge today and it wasn’t a really wet dough, but sticky. I worked it slightly into a round and folding it and put it aside for, I would say, close to an hour. It did not rise, but flattened out, so I put it in a smaller cast iron pot and baked it and it came out really nice. I did follow Jeff’s suggestion to add Vital wheat gluten, I had no idea how much, so I used a TBLSP. I looked up the Einkorn instructions from the cook book I have and they aren’t a lot different, other than it states to leave the dough in a cool dark place for 10-15 hours. They were referring to in a cabinet or countertop, not fridge. But I did the fridge as per your book. I have photo’s but can’t upload them here, but if you haven’t eaten Einkorn, it has such a wonderful flavor compared to modern day flour and I did not sift any bran out, but left it whole grain. It has a nice nutty flavor, and I did get a rise, not like with conventional flour, but a decent rise. I have a 5 lb. bag of berries I am now looking forward to working with again. This has given me a bit more confidence to tackle that.
Fantastic, thanks for sharing all this information. At some point in the near future, I’m going to be trying Einkorn as well
I just got your book and am taking the class on Craftsy with Zoe. I have made a lot of single loaves and want to make the big batch but my problem is I have a small fridge which cannot handle the bucket shown. So I will have to find a smaller container (or could I perhaps make 3 loaves instead of 4?) And if you can suggest the amounts for 3 loaves that might work well for me. Much appreciated. Love making this bread.
My suggestion would be to just halve all the ingredient amounts and then you’ll have something that will fit in your fridge. Unless I’m misunderstanding the question.
My mother was a bread maker so there was no way I was eating store bought bread when I finally got on my own. She bought her big blue bread pan and cover with her first family allowance cheque in the late 50s. I was gifted it years later and carried on her tradition of making big batches of bread. It truly took up most of my day. When my sister introduced me to your 5 minute bread dough, I was skeptical to say the least. Fast forward a year and your bread is the bread I make the most. I have bought your newest Artisan Bread cookbook as gifts for birthdays, Christmas, wedding showers, and “just because” occasions. It is a hit! I never thought Mom’s bed pan would retire to become a conversation piece but I am thankful for all the time I have gained by switching to your delicious bread recipes. I do still make the traditional more time consuming Montreal bagel recipe but I am going to try your quicker Montreal bagel recipe soon. Thank you Jeff Hertzberg and Zoe Francois!
Fantastic Mary, thanks for the kind words. Glad the recipes are working for you.