In Artisan Bread in Five Minutes a Day, we talked about a way to get steam into the oven to create a great, crispy, caramelized crust on lean (un-enriched) loaves: pouring water into a pre-heated METAL (not glass) broiler tray or other pan just before you close the oven door. To be extra-safe about your glass oven window, protect it from the water with a towel before you pour the water; remove the towel before closing the oven door. Some older non-tempered glass windows can crack if you get water on them when they’re hot. This metal-tray method works well in most ovens.
But some ovens are a bit temperamental about this. Really large ovens, or really well-vented ones, and in many cases, professional-quality ovens installed in homes, seem to let the steam escape and you end up with a dull, pale-colored crust that never gets crisp. We’ve got a video of some excellent alternatives… Read More
… …and I’m having trouble finding time to finish editing the video. Zoe and I have two more busy weeks of last-minute editing for our pizza and flatbread book (which will be out in October of 2011). I’ll get the new video up here as soon as possible (on how to get steam into your oven), but meanwhile here’s a re-print of an old post– on roasted red pepper fougasse– a gorgeous stuffed flatbread from France, which looks ahead to next year when we’ll be talking about flatbread all the time. Read More
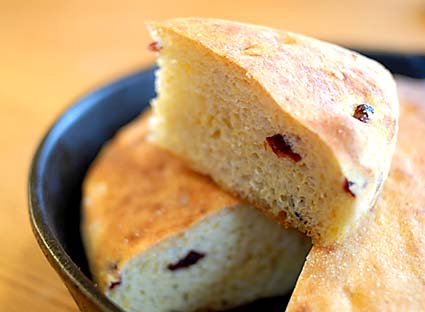
It will soon be American Thanksgiving, so I thought I’d re-post our Thanksgiving Cranberry Corn bread. It’s based on the Portuguese Broa style (page 151 in the book)—it’s the regular Master Recipe, but with 1 1/2 cups of all-purpose flour taken out and replaced with an equal amount of cornmeal.
People think of artisan-style loaves as being free-form, but my high-moisture, stored-dough method also works beautifully in loaf pans. Read on to hear more about getting great results with traditional un-coated loaf pans.
In the books, I’ve tended to be on the careful side about loaf pans. Since this dough is so wet, I recommended non-stick pans and even so, to grease them well. Yet a very heavyweight aluminum pan works beautifully too– all you have to do is grease it well (I like olive oil even for American-style breads but you can use any liquid or solid shortening you like):
… and be sure the formed dough is well dusted with flour before putting it into the pan— it shouldn’t feel all sticky as it goes in. If it does stick a bit, just let it sit for 10 minutes after taking it out of the oven and it will “steam” itself out. I love this pan, and when I say it’s heavyweight, I mean it. The pan weighs a full pound…
This was a big loaf 2 pounds, 5 ounces of dough, using my Master Recipe. Loaves this large need to rest for 90 minutes after shaping, and they tend to need extra time in the oven. For this size, a lean dough needs 45 to 60 minutes at 450 degrees F, and enriched doughs will need about an hour at 350. Or more. If you’re finding that there’s over-browning or scorching in your oven at this temp, try again 25 degrees lower (Fahrenheit) and increase the bake-time by 10 or 15%. Go by the loaf color and the firmness of the crust:
A reader recently asked about REALLY big loaves, in a 16-inch long pan (but still 4 inches by 4 inches h*w), in a pan like this one. That’ll work too, but you need a lot of dough: 54 ounces / 1530 grams, almost a full batch of my Master recipe. Have a great fall, and follow on Twitter, and on Facebook too…
Red Star Yeast (Lesaffre Corp) sponsored this post, and supplied yeast for recipe testing.
Note: BreadIn5.com is reader supported. When you buy through links on the site, BreadIn5 LLC earns commissions.
This Labor Day weekend is summer’s last hurrah for those of us in Minnesota (more on that in a minute). I’m just back from a fantastic camping trip, and as always, we did our flatbread in a cast-iron or other heavy skillet, right on the camping stove (I’ve always used the Coleman). You can use any lean dough, either from The New Artisan Bread in Five Minutes a Day, or from The New Healthy Bread in Five Minutes a Day. Your skillet must have a cover, but that’s about all the equipment you’ll need. This is pretty similar to the naan we do in Artisan Bread, and at this link here on the website.
We Minnesotans pride ourselves on taking winter in stride. The other thing we seem to have pride in is the shape of our state– it seems to work its way into road signs and even macaroni and cheese pasta shapes. So with great delight, I reveal to you: grilled bread in THE SHAPE OF MINNESOTA:
OK, it was an accident. My wife claims that this does not really resemble the state:
Well, use a little poetic license, especially for the Arrowhead region? Other posts on grilled or summer breads are at: Read More
First off, sorry for the loud cricket sounds– couldn’t do anything about that, because…
It’s still summer, and I’m still grilling bread, but I wanted to show how to roll dough exceptionally thin for crackers use the outdoor grill as an oven. The key with crackers is to prevent them from getting scorched. In Artisan Bread in Five and Healthy Bread in Five we talk about doing crackers at in the 375 – 400 degree F. range (190 – 200 C), and that definitely helps prevent scorching. You can also use oil on the crackers, and that helps too. But oil does increase the baking time– my crackers took 20 to 30 minutes to get crisp. And that range depends on whether you get them truly paper-thin. The thicker ones take a little longer. So be more patient than I am and get it to less than 1/16-inch thickness– you should almost be able to see through it.
One other tip: If you bake large flat crackers and don’t cut them before baking, “dock” (puncture) them with a fork before baking or they might puff, which you don’t want with pita.
The idea of crackers has always to have a crisp dried result that stored well– as you can see in the video, these didn’t last long enough to test the theory. And remember: serious bakers wear closed-toe footwear!
The heat wave isn’t nearly as bad in Minnesota as it is in on the East coast, but I can’t say that I’m itching to fire up the oven and bake fresh buns for hot dogs or bratwurst. It’s a cinch to do it on the same grill that you use for your hot dogs or bratwurst, and this video shows you how. Use any lean dough from either of our books, Artisan Bread in Five Minutes a Day, or Healthy Bread in Five Minutes a Day. If anything in the video’s unclear, just visit back and post a question into the “Comments” field.
One word of caution: I can’t vouch for the durability of baking stones placed on a gas grill. I haven’t had any trouble with my half-inch thick stone but the thin ones crack at the drop of a hat. My guess is that if you call any stone manufacturer, they will tell you not to do this. None of them warrant stones against cracking (one company did in the past, but they’ve withdrawn that). I haven’t been listening.
This summer, the son of one of our book’s first testers started a bread business and is delivering bread door to door, by bicycle, right here in Minneapolis. Check out Bicycle Bread… They were recently featured in the Southwest Journal and were on TV, on Fox9 News (click here to view).
Another interesting little home-town business is the Gourmet Girls, who are making fresh breads using our books as the recipe resource. Send an e-mail to inquire about homemade artisan bread via local delivery (southern Westchester County, NY).
Click here if you’d like to see the list of past postings on summer grill-breads again… Read More
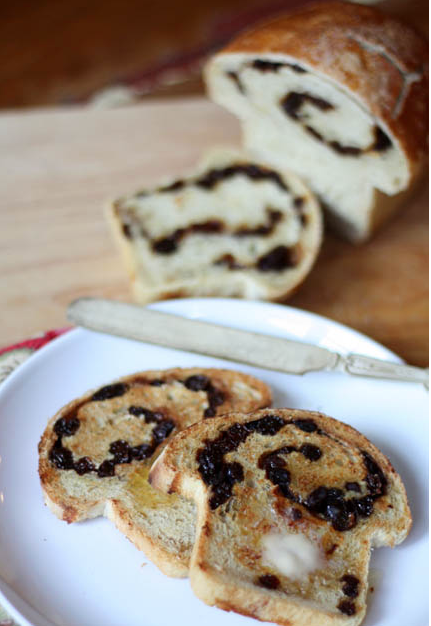
In case you have one of our lean doughs in the fridge (no enrichment or sweetener), but you want to bake up a morning bread or other sweet buttery thing, hope is not lost. I started with our basic light whole wheat recipe, and rolled some delicious things into it.
More about rolling in the fruit, brown sugar, and butter…
After mixing the dough, our recipes only require two hours at room temperature for their initial rise (assuming you’ve used lukewarm water); then the container goes into the refrigerator where it can be stored for up to two weeks (depending on the recipe). According to the U.S. Department of Agriculture, the answer to this question depends on whether or not there were eggs in the recipe. Their website says that eggs should be refrigerated after two hours at room temperature (see their website, scroll down to relevant section).
For our doughs without eggs, when we’ve occasionally forgotten a batch and left it on the counter overnight, we’ve found that this has little effect on the final result, maybe just shortens the batch life by a day or two. If you find that you aren’t getting enough rise in two hours for non-egg dough rising at room temperature, you can go longer.
So, what would USDA recommend if you’re doing a long rise with dough containing eggs? Sounds like the first two hours are safe at room temperature, then into the refrigerator to complete the rising. We leave it to our readers to decide about how to handle egg doughs in light of USDA’s recommendation.
When people write to tell me that their dough seems “too wet,” the first question I ask is: how are you measuring? Because I measured with the “scoop-and-sweep” method, not the “spoon-and-sweep” method.–view the video to see exactly how I do it.
American recipes usually are based on volumes, measured with standardized measuring cups. If you press down into the flour bin (use a flour bin, not the flour’s bag), you’ll compress and get too much flour. If you use the “spoon-and-sweep” method, where a spoon is used to gently fill the measuring cup before sweeping, you’ll get too little flour into the cup. Likewise, don’t “aerate” the flour by mixing it or whisking before measuring; that will lighten the cup.
If you do it the way I tested it (and use flours like the standard ones I tested with), you’ll get results like you see in our photos and videos. You can also consider weighing flour, using the weight equivalents that appear in all our books starting in 2009. There’s more about using weighing flour in this post; I use this scale.
Side issue: ignore what I said in the video (made some years ago) about bleached flour absorbing less water than unbleached–it’s not true anymore. Modern bleaching doesn’t include anything that decreases protein content. I prefer unbleached flour just to avoid the chemicals and because I love the richer color of the crumb that you get with unbleached, but it won’t affect the measuring or the ability to absorb water.
Note: BreadIn5.com is reader supported. When you buy through links on the site, BreadIn5 LLC earns commissions.