Back to Basics ~ tips and techniques to create a great loaf in 5 minutes a day.

Note that there is an updated version of this post, click here to view.
Recently we have seen lots of new readers on the website who are asking wonderful questions about how to perfect their loaves. First I’d like to say welcome to the site and thank you for trying the bread. As I bake through the basic Master recipe from ABin5 I will try to answer some of the most frequently asked questions and also introduce you to a few new pieces of equipment I’ve recently started to use that make the whole experience just a little easier. The goal is to create a large batch of dough that stores in the refrigerator for up to two weeks. That’s why our method saves you so much time– all the mixing and prep is divided over four one-pound loaves.
Master Recipe from The New Artisan Bread in Five Minutes a Day: The Discovery That Revolutionizes Home Baking:
3 cups lukewarm water (you can use cold water, but it will take the dough longer to rise. Just don’t use hot water or you may kill the yeast)
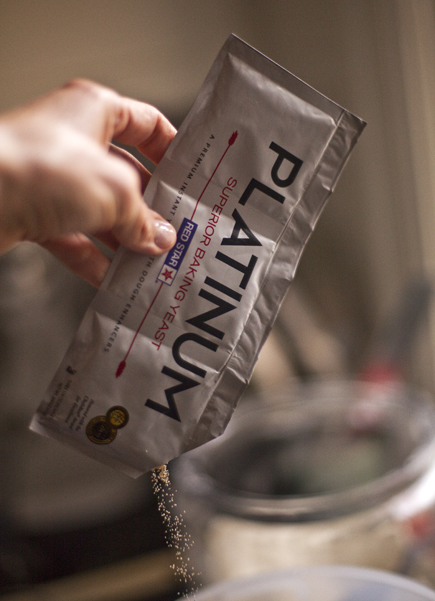
1 tablespoon granulated yeast ( you can use any kind of yeast including: instant, “quick,” rapid rise, bread machine, active dry, or fresh cake yeast*. We’ve always tested with Red Star Yeast and they have a new premium product called PLATINUM, which has worked beautifully in our recipes. You can also decrease the amount of yeast in the recipe by following the directions here. Or you can bake with a sour dough starter, see instructions here.)
*If you use cake yeast you will need 1.3 ounces.
1 to 1 1/2 tablespoons Morton Kosher Salt (adjust to suit your taste or eliminate it all together. Find more information here)
6 1/2 cups (2-pounds) all-purpose flour (we tested the recipes with typical supermarket flour. If you use a higher protein flour check here)
Mixing the dough:

In a 5 or 6 quart bowl or lidded Food Storage Container, dump in the water and add the yeast and salt. Because we are mixing in the flour so quickly it doesn’t matter that the salt and yeast are thrown in together.

(If you are using the fresh cake yeast break it up with a spoon)

Dump in the flour all at once and stir with a long handled wooden spoon or a Danish Dough Whisk, which is one of the tools that makes the job so much easier!

Stir it until all of the flour is incorporated into the dough, as you can see it will be a wet rough dough.

Put the lid on the container, but do not snap it shut. You want the gases from the yeast to escape. (I had my husband put a little hole in the top of the lids so that I could close the lids and still allow the gases to get out. As you can see it doesn’t take much of a hole to accomplish this.)

Allow the dough to sit at room temperature for about 2 hours to rise. When you first mix the dough it will not occupy much of the container.

But, after the initial 2 hour rise it will pretty much fill it. (If you have decreased the yeast you will have to let it go longer than 2 hours.) DO NOT PUNCH DOWN THE DOUGH! Just let it settle by itself.

The dough will be flat on the top and some of the bubbles may even appear to be popping. (If you intend to refrigerate the dough after this stage it can be placed in the refrigerator even if the dough is not perfectly flat. The yeast will continue to work even in the refrigerator.) The dough can be used right after the initial 2 hour rise, but it is much easier to handle when it is chilled. It is intended for refrigeration and use over the next two weeks, ready for you anytime. The flavor will deepen over that time, developing sourdough characteristics.

The next day when you pull the dough out of the refrigerator you will notice that it has collapsed and this is totally normal for our dough. It will never rise up again in the container.

Dust the surface of the dough with a little flour, just enough to prevent it from sticking to your hands when you reach in to pull a piece out.

You should notice that the dough has a lot of stretch once it has rested. (If your dough breaks off instead of stretching like this your dough is probably too dry and you can just add a few tablespoons of water and let it sit again until the dough absorbs the additional water.)

Cut off a 1-pound piece of dough using kitchen shears* and form it into a ball. For instructions on how to form the ball watch one of our videos. Place the ball on a sheet of parchment paper… (or rest it on a generous layer of corn meal on top of a pizza peel.)
*I actually use a pair of Sewing Shears because I like the long blade. I just dedicated a pair to the kitchen.

Let the dough rest for at least 40 minutes, (although letting it go 60 or even 90 minutes will give you a more open hole structure in the interior of the loaf. This may also improve the look of your loaf and prevent it from splitting on the bottom. ) You will notice that the loaf does not rise much during this rest, in fact it may just spread sideways, this is normal for our dough.
You can also try our “refrigerator rise trick,” shaping the loaves and then immediately refrigerating them overnight. By morning, they’ll have risen and are ready for the oven after a brief room-temp rest while the oven preheats (click for instructions).
Preheat the oven to 450 degrees with a Baking Stone* on the center rack, with a metal broiler tray on the bottom (never use a glass vessel for this or it will shatter), which will be used to produce steam. (The tray needs to be at least 4 or 5 inches away from your stone to prevent it from cracking.)
*(or Cast Iron Pizza Pan– which will never crack and conducts heat really well. Be careful to dry it after rinsing with water or it will rust)

Cut the loaf with 1/4-inch slashes using a serrated knife. (If your slashes are too shallow you will end up with an oddly shaped loaf and also prevent it from splitting on the bottom.)

Slide the loaf into the oven onto a preheated stone (the one I’m using is the cast iron) and add a cup of hot water to the broiler tray. Bake the bread for 30-35 minutes or until a deep brown color. As the bread bakes you should notice a nice oven spring in the dough. This is where the dough rises. To insure that you get the best results it is crucial to have an Oven Thermometer to make sure your oven is accurate.

If you used parchment paper you will want to remove it after about 20-25 minutes to crisp up the bottom crust. Continue baking the loaf directly on the stone for the last 5-10 minutes.

Allow the loaf to cool on a rack until it is room temperature. If you cut into a loaf before it is cooled you will have a tough crust and a gummy interior. It is hard to wait, but you will be happy you did! Make sure you have a nice sharp Bread Knife that will not crush the bread as you cut. Or you can tear it apart as they do in most of Europe.

If you have any leftover bread just let it sit, uncovered on the cutting board or counter with the cut side down. If you cover a bread that has a crust it will get soggy.
Enjoy and have fun baking. Bread that is made with love and joy tastes better!
Note: Red Star Yeast is a sponsor of this website and its promotional activities, and provided samples of yeast for recipe testing.
I just purchased the Artisan Bread book and am enjoying it! I just have a quick question…I used some of the boule recipe to make pizza yesterday, using a pizza stone, which I placed low in the oven. The crust had a lovely flavor, but I found that the toppings browned much more quickly than the bottom of the crust, so it didn’t really get that nice crunch I’d like to have. Any suggestions? Thanks so much, I am looking forward to trying many more of the recipes. btw, the Tuscan White Bean Dip was a hit at our Super Bowl party!
Hi Mary,
The trick to getting the best pizza crust is to have the stone as hot as the oven. The thicker stones may take up to 30 minutes to really reach that temperature. If the stone is not thoroughly preheated it will mean the bottom crust is not done as soon as the toppings.
Hope that helps! Zoë
I want to thank you for having your basic recipe online. I wanted to start your breadmaking while snowed in here in DC but have not gotten to buy your book yet. I made the dough last night and my first loaf this morning and am very pleased. I look forward to getting the Healthy Bread in 5 next week.
Great Marc,
So glad you gave it a try.
Enjoy, Zoë
I’ve been baking bread (using your recipe) again since Christmas. Fair success, but some loaves come out dense…especially recently. I think I will play with the water amount a little. Thanks for the pictures. I realized that compared to yours my dough is not spongy at all and doesn’t get the same resting rise either (no bubbles). My white flour is Red Mill, 4% protein and the whole wheat is King Arthur, 4% protein also.
Any suggestions? I’d like to try again today. Thanks!
Hi Carol,
The pictures you see here are for the Master recipe from ABin5 which is all unbleached all-purpose flour. This dough will produce a very different dough and bread than the master recipe from HBin5 that has whole wheat. I am planning to do a post soon on making the whole wheat loaf.
Having said that you can certainly play with the water level in your dough if you are not getting a good stretch in your dough.
Thanks, Zoë
Zoe,
Thanks for your answer. This is about the Sweet Potato bread. I am using regular whole grain stoneground Spelt. Handling the dough was difficult since it is very wet. Can I add the gluten to the dough I already made? Also, my loaf spread quite a bit and in did not rise at all in the oven. Any ideas?
Hi Frydel,
Did you check out our errata sheet? https://artisanbreadinfive.com/?page_id=73 That was one of the breads that was mentioned as having too much water. You can mix in some flour and then let it sit for a couple of hours to absorb the water. You could try adding a tablespoon of VWG to about a cup of flour and then incorporate it. It is hard to add just VWG once the dough is made up because it will clump up in the dough.
Thanks, Zoë
Hi,
A friend taught me to bake your basic loaf last year and I love it. I even gave it out as Christmas presents. Sometimes I add in kalamata olives or garlic cloves. Anyway I just got your book and am excited to try some of the breads that cook in loaf pans. I know you need non-stick pans. Do silicone pans work? I am anxious to try the cinn-raisin bread. I thought it might be good to use blueberries instead of raisins.
Thanks for the great recipes.
Ashley
Hi Ashley,
Yes, the silicone pans work very well. You can certainly use dried blueberries instead of raisins, but fresh ones would be too liquidy.
Thanks, Zoë
Thanks Zoe,
I was thinking dried blueberries or even craisins.
I just got your book: made the healthy bread recipe and had to let it rise 4 hours, not 2. (unexpectedly had to leave the house.) the dough is sitting in the refrigerator. will it still make a good loaf?
Mary Beth: It won’t be a problem at all. I’ve sometimes left it out overnight. Jeff
2 questions: can I use a convection oven? also, what’s best way to check oven temp. — there’s a $3 oven thermometer but my husband (engineer) pointed out its so cheap, it may not be right…better thermometer choice?
Hi Mary Beth,
Yes, convection ovens work really well. You need to adjust the temperature down by 20 degrees to compensate for the intensity of the convection oven heat. Watch the first loaf to make sure that it is baking evenly. You may need to rotate the loaf if one side is coloring faster than the other.
I use an inexpensive oven thermometer and it seems to work just fine. I’ve tried them all and don’t really think the expensive ones work any better.
Enjoy, Zoë
Hi Zoe Thanks so much for your response!! We leave our stone in for an hour, so I’m sure it’s up to temp. I’m thinking of a new stone, this is about 15 years old. Thanks again!
Hi Mary,
If you are sure that your oven is at the right temperature using an oven thermometer then I’m stumped! ;( One thing to consider if you are looking to get a new stone is to try the iron pizza pan that I used in this post. The black tends to make a darker crust, which should help you get that crisp crust on your pizza.
Thanks, Zoë
I just realized that I have a cast iron griddle that is big enough for a 1-pound loaf! Surely it will work like your cast iron pizza pan. I will just turn the handle to the back of the oven.
My pampered chef stone cracked when I baked a loaf the second time. I think this was because of the steam when I added the water to the broiler pan. The stone has been seasoned and used many times before. I am leary to buy a new one. I saw that you used a cast iron one. Would you suggest that instead? Will the bottom crusts still get crisp?
Michelle– yes, we’re pretty happy with cast-iron surfaces, including just a plain old cast-iron pan. Also, there are alternatives to steam:
Baking in a Dutch Oven: https://artisanbreadinfive.com/?p=552
Aluminum Roasting Pan for Crust: https://artisanbreadinfive.com/?p=510
Cloche baking: https://artisanbreadinfive.com/?p=566
I LOVE your book. My husband gave it to me as a Christmas present and it is definitely one of the best gifts I have received.
Question: would any of the recipes from the first book work well as bread bowls (to serve chowder in)? The loaves from the master recipe cook up well, but I can’t get them to hold the right shape. Any suggestions would be wonderful.
Thanks again for making such a wonderful book!
Amanda: I bet you’d get a better result with something with a stouter grain, like the rye bread. Bake it well as a boule (ball-shaped bread), then hollow out the center to form the bowl. Jeff
I have a wheat allergy and have been making recipes from Artisan Bread with white spelt. I’ve been pretty successful in modifying for the spelt and love your it!
I just received Healthy Bread as a gift and would like to make some of the breads, but have a question about the vital wheat gluten. Is there something I could replace it with or would you suggest I leave it out totally? I see that you used xanthum gum in the gluten free bread. Would that be helpful in lightening the whole spelt?
Looking forward to trying the Healthy Bread recipes! Thanks, Becki
Hi Becki,
I have not yet tried replacing the VWG with the xanthan gum, but had that exact thought. I do want to give it a try. If you try it please report back about how it goes!
Thanks! Zoë
I just made a batch where I halved the recipe (1.5 C water, 1 lb flour) and it feels way dry. I am going to add more water.
David: That’s odd, can’t explain why this should have happened. How much extra water was needed? Jeff
Just made my second batch of the master recipe yesterday. LOVED the loaves from the first batch I made, but when I tried to take some of the new dough for pitas tonight, it was SOO wet that I couldn’t use it. There were a few differences in my process I guess – for the first time, I made a double batch and used a stand mixer, but I mixed each batch separately and combined them in the container. I used bleached flour because that is what was on hand. This time I also made a double batch, but used unbleached flour, doubled it right away and mixed it by hand in the storage container. Must have been a measuring error I am guessing.
Long story short, I am trying to salvage the dough so I used my hands to incorporate a LOT of flour – still quite wet, but similar to what I ended up with the first time. This of course resulted in a dough with no bubbles. Should I let it rise again to develop the bubbles before I put it back in the fridge?
I heard your program on Wisconsin Public Radio and got the books the next day and I have to say that this is SO MUCH FUN! I have baked bread weekly for a long time, and I still do my stock 100% whole wheat for sandwiches but now I bake a number of these loaves a week as well.
Hi Deb,
How old was the dough you were trying to make into pitas? If it was fresh, 1-3 days old, then it could just be that it was too wet to begin with. You certainly can add more flour and then let the dough sit so the flour can absorb the water and the yeast can work its magic again.
Thanks and enjoy all the bread! Zoë
Jeff, thank you so much for the alternatives. I will give them a try. I will have to say, my three loaves of bread (boule dough) I made were amazing. The crust is the best..OMG I’ve ever had. For some reason though, my breads don’t rise as high as in your pictures. Maybe I need to take more dough, but when I halved the recipe and split the dough in half, it doesn’t seem like much dough. No worries though when I do the whole recipe next time, I’ll make three loaves instead of four. Thank you so so much for all your help and amazing recipes and ideas.
Hi Michelle,
Have you tried letting it rest a bit longer before baking? This may really the dough to rise better in the oven.
Thanks, Zoë
Becki,
I’m working on the same thing, and would love to see your results. Jeff warned me not to use white spelt, saying it would be prone to collapse. I’ve had pretty good luck with whole spelt (and often rye). I’ve made 2 batches with 1T of xanthan gum for the batch. It rises maybe a drop more than before? I’m trying to figure out whether a little oat flour, a little more xanthan gum, or something else would add what’s needed to really bind it together. Someone mentioned VitaSpelt. Their website claims to use only the spelt for “the best baking,” but you have to buy in pretty big bulk. So I’m waiting to use up all my spelt flour first!
Hi Stephanie,
Thanks for the info on baking with xanthan and spelt. Oat flour will not add any stretch to the bread, no gluten, but it will be tasty!
Keep us posted, Zoë
I would love to buy this book! Sounds amazing! But I can only get fresh yeast cubes here! Will that work? If yes, how do I convert amounts from dry to fresh yeast?
Hi Yuti,
I give the equivalent for fresh yeast in the recipe on this post. Just read the list of ingredients and you will find it under the yeast.
Thanks and enjoy, Zoë
Just bought your Healthy Bread book last week and love it; thank you for helping me bring homemade, healthy bread to my family so easily! I have looked in the book, FAQs, and videos but need more direction on cloaking. I find this difficult–the dough breaks off as I’m pulling it from the center of the top of the dough ball to the bottom. Am I trying too hard? Is it more of a gentle stretching from the sides of the ball to the bottom just to make a smooth top?
Hi Jennifer,
You are in luck, Jeff just made a video of this exact thing: https://artisanbreadinfive.com/?p=1632
Hope that helps! Zoë
I just baked the whole wheat sandwich bread and it doesn’t taste very good. It had a strong bitter taste. I felt like I followed the directions closely. I did wait to bake it on the 5th day of refrigeration. Is that what gave it such a bitter flavor?
On page 56 of your current edition at the top is says”; leave it open a crack for the first 48 hours to prevent buildup of gases;” It then says to allow it to rise for up to 2 hours. Should it have read 48 minutes?
Hi Barry,
You leave the mixed dough on the counter for 2 hours to rise, then refrigerate it for up to 2 weeks. During the first 48 hours the lid should be left cracked a bit, this includes the initial 2 hour rise.
Hope that helps? Thanks, Zoë
Barry-
The book is correct- the container should not be airtight for, at least, 2 days or 48 hours. But it sits on the counter (also in a non-airtight container) for the first 2 hours.
Hi Zoe,
Thanks for the reply. I did add more flour and let it sit for an hour before I refrigerated it when I went to bed. It is great now – my fourth large pita is just finishing baking now. They puff so beautifully, and my skill in rolling out a circle got much better with each one. I may sell the first one on ebay because I think it looks like Rodney Dangerfield’s profile!
Thanks so much for the great recipes!
Deb
Hi Deb,
That is wonderful!!!
Thanks for letting me know! Zoë
so far i’m loving this bread! i’m on my first batch and i’ve made loaves on day 2, 4 and 9. the last day, the dough definitely had a fermented smell to it. is that okay?
Hi Elana,
Many folks wait for the dough to have that “sour” characteristic before using the dough, but it is a matter of preference. If you prefer the dough to have a more subtle flavor than you’ll want to use it up or freeze it before it gets that fermented.
Thanks and enjoy! Zoë
oops, thought of one more question! when i first made the dough, i covered it with saran wrap and poked a few holes in the top when i put it in the fridge. should i just keep that saran wrap with holes on the whole time it’s in the fridge?
Hi Elana,
You don’t really need the holes because the saran will never provide an airtight seal. The dough ferments naturally and it is the desired result. You will just have to determine how much of that flavor you like.
Thanks, Zoë
Hi Zoe,
You suggested that I add more water to my whole wheat dough to give it more rise. Is this something that I can do with the dough that’s currently refrigerated or is this for future reference when I make my next batch?
Thanks for your great help!!!
What do you all think of the whole wheat flour that is supposed to act like white all-purpose flour? I’m thinking of something called Ultragrain and I’ve had mixed results using it — things have been improving with the addition of gluten from HBin5, but I wonder if it’s still dry and needs more water. Have you used anything like this and if you have, what is your experience?
Chris: White whole wheat (WWW) is actually whole wheat but with a lighter-colored, less bitter bran layer. It mixes and measures like regular whole wheat– in other words, it requires more water than white flour.
Ultragrain is a mixture of WWW and all-purpose (AP) white flour, and contrary to what the manufacturer suggests, it cannot be successfully swapped 1 for 1 in bread recipes for AP. That’s what you’re running into. Since we don’t exactly know the proportion of white to WWW flour in the Ultragrain product, you have to guess. Start increasing the water by 1/8 cups, or maybe 1/4 cups. See what you think. As you’ve already seen, may need VWG as well. Jeff
I make my own flour from wheat just before I make a loaf of bread. This is the only way to get all the nutrients from wheat as it is only alive for three days. All of your recipes include white flour from the grocery shelf which I do not use. Can you help me adapt your basic recipe to use all whole grain freshly milled by me? I have on hand both red wheat and winter white. I usually combine the two as my husband prefers the hardiness of the red. I would like to try your recipe. The moistness of the bread appeals to me! Thank you for any help with the recipe to fit my freshly milled flours!
Janie: I talk about freshly ground whole wheat at this post, https://artisanbreadinfive.com/?p=1165, but we haven’t yet released a free version of our 100% whole grain recipe. It’s about 75% whole grain, the rest all-purpose white. You’d need the book for the 100% recipe, can buy at https://tinyurl.com/pe8yr9
I’ve had your new book for a couple of weeks now and I’m ready to start experimenting with the basic recipe. Rather than make a whole batch of something experimental, like adding herbs or cheese or what-have-you only to find it’s a failure, do you have recommendations with respect to how small a batch is feasible? Would I start with a whole batch and divide it up before adding liquid?
I see from one FAQ that you can fold in some ingredients at shaping time but I think that with small dry ingredients like seeds and nuts and herbs and grated cheese that adding them to the dry mix would give a better result.
Tony: That FAQ is the way I usually solve this problem. Doing it your way, I’ve found that quarter-batches are feasible, but below that it gets to be odd measurement amounts. The result is only one pound of dough, which is pretty modest. Jeff
I sent your original book to my mother in Canada. She is having problems with the basic recipe – the dough is very lumpy with lots of unincorporated flour. Maybe Canadian flour has higher protein content? Any ideas?
Theresa: It sounds like for whatever reason, the result is too dry and it’s tough to get everything incorporated. Higher-protein flour could be one definite explanation, and it would require more water. 1/8-cup? 1/4-cup? All depends on just how high-protein this flour is. Using a machine to mix might make this irrelevant, but we don’t want to require that.
But, yes, Canadian all-purpose is often higher in protein than U.S. Could be contributing to the problem. Jeff
Hi Jeff or Zoe,
I think my post got skipped from yesterday. I made the whole wheat sandwich bread and it was bitter tasting. I waited until the 5th day of refrigeration. Is that just the sour taste from the yeast? Do I need to make it closer to 1 day of refrigeration? Thx, Sara
Hi Sara,
Sorry if we missed your question! I think the bitterness that you are tasting is the fermentation of the dough. Just as you suggested if you use the dough earlier in the storage cycle you will have less of that “sour” flavor built up in the dough. Some people love that and others prefer the dough when it is fresher.
Thanks! Zoë
Chris – I’ve used Eagle Mills brand AP flour with ultragrain in recipes from both books. I get the best results when I weigh the flours (weights are given in the second book) and when I add 2-4 extra tablespoons of warm water, depending on the proportion of ultragrain flour in the recipe. I add the extra flour at the end and shoot for what I think/hope is the right consistency. It helped to make a batch without the AP flour (100% whole grain), weighing the flours, so I could see first-hand how wet the dough is supposed to be. Hope that helps. 🙂
whoops – that should be “I add the extra water at the end…”
I love your bread recipes! My Grandma introduced me to the caramelized onion rolls from your first cookbook last summer and I make them all the time.
I have a cooking blog and would like to do a post with one of the recipes from your second cookbook – is that alright? I wasn’t sure what the procedure to go through was but I wanted to share with my readers how fabulous your bread is!
Sarah: We can’t give permission to copy our recipes in print, or on the web– the best source for our recipes is this blog, which you can link to. Unfortunately, the publisher will have our heads if we give blanket permission to copy recipes on other people’s blogs. It would seem like we were waiving our copyright– which we can’t do. Jeff
Hi!
I’m looking forward to my first loaf from this recipe — the dough’s chillin’ in the fridge right now — but I had a few questions.
1) I didn’t get a lot of rise out of my dough when it was sitting out on the counter. It took about four hours to rise to about half of what is shown here in this post. I did notice during mixing that the dough, while sticky, had a bit of flour that wasn’t getting incorporated. Should I add more water next time?
2) What’re the effects of bleached AP flour vs. non-bleached in this dough? If it’s that crucial, I have a bag of flour I need to return. 😉
Thanks!
Hi Amy,
A slow rising yeast may be due to the temperature of water that you used. If the water was cool it will take much longer for the yeast to fully activate.
Unbleached flour has more gluten than bleached. The gluten gives the dough structure and it absorbs more water. If your dough seems too wet it is due to the lack of gluten in the flour. You can try adding more flour if it is too difficult to handle.
Once the dough has refrigerated over night let us know what the consistency is.
Thanks, Zoë
Thanks Jeff! I did a little more research and found out that Canadian All-Purpose Flour has the same protein content as American Bread Flour. So I have suggested that my mother follow your book’s directions for using Bread Flour rather than All-Purpose.
Theresa: We say more about adjusting for different flours at the FAQs page, the one about flour varieties. Jeff
Following up on a question posed by Tracy a few days ago, I find that my master recipe dough rises only about half as much as it should. Your photos show the dough at about the 4 quart mark after 2 hours, but mine only rises a little past the 2 quart mark. We’re using the same brand of dough buckets. I’ve double-checked my measurements. Is this just about adding a little more water, as you advised Tracy, or is there something else I should be doing? Maybe this is related, but I find my baking times are a little shorter than you advised. I checked my oven temperature with an oven thermometer, yet breads you say need 30 minutes I find I take out at 25 in order to avoid burning the crust. (By the way, everything tastes terrific!)
Bob: It has to be a difference in ingredients (try everything with commercial ingredients if you’ve been using fresh-ground)? Room temperature (mine’s 68)?
If you’re dough’s looking drier than what we get in the photos or video (like the one on the home page right now), then yes, let’s increase the water by increments, say 1/8-cup at a time, till it looks resilient like ours.
Since the stuff you’re baking passes the flavor test, I’m less concerned 🙂 Jeff
Hi, Zoe,
I used lukewarm water from the tap (not hot!). I did raise the thermostat after 15 minutes, when I figured out it was about 66 degrees in the kitchen. So hrm…
The dough is sticky to the touch, enough to leave traces behind on my fingers that require scrubbing off. I’m assuming a little flour on my hands will help with that? It stretches very nicely, though.
Will be trying the dutch oven method of baking in an hour or so, as I only have the one oven rack and placing a broiling pan or baking pan directly on the heating element seems to be something of a bad idea.
Hi Amy,
Our dough is really quite wet, so you can use some flour on your hands and dust the surface of the dough with some as well.
You will love the results in the Dutch Oven.
The temperature of the water will just determine how long it takes for your yeast to activate. Should be just fine!
Thanks, Zoë
Not that this has anything to do with the topic of this posting, but I just wanted to share with you an idea for using your dough that you may not have thought of. Tonight I used the Light Wheat Dough in ABin5 to make Chinese steamed buns with meat filling. A 1-ounce piece rolled into a circle, filled with about 1/8-cup of a pork and shrimp filling and steamed for 15 minutes came out beautiful and delicious. Accompanied by a vegetable fried rice, my husband commented that we’d never get take-out again. Well, that may not quite be true, but it’s nice to know that our little experiment had such satisfying results. Thank you for sharing this wonderful technique with all of us. I’ve been having such a lot of fun making your recipes from ABin5 (sticky buns this morning) and experimenting with my own. You’ve made me look like an amazing baker and it’s all been so wonderfully fun and easy.
Wendy: Gotta try this– someone else told me that this works too. Jeff
Hi Jeff and Zoe,
I’ve always found bread baking to be a charming yet uncommon skill to have (I don’t know many regular bread makers) so I was excited to become the family bread maker. (My husband got me your first book and got me really enthused about taking on this fun task.) Now, I’m used to having success with nearly every new cooking endeavor but for some reason, bread making has me pulling my hair out. Why? Well, my bread (master recipe boule from ABin5) doesn’t look like yours in the book, website or youtube videos. Mine comes out hard on the outside (will practically chip a tooth) and gummy almost wet-like on the inside. I’ve spent the last 4 hours scouring your website and video posts (I really, REALLY want to do this well. I WILL learn to bake bread is my new mantra. hehehe) and I kind of figured that maybe my boules are a little too big and my dough might be a little too wet and maybe I should let it rest for 90 minutes after shaping. So, I’m going to tweak the boule size (I just hate using the oven to bake a small loaf that’s why I’ve been trying to make it big but I guess I’ll bake 2-3 smaller boules vs. 1 big boule), incorporate more flour and let it rest for 90 min. So, I have a question on one final thing. My oven. Okay, my oven gives me an option to use regular baking or convection baking. If I use the regular baking option, whatever temp I punch in is what it stays at (so 450 is 450 degrees) but the convection reads 25 degrees less. So if I punch in 450, it heats up to and stays at 425. I’m thinking that it’s probably because convection heat is thoroughly warmer so it knows to adjust because convection 450 degrees is hotter than traditional 450 degrees????? Anyway, so my question is, should I bake on the regular baking option or convection? If I choose the convection option and the recipe calls for 450 degrees, should I punch in 475 so that it settles at 450 convection degrees. I’m ready to tear my hair out. Btw, I’ve made your challah bread which came out delicious and soft (no teeth were chipped) but it was dense, not flaky/fluffy like I’ve seen challah be. So, what are your thoughts on the oven options because I really would love nothing more than to make bread that’s baked fluffy on the outside with a light crispy crust on the outside. Learning this is a BIG deal for me. So, I so appreciate your input. Oh, and I use a baking stone too. Okay, that’s it. Thanks and looking forward to your advice!!!!
Flora: I think your oven temperature is off– don’t be misled by digital readout, they are as likely to be off as an analog system. A simple inexpensive thermometer will give the answer, like this one on Amazon: https://bit.ly/czmco2 Bet your oven is way hot.
If not, the second-likeliest explanation is that your dough is just too wet, and you can decrease the water slightly (or increase the flour) at mixing time.
Once we’re sure of your oven temp, I’d tell you that convection works great, just turn the temp down 25 degrees and everything else stays the same. Some people find a better crust result w/convection, but that all depends on your oven– see what you think.
And as you’ve already guessed, it’s much easier to do small loaves while learning our method, so you’re on the right track. Jeff
Oops, the sentence toward the end should read, “I really would love nothing more than to make bread that’s baked fluffy on the INSIDE with a light crispy crust on the outside.” Sorry.
Hey Jeff, thanks for your response! Will be buying that recommended thermometer. As for the convection oven temp, should I punch in 25 degrees lower even though the oven already does that when set to convection? So what I mean is if the recipe calls for 450 degrees, and I punch in 450, the convection setting heats it up to 425. Since the oven does that, is that 25 degree difference sufficient or are you saying that if the recipe calls for 450, I punch in 425 (then the convection setting will read 400)? I don’t mean to belabor this point I just want to make sure I’m doing it right. Thanks so much!!
Hi Flora,
If your oven automatically recalculates the temperature then you do not need to adjust it. Some newer models do that. Just keep an eye on the first loaf to make sure it is not over browning too early.
Thanks, Zoë
The weight of flour confuses me. I don’t understand why you have different weights than King Arthur Flour. For instance, KAF says that all-purpose flour weighs 4 1/4 ounces per cup and in HBin5 you list it as 5 ounces per cup. Also, the two of you have different weights for whole wheat flour and other flours. Do I use one weight for your recipes and another for theirs? Why is their a difference?
Hi Kathleen,
The reason our weights are more is because we use a scoop and sweep method of measuring our flour. This method weighs more than if you spoon the flour into the measuring cup as many people do. You need to use a 5-ounce cup to get the right consistency in our dough.
Hope that helps! Zoë
Thanks for the site, book’s on order from Amazon! I made a boule tonight in Boulder (5300ish feet). At 25 minutes it was golden brown and quite “done” looking, but a bit gummy and underbaked even after a complete cooling. Should I lower the temp and cook longer, or perhaps tent the loaf with aluminum fool? Thanks!
Hi Cynthia,
Are you using an oven thermometer, your oven may just be running hot?
As you can see on the cover of ABin5 the loaves can even get so dark as to have some burned looking bits. You may just want to lower the rack in your oven so the top of the loaf doesn’t get too much color. You may also want to look through our post about baking at high altitude. https://artisanbreadinfive.com/?p=144
Thanks and enjoy! Zoë
I am a devoted bread-a-holic and love both your books. One challenge I have (even though I’m at high altitude) is that during the oven spring, the dough “errupts” through the slashes on top (making the boule or baguette shapes). This results in a tasty, but less attractive loaf. I’ve tried slashing a little deeper, and a little farther across the dough, but that didn’t really help. Any thoughts?
Ann: Your oven may be too hot, check it with the inexpensive thermometer in the Amazon store at left. Also, consider a longer resting time before the oven, we were conservative with that in the 1st book– 40 min may be too short. Consider 60, or even 90, even with white bread.
Use a bread knife rather than a razor or lame, both of which tend to allow the dough to re-adhere to itself with the very wet doughs in our books. Jeff
Thanks for the prompt reply, Zoe! I do have an oven thermometer, will try lowering the shelf. (If my pizza stone breaks, I’ve been looking at a cast iron one anyway….) Will report back on the next batch.
I was so excited to get this book as a Christmas gift. I love bread, but bread doesn’t love me. When I found this book thru King Arthur’s blog, I just couldn’t wait to try my hands on it. I tried your Light Whole Wheat bread…everything went fine until cutting a pound off and rising it. It didn’t rise the way your picture here did. It still tasted good…but I didn’t get the rise that I wanted. The last batch, I let it rise for a long time but didn’t rise any higher. It looked like a focaccia bread. What do you think I have done? Thanks…I won’t give up till I get it though…
Mari: Any chance you are using bleached flour (doesn’t have enough protein)? Also, go through our FAQs page and see if you can identify a problem there, then check back with us here. Jeff
Haven’t bought a loaf of bread since discovering your books last year. Now I have fallen in love with your “toasted millet and fruit bread” It is GREAT! Keep up the fantastic work. I love love love your books.
Hi LaVerne,
So glad you tried the Millet bread! Thanks for letting us know!
Enjoy all the bread, Zoë
It is completely random that I discovered this blog today but this recipe was originally printed in Cooking Light in 1998 or something like that. I kept the issue and often bring it to a shared lunch group we have at work. Cassie did give credit which I’m sure our host authors appreciate!
Cassie said:
This is the African Peanut Soup recipe as printed in Golden Goodies, a cookbook published by Golden Lake Elementary in Circle Pines, MN
Great comments & ideas, friends! Stacy
Hi Jeff: Luckily I have unbleached flour and that was what I used. I will go to your FAQ and try to find my answer… but just to let you know, I am not giving up. I know I can make the whole wheat loaf bread…so I can do the others too.
Thanks.