Secrets of Cracker Crust Pizza, plus, our TV segment with Saturday Night Live’s Colin Quinn
This cracker crust pizza is so thin and crackly that light shines through it! It’s much easier to achieve perfection with this Tuscan specialty than you might think. Plus, our TV segment in Charlotte, North Carolina, with former Saturday Night Live cast-member Colin Quinn. On TV with Colin, we threw pizza high into the air for Neapolitan thickness crusts (1/8-inch), but don’t try that with this much-thinner (1/16-inch) cracker-crust, or it will tear (this 2012 segment isn’t live anymore).

Colin is about 10 times funnier than we are…

Everyone knows that cracker crust pizza needs to be stretched really, really thin in order to get a crunchy and super-thin result. But before you even start with that, two things to do:
- Pre-heat your oven for 30 minutes or longer, with a glazed or unglazed baking stone in the bottom third of the oven, and use the highest heat your oven allows (for me that’s 550 degrees F).
- Prepare all your toppings before you start stretching the dough: Otherwise the dough will glue itself to the pizza peel while it’s waiting to be topped and you’ll never get it into the oven. Today I used a smooth, plain tomato sauce (less than 1/4-cup), and about 1.5 ounces of fresh mozzarella. Cracker-crust pizzas need very little topping– if you use lots, it won’t crisp and the whole thing may turn to porridge.
In Artisan Pizza and Flatbread in Five Minutes a Day, our cracker-crust pizzas call for a dough-round that’s only 1/16-inch of an inch thick. Maybe there’s someone out there who can do that with their bare hands, but I can’t. I need a rolling pin, and I’ve come to love the handle-less French milled rolling pins, which give you better control in this situation. Use a small ball, about 4 ounces (peach-sized) of refrigerated dough from one of our recipes. You need “lean” dough here (those not enriched with eggs and lots of sweetener) from our books: white dough, or the whole-grain are just two examples, see the books for more. Using some whole grain makes it easier to get very thin–plain white dough is the most difficult to stretch because of its gluten-strength. If you use a large ball, you’ll have a very hard time getting it this thin:

(You don’t really have to weigh it, but it can be nice when you’re learning). Briefly shape it into a ball as in our other posts, and if you have time, let the ball rest under plastic wrap or an overturned bowl at room temperature for up to 60 minutes; that will make it relax and be easier to roll out. So start with the rolling pin and your fingers…

It’s pretty easy to get it to 1/4-inch thick, and then 1/8-inch. But for my ball of dough today, it needed to get to a diameter of about 14 inches in order for the thickness to be down to 1/16-inch…

Use plenty of flour…

Getting it to 1/16-inch takes a bit of perseverance. Some tricks:
- If it just won’t “relax” and thin out, cover the partially-stretched dough-round with plastic wrap and give the glutens five or ten minutes to relax.
- Use the dough’s own stickiness to force it thin: although you’ll need to dust with lots of flour, allow it to stick to your work surface a little. That pins it down and allows the work surface to oppose its natural tendency to shrink back into its thicker self.
- Use a dough scraper: It’s very difficult to make cracker crust without one, because this dough will try to stick miserably to the work surface, and as I say, you want a little of that. But periodically “un-stick” it, like so:

As you gather it up in your other hand, you can see that the top surface is going to need lots of dusting flour. Don’t be stingy with it; most of it will fall off as you work with it. You know you’re getting close when the dough is looking paper-thin, and draping your hands like a glove:

When you get to 1/16-inch thickness, place the dough-round onto a pizza peel dusted with flour. Periodically shake the peel to be sure that you’re not sticking. Start with the sauce; you can use a spoon, but a pastry brush is quite handy for the thin coating of sauce that’s called for here. And if your sauce is chunky, put it through the food processor or blender–chunky sauce is a problem for crust this thin:

… OK, maybe a little more than that, but don’t overdo it:

In our pizza book, our cracker-crust pizzas don’t call for the big cheese chunks that work so nicely on Neapolitan-thickness pizza– go for grated cheese if you’re using commercial mozzarella, or small pieces of fresh mozzarella as in these pictures (you really can’t grate the fresh stuff, it just disintegrates). And not so much– 1.5 ounces is enough here:

… so you’re spacing the cheese a little. Now slide it onto the pre-heated stone (more on that technique in the book). Hopefully the 30-minutes preheat was enough, but if you’re not getting the crispiness you like, next time preheat for up to an hour:

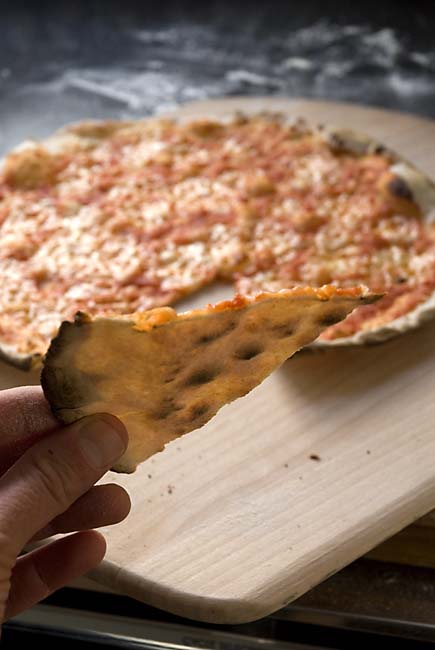
In my oven, which runs hot (and I’m never getting that fixed), this was ready in 5 minutes. If your oven runs cooler, you’ll need more time, but check early– this is thin stuff and you don’t want it burning. Check your oven with a thermometer or it can be challenging to get the crispiness you want. A little scorching is OK– see the blackened bits on the underside and at the edge, and yes, the light should shine through it:

Give my regards to Siena!
Looks fabulous!
Could you use parchment to roll it out, or does it need to be in direct contact with the stone for the crispness?
I have all your books, and all of us at our house have become bread and pizza “snobs” — no bread or pizza we can buy anywhere measures up to what we make at home!
Doug: I think you’re going to get a better result right on the stone, but it’s not bad on parchment either. You may find that it sticks to parchment though…
Wow! I have never heard of this before! Agree with the comment above. Your recipes are turning us into bread and pizza snobs. No complaints 🙂
I always use parchment. I also use my ceramic egg with a pizza stone on top of the grill. That guy can get up to nearly 1000 degrees. I’ll put the pizza out with the parchment first, then remove it after a few minutes and let the pizza cook the rest of the time directly on the stone. This has been working out really well for me, but I haven’t been getting the dough as thin as this. My pizzas are usually more like 1/8 of an inch thick, maybe just a bit more.
Virginia: 1/8-inch is the standard Neapolitan thickness, so that’s fine. And there’s nothing wrong with American pizza either (1/8 to 1/4-inch, or see the Sicilian thick-crust style at https://artisanbreadinfive.com/2011/11/08/secrets-of-sicilian-style-pizza-crust-and-announcing-the-winner-of-the-our-giveaway-contest
AH! A pastry brush for the sauce! Brilliant! I’m making pizza tonight just to try it out.
An off-topic question for you:
I’d like to use some whey (leftover from straining yogurt) in my bread baking. Have you tried this, and could you recommend a ratio that works for ABin5, for example in the Master recipe?
Thanks for your time. I love your books!
Hi Melissa,
Yes, I do it every time I make yogurt, which is quite often. It makes great bread. I just use whatever I have and add enough water to match the amount needed for the bread recipe.
Thanks, Zoë
Oh, fabulous! Thanks, Zoe. I can’t wait to try it.
Would this be better done on a stone or a black cast iron pizza pan the one I have seen on this website?? I wanted to know if it makes a difference b/c I will be making up the dough today and hopefully trying out my first pizza from the new book,( I have all 3 of your books and love them!)
Pam: The stone and the cast-iron are both equally good. The cast-iron heats up to temp faster in most ovens. If you have one, you don’t need to buy the other.
Could you send me please the dough reciept?
Just click on the link below either the one that says white dough, or whole grain.
Hi! I have a pretty dumb question, and it doesn’t so much belong on this post but I wasn’t sure if you would see it if I posted it elsewhere.
Last night I made the master recipe from ABin5 (which I’ve done many times with lots of success…thanks!)but I guess I was sleepy because instead of putting on the counter to rise for a couple of hours, I put it in the fridge and there it stayed overnight until I saw it this morning (insert mental head slap). So I ask you…is it ruined? If not, what shall I do?
Linda: Go to the FAQs tab above, and click on “Left the dough on the counter overnight…”
In ‘Artisan Pizza and Flatbread . . .’ on page 4 you say ‘white rice (sometimes labeled “sweet white rice flour”‘ — there is a distinction between white rice flour, and sweet or glutinous white rice flour. They are very different in how they perform. Which one do you mean? They are not interchangeable, in my GF baking, so with your recipes, it is critical to know exactly which white rice flour you mean.
Hi Ann,
Sorry for any confusion, we used the white rice, not the glutinous rice flour.
Enjoy the bread! Zoë
That pizza looks absolutely delicious. Mm. Last night, my toddler who just turned 2 said “I want pizza” when it was dinner time. She will love this 🙂 Thanks for the tips on keeping the pizza from sticking to the peel because last time, I could barely get it in the oven and I thought, isn’t this why I bought a pizza peel?!
Lucy: Fun!
Hi,
Just found your site & was interested in WHY do you use such a HUGE ammount of xanthan gum????? You can easily cut the amout in half & have a wonderful LIGHTER bread. Xanthan gum is a glue that will made anything stick together with Moderate useage. I have made breads for years & never, ever use 2Tbsp- for cakes I may use 1/2 – 1 tsp. GF Breads tend to get so dense that i-2 tsp. is often enough to make a teriffic, non-crumbly bread.
Juli: Because we store our doughs, and that makes them tend to become dense. The full-dose xanthan counters that. You won’t find other recipes that allow you to store GF dough for daily use– that’s our thing.
This the first time I have be on your site. I love the photo enhanced instructions and tips. I’m now cokking for two family members with Type2 Diabetes. Both love pizza and I’m hoping that a thin cracker crust will help satisfy them and reduce the carbs. I’ll ;et you know how it goes, but wanted to thank you for the photos and tips that will help me right now.
Great Valerie, keep in touch.
Hi there – I’ve just bought your Five Minute Bread book (UK and I’m experimenting with different UK flours which of course are different to US/Canadian flours) am wandering if I can use French T55 flour for any of your recipes which I know has a lower protein content – Have you tried this? Any advice
Siobhan: It’s going to result in a wetter dough, which may be unworkable. See our videos on the tab above and adjust the water downward (or your T55 upward) until it looks like ours does. You should be able to shape it as we do.
Can you prebake the crust? I am making it a half supreme, half pepperoni and pineapple. I don’t have a stone so I’ll be using a metal pizza pan. Will it crisp the same and if not can I prebake it and how long?
Hi Angelica,
Yes, you certainly can pre-bake the crust or just freeze the rolled out crust. Both of these are described in detail on page 51-52 of Artisan Pizza and Flatbread in Five Minutes a Day.
Thanks, Zoë
I’ve been making thin crust pizzas like this, using your basic pizza dough recipe, for some time. I’ve found that it works best with chilled 1 or 2 day old (or just thawed) dough and lots of flour while shaping. I use a rolling pin to shape it on a countertop and then transfer it to a cornmeal covered pizza peel before putting the toppings on. If you are having trouble stretching the dough, just let it sit for a few minutes and come back. The cornmeal adds some nice texture and burns less if you are making a bunch of pizzas at the same time.
Hi, I’m making this crust for dinner tonight and have a question about the rising times. Do I let it rise twice (like the whole grain recipe says) and then let it sit out for a third time for an hour like the directions here indicate? I’m using fresh dough.
Stacy: There’s the initial rise in the bucket for the big batch, which can be refrigerated and used later. When you’re ready to bake, form your dough balls and let them relax, then roll out. So twice, not three times.
I didn’t use your dough but I used this as a reference for making a super-thin and crispy crust. Thank you!!! I floured the heck out of the kitchen counter and got to rolling. Once it was about the size of a dinner plate, I picked it up and finished stretching it on the backs of my hands (fists, really). I don’t have a pizza stone or a cast iron pan or a pizza peel, but I cranked the oven up as high as it would go. I inverted my heaviest pan, dusted it with flour, and laid the crust on the (still cold) pan and topped it and stuck the whole thing in for 5 minutes. It wasn’t even close to perfectly round but that just made it look more homemade. 🙂
It was DIVINE! Even without any of the equipment to get as hot an oven as possible, it was perfectly crispy and gloriously thin and juuuust starting to get lovely little burned bits! So for any folks out there who haven’t invested in the equipment (yet!), this will still work as long as you heed the advice about being spare with the toppings!
I once helped a German woman make strudel and she told me that the dough is supposed to be thin enough to read through. This didn’t go quite *that* far but held up toward a light was definitely making the pizza glow!
P.S. Tonight’s pizza was what I call “Topsy-Turvy Margherita”: spinach-basil pesto for the sauce, oven-roasted cherry tomatoes, and fresh mozzarella.
Just read your comments. Thanks for the reassurance that when one can’t afford all the equipment at the moment, it’s still possible to make the pizza! ❤️
Glad it helped!
I have a question about the olive oil pizza dough. I made a big batch and loved the results for pizza. could this dough be shaped and used for a loaf of bread using your usual shaping and resting method similar to the master recipe? I have so much pizza dough and but actually need to make bread, so I thought I’d try it using the pizza dough. Thanks for such great recipes. I tried the European Peasant Bread a few days ago with great success and I am lined up to try the brioche later this week!!
Sure can, makes a great bread.
Can you PLEASE provide the Recipe for the Cracker Crust Pizza Dough???
Hi Becky,
You can many different doughs with this technique. The process is laid out in our Pizza and Flatbread book and there are quite a few doughs in there that will work, but you could do it with others too. Do you have any of our books? I can lead you to some recipes that would work nicely.
Thanks, Zoë
Have you calculated Weight Watchers points for this crust? Thanks!
Hi Suzy,
No, we have not. Here is some nutritional information that may help? https://artisanbreadinfive.com/2009/12/14/nutritional-information-for-whole-wheat-flaxseed-bread-or-any-other-recipe-in-our-book-using-the-usda-national-nutrient-database/
Thanks, Zoë
Ok just tried this. Wow !!!! I
‘ve been making my own pizzas for the better part of ten years now but these tips are wonderful. My Dad made an awesome cracker crust pizza and he did it with a food processor, so I know he over kneaded the dough wish I paid attention to what else he did. I used my standard pizza dough recipie but did the sauce just like you said I did put too much cheese on it and some green peppers and it still came out crisp !
It was almost a fail because I left it on the peel too long and it stuck. I was able to pry it up, fold it in half and transfer to the stone and unfold it. Our oven is calibrated well and five minutes was perfect !
Cracker crust Pizza is my favorite. Thanx I now can make a perfect cracker crust. And we all know the crust is the heart of a pizza pie 🙂
That it is… glad this is working for you…
Great story and photos. But am I missing something? Where the heck is the pizza dough recipe?
Thanks.
It’s in my books! Or u can use the Master Recipe here on the website. Click on the links to white or whole grain below
Can i have the recipe of that thin dough?
You can use the standard white dough, or even the whole grain, though it’s a little more challenging to get this thin.. Type “back to basics updated” into the search bar on this site
Where is the recipe?
In my books! Otherwise type “back to basics” in the search bar–for a basic recipe that works for pizza too…
A recipe for the dough would have been helpful. Unless I missed it
Go ahead and type the word “updated” into the Search Bar on this web page (not into the URL line of your web-browser), and it’ll return the basic recipe for a white dough that works nicely in this recipe.
Gonna try this!!