Baking Bread in a Dutch Oven!
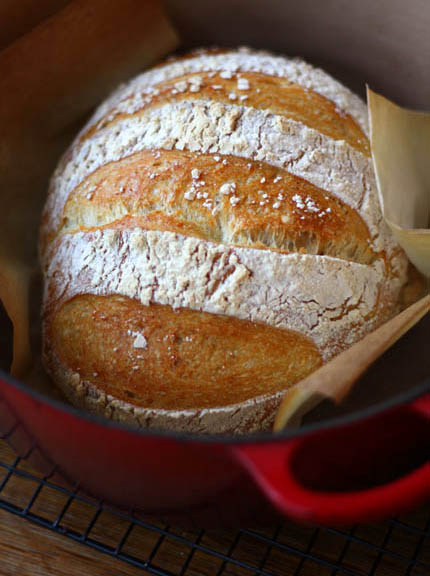
Here is yet another way to get a fabulous crust on your bread without using any steam in the oven. An unsophisticated disposable lasagna pan is an option but here’s another idea. Baking bread in a Dutch oven is a very old idea. All the iron-pot methods are based on the old European technique of baking inside a closed clay pot. Most people don’t have one of those, but enameled cast-iron pots are readily available—and they trap all of the internal moisture in the dough and that creates the steam you need to get a crisp and shiny crust. It really is fantastic and it works perfectly with our stored doughs from the book.
As you can imagine, the only drawback to baking bread in a dutch oven is that you are limited to a bread that is the shape of your Dutch oven. Luckily, Le Creuset has several shapes to choose from and I’m determined to try them all! The company even sells a special knob that can withstand the 500°F baking temperature of this method. All of these items (including the metal replacement knob) are available in Minneapolis-St. Paul at Cooks of Crocus Hill or nationally through Amazon (which offers a 7 1/4 quart pot, a 6 3/4 quart oval, a two-quart, and others.

Using a metal replacement knob is really essential to baking with this method, the hard plastic knobs will smoke at 500°F. Otherwise you’re limited to the maximum temperature recommended by Le Creuset (usually 450 degrees), and the crust won’t get as crisp.

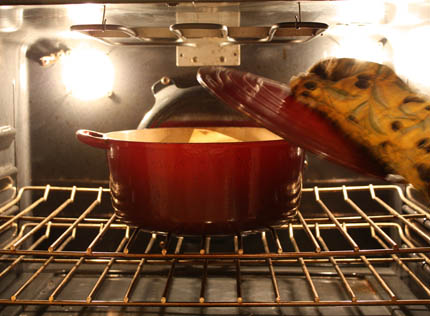
Preheat the pot with the lid on to 500°F for about 20 minutes. I used a 7 1/4 quart pot to bake a 1 1/2 pound loaf of bread.
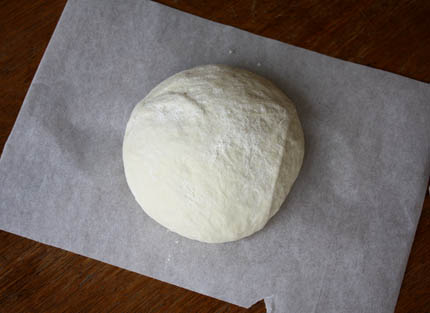
Shape your boule from any of the non-enriched doughs from the book and allow to rest on a piece of parchment paper as suggested in the recipe. What’s used here is the master recipe–let it rise for about 90 minutes. It’s easiest to get the dough into the very hot pot if you can drop it in right on the paper.
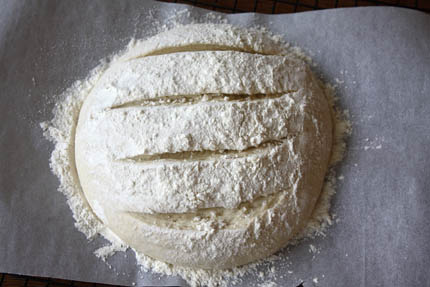
Slash the dough 1/4″ deep.
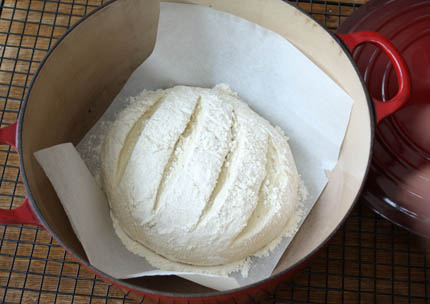
VERY carefully lift the dough and drop it, with paper and all into the preheated pot. This can be awkward the first time you do it. Take the pot out of the oven and rest it on a cooling rack so that it’s at a comfortable height to get the dough in without fear of touching the hot pot! It is very easy, but just be careful! Replace the lid and slip it back into the oven.
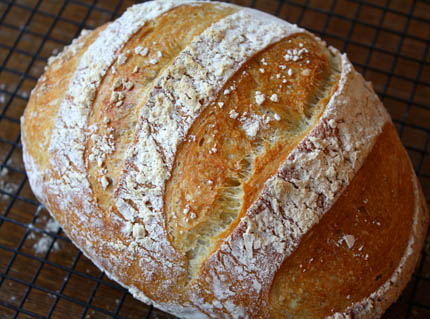
After 15 minutes of baking remove the lid. The dough only needs to bake in the steam for that amount of time. now it is time to get a lovely caramel color to the bread. Turn the heat down to 450°F and bake for another 15-20 minutes, depending on the size of the loaf.
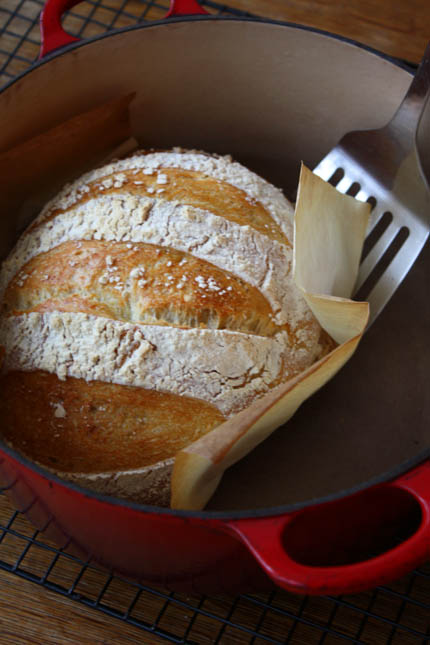
Once the loaf is nicely browned, carefully remove it from the pot with a spatula.
Peel off the parchment and allow to cool on a cooling rack.
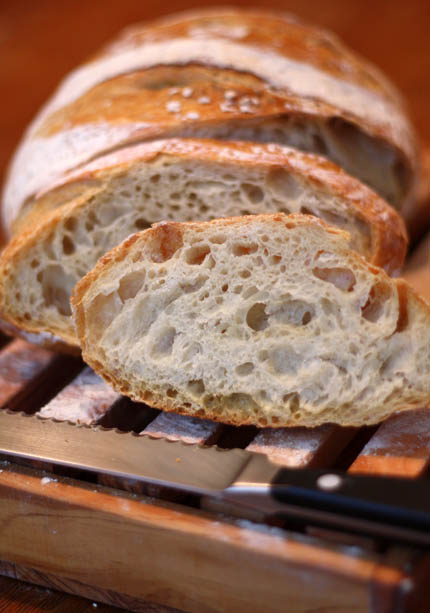
Once the bread is totally cool, cut and you can see how fantastic the crumb is!
Note: BreadIn5.com is reader supported. When you buy through links on the site, BreadIn5 LLC earns commissions.
I have another brand of dutch oven. I wonder if the metal replacement knob would work on mine, or if I can find one for my brand. I really want to try this method! Love all the continuing info you guys give us!
I’ve been using your book’s recipe with Lahey’s cast iron method for awhile, and it’s worked pretty great. I actually cover the knob with aluminum foil completely, which protects it from the heat (I don’t have a Le Creuset, though the cast iron dutch oven I have does have a plastic handle). Have not had a problem yet. You can also remove the knob in most cases, but that makes it harder to put the lid on. Also, the parchment paper is a good idea, but not necessary if you don’t have it. Have baked it many times without it.
Victoria: I wouldn’t bet on having that Le Creuset knob fit on a non-Le Creuset pan. Better check it out in an actual store rather than buying on-line.
Bryan: The Le Creuset plastic knobs are rated to 450, so another option is to bake at the lower temp but the crust won’t be quite as good.
I made this bread for the first time yesterday, added 1/4 cup too much water by mistake, and aside from the dough’s being hard to handle, it was perfect. Baked it in a copper pot with lid.
I’ve been using this method with a Tramontina enameled dutch oven (can’t beat it for $40) for about a month now — ever since I bought the book. Works fabulously.
I replaced the knob on the oven with a metal cabinet knob that I had laying around the garage. I’m pretty sure that you can use the LC knob with this (and other) dutch ovens, but you may have to get a different length screw to attach it with.
Thanks! I’ve been wanting to do this for a long time – RLB posted a similar article on her blog a while back (https://www.realbakingwithrose.com/2007/01/baby_breada_great_new_techniqu.html). I need to get a new knob though. 🙂
Wow – there is no end to the ways to be using your bread recipe. I will be trying this method this summer camping… I figure if I put the lid of my dutch oven upside down and put hot coals on it – making the bread a bit flatter, I could probably make it work!
I’ve been playing with some bread sticks too – you might like to see my new ‘twist’ on them if you have a moment. I’ve posted a step by step on my blog at
https://www.lalalime.blogspot.com
Thanks for all the new ideas – I have not bought bread for several months!
just curious, the manual that came with my LC says to never heat an empty pan because you can cause permanent damage to the enamel and pan.
Love the book. I’ve been using a similar method for a bit — though no fancy Creuset here… I use an 18″ covered Granite Ware roasting pan, $13 from Amazon.
Advantage of the 18-incher is it’s long enough for a nice size french baguette. Simply stretch master dough, rest on parchment, and bake covered for 25 minutes (ish) and uncovered for 12-15 (ish) more.
Perfection.
Hi Chris,
I just emailed the people in the know at Le Creuset and they said that the pots are just fine with the empty 500°F pre-heat. Just be sure you have a metal knob!
Thanks for the great question!
Zoë
I gained 10lbs when I bought your book so I am taking a break from bread, but when I return to carbs, I really want to try this method. Do I understand that this can be done in a cast iron pot? Sounds great!
I bake all my bread in a cast iron dutch oven, which has a glass (or maybe Pyrex, not sure) lid. I love it!
Thanks for the great tip! It seems I’ve been…um…forgetting to pour the water into the tray with some of my loaves, so perhaps this will help ensure I incorporate some steam in my bread baking! Just need to get one of those metal knobs.
I actually split the plastic knob of my Le Creuset the first time I made Lahey’s no-knead bread. It wasn’t the end of the world, though. If you do that, you can call Le Creuset and they’ll send you a replacement, no questions asked. For a few dollars, they’ll send you a metal one. Mine came with screws, so if you did get a metal Le Creuset knob to modify the knob of another oven brand, the screw likely won’t be the issue–the size of the hole will. ‘Course, the screw hole for the lid of any decent Dutch oven shouldn’t be too big.
ive been using this method too lately after i came across ‘the magic bowl’ method. a ‘toxo bread’ had made your boule by the same method you’ve mentioned above but using a pyrex bowl. i tried it in my large oval glass baking dish (with lid).
i forgot to preheat it with the oven though but tried it anyway and that was the first time my scoring had opened up so much.
i also tried it with my mum’s bassema pot and covered the knob with foil but there was a smoky smell (must’ve missed a spot) but the bread turned out wonderful and again really opened up.
by the way i forgot to ask how old was your dough (because of the crumb)?
also, the bottom of my bread always gets shaped by the baking paper. the baking paper bunches up around the dough and ends up influencing the final shape.
thanks
I use this method whenever I am baking indoors instead of in my wood fired oven. It is absolutely the best way to get the steamed crust that professional bakery ovens achieve. Thanks for posting such a clear description of the process. I usually let my bread rest on the parchment, INSIDE a bowl. I think it helps the bread keep its shape better than resting flat on the counter. I will link to this as well as your book on my site. Keep up the good work.
Bill
https://www.woodfiredpizza.org
Maybe you could simply cover the Dutch oven with foil?
Hi Brenda, Yes a cast iron pot, with or without the enamel, with a lid should work just as well. Let me know once you have tried it!
Hi Nads, This dough was 5 days old. My pot is quite a bit bigger than the loaf was, so the paper could lie flatter. I bet this is why it didn’t effect the shape of my loaf.
Thanks everyone, Enjoy the bread!
Zoë
Hi Tres Amie,
I’m not sure if it will trap the steam well enough, but it is certainly worth a try!
Report back if you do it.
Thanks, Zoë
Wow – look at the holes in that bread. I am jealous – I don’t seem to be able to get that. I make the basic white master recipe. Never bake the 1st day, usually 3rd or 4th is 1st time. Quickly shape it, let it rise for 30-60 minutes, then bake.
Any suggestions?? I do notice that during the week, the dough sometimes seems to lose some of it’s volume in the fridge. I use a rubbermaid container for my “bucket”.
Thanks – Ann
I do get “great spring” from mine, just not holey enough!
I found your fabulous recipes in Mother Earth News and immediately bought your book. My family and I thank you for your contributions to our culinary delight! However, one question that is not made clear…in the recipe for 100% Whole Wheat Sandwich Bread (pg 76)…you mention that this recipe is also good for the freeform artisan loaves. If I am making the loaves this way, should I follow the standard boule technique, using only one pound portions and allowing a forty minute to 1 1/2 hour rest, then baking for 30-35 minutes at 450 degrees? Or should I be following the exact given instructions without using the actual baking pans: 1 1/2 lb. loaves, 1hour 40 minute rest, and 50 to 60 minute bake time at 350 degrees? I would appreciate your assistance with this. Thank you so much for your help!!!
After cracking my stone on my very first loaf of bread, I’m a little gun-shy to use another stone and have it break, too. So this is brilliant! I’ll be buying a cast iron pot sometime this week. In the meantime, I’ve been using the cracked piece of stone, and it did work out okay, but it’s not very big 🙂
Jeff & Zoe:
I wanted to ask a question about the buttermilk bread recipe in the book. I made some last week — it tastes, predictably, wonderful — but I found that my crumb was a bit dense and I didn’t get a good deal of rise in the loaf. I made all 3 loaves at different times during the week, letting them all rise for at least the time indicated in the recipe… but none of them rose above the top of the baking pan during baking. I’m fairly certain I used the right amount of dough (about 1/3 of my container of dough the first time, half the next, although I’m not sure they were “cantaloupe-sized” balls) and before baking each loaf rose to fill 1/2 the baking pan — at least in the center. Any idea what my problem might be?
By the way, I have successfully converted three people to your baking method. I’m working on others…this is too good not to share! 🙂
Ann: It’s normal to have some loss of volume in the fridge. Try a longer resting time and I bet you’ll like the results better. Maybe 60 to 90 minutes and see if the crumb doesn’t open up for you. Also, check other approaches we’ve discussed on the website at https://artisanbreadinfive.com/?p=141
Jocelyn: For that WW loaf, you do need to lower the temp down to 350 or it scorches the crust. and you’ll need the longer rest and baking times as you say.
Melissa: As an FYI, Williams-Sonoma continues to offer a lifetime guarantee against cracking for their 14×16-inch stone– save your receipt if you go for this.
Julia: Our method depends more on oven spring for its loft than on pre-oven rising. In order to get a taller loaf, we’re telling people to fill them higher than we said in the book. Try 3/4’s full when first placed in the pan. And let it rest for 1 1/2 to 2 hours before putting it in the oven. Also, check other approaches we’ve discussed on the website at https://artisanbreadinfive.com/?p=141
THANKS FOR ALL YOUR COMMENTS!
I have a Lodge cast iron dutch oven, with the traditional lid and handle? I’m assuming this would be acceptable to use as well?
I have a large unglazed clay baker (large enough to do a chicken/dinner in), that I am “supposed” to soak in water before using for the steaming effect. (I am also supposed to put it in a cold oven. I am wondering if I could use this preheated without the soaking/steaming? Would the bread dough be enough steam?
I also have a Lodge cast iron chicken fryer, and a Club cast aluminum dutch oven. Would one of those be a better choice than the clay baker?
Gorgeous loaf!
I have been using this method for a long time, but substituted your recipe for the Lahey recipe. I liked the time factor and the taste so much more. My Le Creuset dutch oven is the same age as our marriage(42 years) and I have never had a problem with the lid. Recently I purchased a Chantal dutch oven at Marshalls that cost me $9.99 and works just as well as my “antique” LC. I switched to parchment paper when I found it difficult to plop the loaf into the pan. I use your recipe and the same parchment paper method in my rectangular Le Cloche. Love the flour on top of your loaf. Thanks for the book and this great web site.
Hi Suellen, Yes it should work beautifully!
Hi Rosemary, I love that you have been using your LC for 42 years! Bravo to you!!! Enjoy the bread!
Zoë
Hi Barbara, they all sound like great options! I don’t think you need to soak the clay pot first. The dough will provide plenty of moisture to produce steam.
let me know how it goes! Zoë
I have a lodge enameled cast iron dutch oven… I asked about replacement knobs and they instructed me to go to a local hardware store and pick up any stainless steel knob there. It’s worked like a charm.
I have a Magnalite GHC anodized aluminum 7qt Dutch oven–metal handles and all metal lid. I’m assuming it’ll be okay at 500 degrees, but it’d be nice to hear if you know for sure.
(My first half batch of the basic recipe is in the fridge. I’ll be baking my first loaf tomorrow!)
Mev: Perfect, maybe a much cheaper way if the hardware store one fits your dutch oven.
Janice: Best way to check is to go back to the manufacturer and it’s usually on their website. If it’s sold on Amazon, usually all the specs are right there also.
Yes–I’ve been using this method with your recipes from the beginning and it works. I’ve used a variety of enamel coated dutch ovens and they work. So did a thick potterir pot and lid (an old Dansk one from about 1970). All work fine.
I like the notion of the roaster for baguettes that another poster suggested.
In years of trying to bake good bread at home, I have tried every oven technique and have found only the wetter dough cooked in a pre-heated covered pot works.
I do this in my pyrex casserole with lid. Works fine. I have an oval baker and I use a half recipe, and get a lovely large loaf. I like the idea of the parchment, though, as I’d been using Lahey’s “dump it in” method and couldn’t slash the top.
I need help! I have been using your book with excellent results – buttermilk bread and brioche (including beignets), but I cannot seem to cook the pizza dough correctly. Either the bottom burns, even with a pizza stone, or the center of the dough is raw. What am I doing wrong?
My plain cast iron Williams-Sonoma covered deep skillet works fine, as does a Lodge cast iron Dutch oven.
I use a Silpat for resting to avoid throwing out a sheet of parchment paper every time. I wonder if I could plop the Silpat in the pan as you do the parchment?
where might I find info on cooking in a clay pot. I have a covered clay cooker and wonder if it would be acceptable to use. thank you.
Thanks for the response. The Magnalite line is no more and I can’t find specs online. Rather than risk it, I’ll bake in an All-Clad stockpot.
I’ve been making your master recipe this way for some time now, I use an Emile Henry clay dutch oven, works beautifully.
Hi Brenda,
I like the fact that you have more control over the dough if you use parchment. Be sure to put quite a bit of flour under it before you rest your dough or some parchment paper will stick to your loaf.
Hi Megan,
I wonder if you are rolling the dough out thin enough? How long are you baking the pizza? This is very curious, most people have the opposite problem of the bottom crust not crisping enough. I’d love to figure out what you are doing differently.
Thanks, Zoë
Hi Cheap like me,
Hmmm, this is an interesting question. Some silpats say that they can stand 500°F, but others say only 400°F. Be sure to check which yours is before you throw it in a 500°F pot.
I’ve never tried this method, so I’m not sure how it would work?
Thanks, Zoë
To everyone interested in baking in the CLAY POT. Jeff just got one and is going to do a post on it soon! Stay tuned!!
Thanks, Zoë
Do you ever give your resting loaves a little nudge if/when they start to spread out to the sides? How to you keep them so round?
I have already tried it!
Regards from Spain!
marga – aprendizdepanadera
I love your bread book. Every recipe I’ve tried so far has turned out great even the pizza dough, however, the frustration level is too high. I can’t get the pizza into the oven without it folding over or like last night I lost most of the toppings on the oven floor. What if I put the pizza in a pan? What about aluminum foil as parchment paper will only take a 420 degree oven? HELP! I’m determined to make a great pizza on Friday nights.
Hey,
What about folks (i.e. college students) who don’t have a baking stone or a fancy dutch oven/clay pot?
I have old cheap cookie sheets… so I’m going to try that with parchment and the disposable lasagna pan method. Any alternative suggestions?
By the way I think I love you guys! a few questions -do you think I can exchange any more King Arthur’s white whole wheat flour for white flour in the light whole wheat dough recipe?
BTW it was the metal peel that was causing the problem in the pizza recipe. The wood peel made all the difference.