Baking Bread in a Dutch Oven!
Here is yet another way to get a fabulous crust on your bread without using any steam in the oven. An unsophisticated disposable lasagna pan is an option but here’s another idea. Baking bread in a Dutch oven is a very old idea. All the iron-pot methods are based on the old European technique of baking inside a closed clay pot. Most people don’t have one of those, but enameled cast-iron pots are readily available—and they trap all of the internal moisture in the dough and that creates the steam you need to get a crisp and shiny crust. It really is fantastic and it works perfectly with our stored doughs from the book.
As you can imagine, the only drawback to baking bread in a dutch oven is that you are limited to a bread that is the shape of your Dutch oven. Luckily, Le Creuset has several shapes to choose from and I’m determined to try them all! The company even sells a special knob that can withstand the 500°F baking temperature of this method. All of these items (including the metal replacement knob) are available in Minneapolis-St. Paul at Cooks of Crocus Hill or nationally through Amazon (which offers a 7 1/4 quart pot, a 6 3/4 quart oval, a two-quart, and others.

Using a metal replacement knob is really essential to baking with this method, the hard plastic knobs will smoke at 500°F. Otherwise you’re limited to the maximum temperature recommended by Le Creuset (usually 450 degrees), and the crust won’t get as crisp.

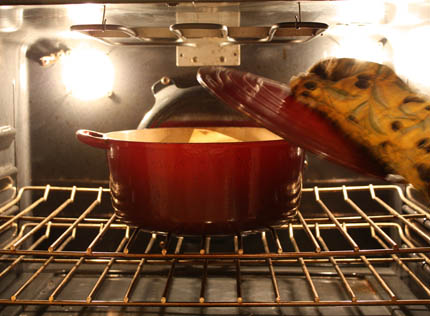
Preheat the pot with the lid on to 500°F for about 20 minutes. I used a 7 1/4 quart pot to bake a 1 1/2 pound loaf of bread.
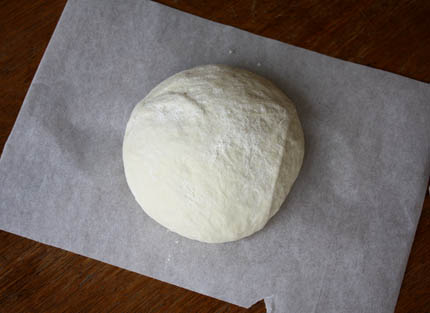
Shape your boule from any of the non-enriched doughs from the book and allow to rest on a piece of parchment paper as suggested in the recipe. What’s used here is the master recipe–let it rise for about 90 minutes. It’s easiest to get the dough into the very hot pot if you can drop it in right on the paper.
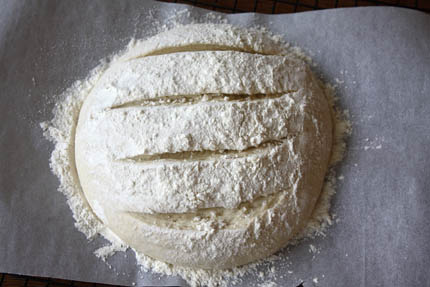
Slash the dough 1/4″ deep.
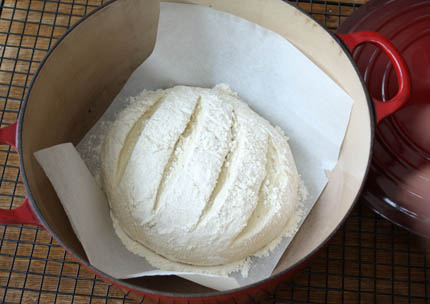
VERY carefully lift the dough and drop it, with paper and all into the preheated pot. This can be awkward the first time you do it. Take the pot out of the oven and rest it on a cooling rack so that it’s at a comfortable height to get the dough in without fear of touching the hot pot! It is very easy, but just be careful! Replace the lid and slip it back into the oven.
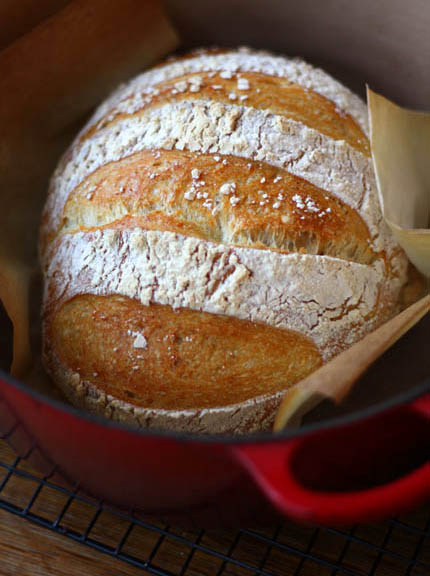
After 15 minutes of baking remove the lid. The dough only needs to bake in the steam for that amount of time. now it is time to get a lovely caramel color to the bread. Turn the heat down to 450°F and bake for another 15-20 minutes, depending on the size of the loaf.
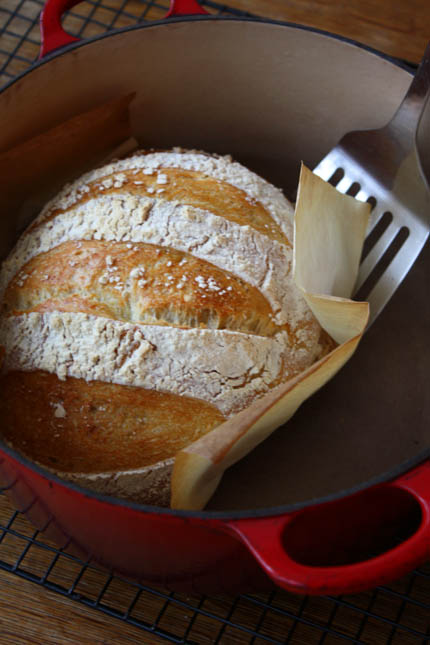
Once the loaf is nicely browned, carefully remove it from the pot with a spatula.
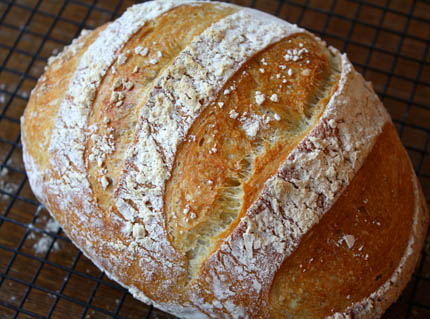
Peel off the parchment and allow to cool on a cooling rack.
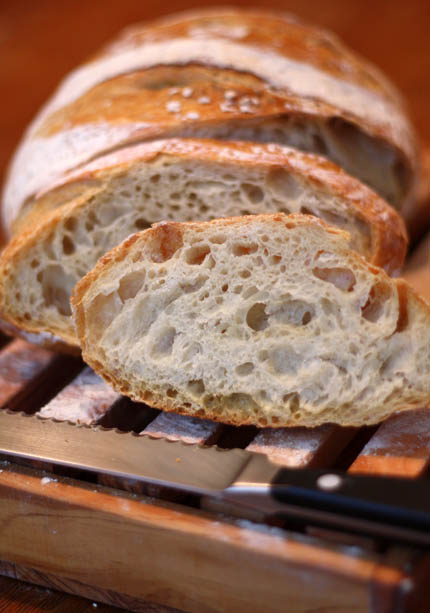
Once the bread is totally cool, cut and you can see how fantastic the crumb is!
Note: BreadIn5.com is reader supported. When you buy through links on the site, BreadIn5 LLC earns commissions.
Have been making the Bittman recipe for a bit (although I just got my copy of Artisan Bread in the mail yesterday and am very excited to start!)
I have an oval pot Le Creuset (I got it for free, from a neighbor who didn’t like it). For the final dough rising, before it goes into the hot pan, I made a form that exactly matches the bottom of the pan out of a cardboard drywall shim (individual cost at Home Depot:$0.02 each. These are flexible cardboard strips, about 2″ wide and about 4 feet long. I laid the strip inside the pan, cut it to length and then stapled it together.)
I put the form on the counter, line it with parchment paper, drop the dough in, cover with a kitchen towel and let rise. When I’m ready to put it into the hot pan, I lift the dough out by the parchment paper and drop it in to the pan.
The parchment paper gets brittle but hasn’t burned yet, in about 25 loaves.
I also have a sourdough starter I use (I add a cup to the wet dough without making any other changes).
Nina: I don’t nudge them to keep the shape, I think it’s a matter of technique– see our videos (but you’ve prob done that– https://artisanbreadinfive.com/?page_id=63). If it continues to spread sideways, mix up your dough a little drier– increase the flour by a quarter cup and see what happens.
Aprendiz: Thanks for trying our stuff!
Judy: Pan pizza is great… pre-heating a cast-iron skillet, then dropping the dough works well. Another way is to bake the crust “blind,” that is, without toppings. Go 5 to 8 minutes, take it out, top, then slide back in– it won’t fold or otherwise be difficult.
Annie: Cookie sheets are a good way to start. If you can take it off the sheet and finish on a bare shelf once it sets, all to the better.
Sue: If you increase the WW, increase the water too, or it will be dry. Keep the consistency like our Master and you’ll be fine. See also https://artisanbreadinfive.com/?p=142
Mo: Cool ideas, thanks!
Jeff and Zoe
I bought the book locally, because I wanted it soooo bad. I made a batch. The first night I bake a loaf on my baking stone. Last night my grandson was here, and we made our own little pizza’s, we had so much fun, making, watching them bake, and best of all eating them. I have a small amount left from the first batch, and plan to make caramel pecan rolls in the morning. (They turned out great) I have also started a second batch. Love it so much, I don’t think anyone could mess up a batch. Thank you so much, I am glad I found “Artisan Bread in Five Minutes a Day”. I am a baker from way back, my mother had a bakery/diner and I have made all types of bread, and some of them take all day, believe me, I am starting to like to bake again.
Thanks again
Joy
Thanks for all the kind words, Joy. Check back if you have questions for us. Jeff
Thanks Jeff. All of my previous batches have been make with AP co-op flour. My next batches will be made, as per your suggestion, with Gold Medal AP, and if that spreads sideways too, I will add an additional 1/4 cup.
Jeff and Zoe, I love the convenience of your bread and a number of your recipes are wonderful–the brioche and deli rye for example, but even though I always use the pot cooking method and let the bread rest for 90 minutes before baking, the texture of the boule made your way is frankly not as good as the bread made the Sullivan St Bakery way.
I wonder if letting the yeast rise for more than 90 minutes before refrigerating it would help? Have you tried that? Or, is it possible to double the Sullivan St recipe and let it sit overnight before refrigerating the dough.
I meant rise for more than TWO HOURS before refrigerating it…Sorry…
Such a timely article. My daughter lives in Romania and brought me a Romertopf clay pot for Christmas. I can’t wait to try your bread recipe in this. Today I stopped at a thrift store and there was a Romertopf clay pot for $5.99. You can believe I snatched that up immediately for a friend.
I have been using a 7 qt Lodge cast iron pot since reading the Mark Bittman article a while back. So, when my sister gave me your book a few weeks ago (how could I have missed it!?!) I just adapted all of your recipes to the pot. Of course, sometimes I have to squish them in a bit, but it works fantastically well. I don’t bother with parchment paper. Thank you so much for coming up with your method Jeff & Zoe, you have made breadbaking a pleasure for me, my family and friends (who are coming out of the woodwork to enjoy my/your bread!) BTW, yesterday I made an amazing fougasse with parmesan, shredded mozzarella, meatballs, caponata and a little tomato sauce. I would have never been so adventurous if it weren’t for your guidance. Thanks again!
I think I may have the answer to my own question. I went upthread and noticed I might have to add more water as I do use higher protein bread than you are using. I’ll try that.
ugh–higher protein FLOUR..C
Have been using my grandmother’s and aunts 70 year old cast iron Dutch ovens for this method for many months. I preheat to 450, slide the dough off the peel into the pot, quickly nudge it to shape and cover.
My neighbor Kris, a convert and devotee also uses this method. We think our method works just as well as using the stone and parchment.
Hi Clarice,
I think the way to go is to allow your loaves to rest longer before you bake them. If the dough goes into the oven when it is still cold and dense you will not get the nice open crumb that you are looking for. As you can see from my pictures our dough will do that, but you have to let it rest long enough. See if that makes a difference.
Yes, you are right about adding more water to your high protein flour. The drier dough will make a denser bread. Try both things and I think you will be very pleased!
Hi Jan,
Write back and let us know how your clay pot worked out with the bread. I bet it will be fantastic!
Hi Toby,
I think if it makes a bread you love to eat than keep it up!!! 😉
Thanks everyone! Zoë
Hi Barbara,
Thank you for the great note. So glad your sister got you the book and you are enjoying the bread. Your fougasse sounds incredible! It is amazing how people show up when there is fresh bread baked! 😉
Thanks, Zoë
HAPPY ST. PADDY’S DAY!!! I got an email from King Arthur Flour today. They had a recipe for a “Harvest Loaf” (long rising method) They used one of the Romertof (sp,??) bakers. After the long rising, they formed and put the loaf in the baker. They let it rise for two hours and then put it in a cold oven, setting the temp. to 450. They did soak the top of the pot, for extra steam. So…..I feel I can now use my Romertof, and your method. “May the wind be at your back, may the road rise up to meet you, and may there be bread at the end of your journey.”
Rosemary: Crazy coincidence, my clay baker arrived today, and I’ll be testing it for a future post. I got the Sassafras La Cloche https://tinyurl.com/dhlms5, but these all work pretty much the same. Stay tuned! Jeff
i’ve been using several different dutch oven types including a round clay pot and the chicken clay pot, as well as a le creuset, and even tried an old heavy alum. dutch oven (which got the bottom too brown). I can make all different shapes with the variety. I found that using one of those thin silicone sheets called “super parchment” I’ve been using the same one for over 1 year and it keeps working. Thanks for doing all your research on what steps we could eliminate! Wonderful. ps. I use 1/2 ww flour which I grind just before using it. or same with rye flour I grind.
Hi Carol,
The “super parchment” is a great idea. Thank you for sharing!
Cheers, Zoë
Hi Jeff and Zoe
I’m hoping you can help me, I’ve tried your master recipe, and am not having much success, I figure there’s something I’m not doing right!! When I take the dough from the fridge, it is quite sloppy, and once formed to let rise, just spreads on the surface it’s resting on. It does rise in the oven, and is edible, but not what I expect. Is it just a matter of not making the dough so hydrated, so that it’s able to be formed as your pictures above show?? I’ll try this next time, but any help would be gratefully appreciated, thanks!!
Great post on this bread. This is one of my favorite breads to bake. I’ve been using a Lodge cast iron (non enameled) Dutch oven which avoids the issue of the knob.
The parchment is a great idea. I had been proofing on a couche and sometimes the dough sticks.
Glad to have found your site…I’ll be visiting often.
I have tried this method with the no-knead bread of the Mark Bittman article fame…I’m so excited that I can do this with your breads too! YAY! Can’t wait to try it!
I have a great covered casserole made by a potter Meg Campbell from up by Duluth. It is glazed, both bottom and top.
Do you think this will work for the dutch oven method?
Allison: Any chance you’re using bleached flour? Cake flour? White Lily brand? Those are all too low in protein and don’t absorb enough water. If that’s not it, then increase the flour slightly. Quarter-cup? Then see what you think.
Don: Lodge is a nice product, I have their skillet.
Ann: So long as it’s oven safe to the temps we’re using here, you should be fine. I’d maybe keep it to 450 if you have any doubt. Can you ask Meg Campbell?
Off topic: Found your website and bought the book last week and I’ve been thoroughly impressed so far. The problem is that my wife has Celiac disease and can’t eat wheat, barley or rye and she’s jealous of my awesome bread. Have you guys experimented at all with gluten-free bread mixes? I’ve tried everything I can think of and nothing seems to produce bread that’s above average.
I was wondering if you had an area where we could post photos of our wonderful breads. I just made an awesome pizza and my husband insisted on photographing it before we ate it! Yes, it was that good! LOL! I would love to share the photo with you as it’s too late to share the pizza!
Hi JT,
Tell your wife that we are on it! We are currently working on our second book and there will be a chapter on gluten-free breads. It will be out in the fall!
Thanks, Zoë
Hi Barbara,
That is a wonderful idea! I’ll ask our webmaster what it would take to have a page where you could show off your breads and pizzas!
Until then you can send it to [email protected]. I’d LOVE to see your pizza!
Thanks! Zoë
Hi – re: your Master Recipe Boule, what weight of a cup of flour was your recipe written for? I’m a weigher, not a cup-measurer, so I’m interested in what degree of hydration the recipe intends. I’ve VERY disappointed that your recipes only specify volume measurements and omit the weights.
Thank you,
For the Master Recipe, it’s 2 pounds of unbleached AP flour with 1.5 cups of water (75% hydration). That’s very close to 5 ounces per cup of unbleached AP, measured by the scoop and sweep method. Other resources at QA Types of Flour, Weights, and How Much Water To Use: https://artisanbreadinfive.com/?p=140
This bread looks perfect! I often make the no knead bread in my dutch oven but it never looks pretty. Now, it will!
zoe–I regularly have been letting my loaves rest for 90 minutes. Yesterday I tried leaving one in the fridge all day covered with saran wrap before baking and the dough opened up more..(It was still from a batch of high protein flour dough to which I should have added more water.)
Next week I’ll be thru this batch and I’ll try more water–or a different flour, ninety minutes rest and all day in the fridge to see if I can get an even better crumb.
Although to date the crumb on my zoe and jeff breads is not quite as good as the Sullivan loaves but they are delicious..and your deli rye and brioche doughs were really fabulous.
Hi Clarice,
I will look forward to hearing about the next batch. I think you will like the dough better when it is a bit wetter!
Hi Redmenace,
Let us know how it comes out this time!
thanks, Zoë
hi! yours is mainly the only bread ive been making eversince coming across your method and buying the book. i always keep a bucket of dough in the fridge ready no matter what else ive got going on. which brings me to my question, lately ive been researching simple french breads using only the 4 ingredients that make up your master recipe. what i noticed was that it is the universal recipe for french bread.so….may i ask is there a difference to the end results and if not (or not much) what is the point of all the fiddling about, etc. with the usual methods?
also, i made a baguettte the other day using master dough but more stiffer version (as for epi), and i noticed my scoring has improved heaps (i used a bread knife, very lightly dusted, sprayed with water)but when shaping (i used letter fold ) it wasn’t smooth the way my boules/ovals ususally are and this is always the case. could you possibly show a step by step baguette on your site with end results (there’s no pic in the book)
thanks heaps, appreciate it.
Nads: The traditional recipes for baguette contain the same ingredients, but much drier, don’t you think? Otherwise it doesn’t store well, we’ve found.
Step by step for baguette is at: https://artisanbreadinfive.com/?p=152, just quit before the snips are made for the pain d’epi.
thanks, but do you have any photos of the baked baguettes?
yes i have noticed the water is less by a half cup. however, ortiz in ‘village baker’ refers to the advanced baker increading the water to 3 cups.
this is totally unrelated, but i was jus wondering about these very light delicious sweet breads, sometimes with filling/plain/iced(glazed). they’re found in asian HOT BREAD bakeries. due to the airy crumb do you think its suited to your method. they contain eggs flour sugar milk yeast salt can’t remember off the top of my head if there’s any other ingredient. i’d love to try it but i have no idea how much of each ingredient to put. appreciate any advice.
thanks heaps.
Thank you sincerely for this wonderful book! I made my first boule last night using the master recipe, and it was absolutely divine – as good if not better than what I can get at local bakeries. I’m still stunned that *I* made it, and it was so simple!
Right now I have a free-form loaf of 100% WW + vital wheat gluten and flax setting on the counter to rise. I’m going to bake it in my dutch oven, and I’m wondering if you can tell me at what point I should remove the lid? I’m planning on baking it for 50 minutes since it’s only a 1 pound loaf.
Thank you again! I can’t wait to buy the new book.
Nads: No, I guess we don’t have finished baguettes on the website, except for the ones cut as Epi loaves. Not familiar with the HOT BREAD bakeries.
Kimberly: In Zoe’s post she goes covered for about half the total baking time or a little less. So pull the lid at 20 to 25 minutes.
I used the last of my boule dough batch to make a baguette this afternoon. I have a covered crueset pate loaf pan that I baked it in. It’s still too warm to cut into but it looks very good..
Thanks Jeff!
Unfortunatelly Le Creuset pots are very expensive…
And who won the book? I keep searching for that information but I couldn’t find it.
Hi manuela,
There are several other options that people have suggested in this comment stream that are less expensive. Here is the announcement for the winner of the book: https://artisanbreadinfive.com/?p=562
Thank you! Zoë
I’ve had great success baking my bread on a pizza stone and covering the dough with an unglazed terracotta flower pot. Just be sure to plug the pot’s drainage hole with a piece of crumpled aluminum foil. Preheat both the stone and the flower pot as you would the dutch oven and follow the directions for the recipe with regards to temperature and baking time. Works like a charm!
Hi…I only just joined the great club of ‘five minute a day’ bread bakers…& am sold on the idea. The book isn’t available in India, & I luckily found the recipe & your review on Mother Earth news.I substituted some plain flour for wholewheat garlic-chives flour, & some oatmeal flour…handsome loaf!! Thanks a million!!
Wow marianne, that is a great idea!
Thanks, Zoë
Zoe, I can’t take credit for the idea. I read about it somewhere on the Internet. But, it does work and the price is right!
I have a 2 & 3/4 qt. Le Creuset oval pot I would like to use for a petite loaf. How much dough should I put in the pot? I am just getting started with this after being introduced to your book by my daughter. Thanks for something we are both enjoying!
Hi Ellen,
I would try baking a 1/2-pound loaf (about the size of a large orange)and see if that fills the pot nicely.
Let me know how it goes!
Zoë
I just bought your book and I am eagerly waiting for my first batch of dough to get ready for baking. I just love your technique !
Can I adapt your recipes to bake loaves using a combination of both your refrigerator rise idea and the use of a covered Le Crueset pot-either in a hot oven or a cold start oven ?
Rochelle: The covered iron pot method is usually done with a pre-heated pot; we’d worry that the crust wouldn’t crisp in a cold iron pot at the start.
That said, the closed clay pot method is often done with a non-preheated pot, so it may be worth a try. Certainly easier to handle a cold iron pot than a hot one.
I’d always preheat the oven though.
Looks jummy. How about skipping my glass lid with black knob and putting the pizza stone on top of the enameled dutch oven instead?