The New Artisan Bread in Five Minutes a Day Master Recipe! (Back to Basics updated)
This is one of the site’s most popular posts. Why? It answers many of the questions that you asked, with the answers incorporated The New Artisan Bread in Five Minutes a Day. Thank you all for making this new edition possible–readers are where the new ideas come from. If you’re having trouble getting this recipe to turn out the way you’d like, check out the troubleshooting tips on the FAQs page here.
For the Master Recipe…
If you’re new to the site, welcome, and thank you for trying the bread. The updated edition (2013) has lots of material that wasn’t in the original Artisan Bread in Five Minutes a Day (2007):
—More color pictures, there are 40 now (compared with 8), and 100 B+W instructionals
—A gluten-free chapter
—An expanded Tips and Techniques section
—Weight equivalents for every dough–for those of you with digital scales at home (optional!)
—Instructions for adjusting yeast and salt to your taste. And we decreased our standard yeast amount to 1 tablespoon (previously used 1.5 tablespoons for four pounds of dough).
—And 30 new recipes, including crock pot bread, a whole wheat variation that lets you increase the whole grain, rolls, panini, and more. About 130 more pages than our first edition.
As we bake through the basic Master recipe from NewABin5 we’ll try to answer some of the most frequently asked questions. The goal is to create a large batch of dough that stores in the refrigerator for up to two weeks. That’s why our method saves you so much time– all the mixing and prep is divided over four one-pound loaves.
Master Recipe from The New Artisan Bread in Five Minutes a Day: The Discovery That Revolutionizes Home Baking:
3 cups (1 1/2 pounds/680 grams) lukewarm water (you can use cold water, but it will take the dough longer to rise. Just don’t use hot water or you may kill the yeast)
1 tablespoon granulated yeast ( you can use any kind of yeast including products labeled as instant, “quick,” rapid rise, bread machine, active dry, or even fresh cake yeast (which isn’t granulated)*. You can also decrease the amount of yeast in the recipe by following the directions here. Or you can bake with a sour dough starter, see instructions here.)
*If you use cake yeast you will need 1.3 ounces (37g).
1 to 1 1/2 tablespoons Morton Kosher Salt (adjust to suit your taste or eliminate it all together. Find more information here)
6 1/2 cups (2 pounds/910 grams) all-purpose flour (the recipe’s tested with typical supermarket flour. If you use a higher protein flour check here)
Mixing the dough:
In a 5 or 6 quart bowl or lidded dough bucket (the lid is sold separately), dump in the water, and add the yeast and salt.

Because we are mixing in the flour so quickly it doesn’t matter that the salt and yeast are thrown in together.

Dump in the flour all at once and stir with a long handled wooden spoon or a Danish Dough Whisk which is one of the tools that makes the job so much easier!

Stir it until all of the flour is incorporated into the dough, as you can see it will be a wet rough dough.

Put the lid on the container, but do not snap it shut. You want the gases from the yeast to escape (you can put a little hole in the top of the lid so that you can close the lid and still allow the gases to get out. It doesn’t take much of a hole…

Allow the dough to sit at room temperature for about 2 hours to rise (it may take longer). When you first mix the dough it will not occupy much of the container.

But, after the initial 2 hour rise it will pretty much fill it. (If you have decreased the yeast you will have to let it go longer than 2 hours.) DO NOT PUNCH DOWN THE DOUGH! Just let it settle by itself.

The dough will be flat on the top and some of the bubbles may even appear to be popping. (If you intend to refrigerate the dough after this stage it can be placed in the refrigerator even if the dough is not perfectly flat. The yeast will continue to work even in the refrigerator.) The dough can be used right after the initial 2 hour rise, but it is much easier to handle when it is chilled. It is intended for refrigeration and use over the next two weeks, ready for you anytime. For the first two days of storage, be sure to leave the lid open a crack, to allow gasses to escape. After that, you can usually snap down the lid on plastic contains without problems, because they’re usually not entirely airtight. BUT, DON’T SEAL GLASS CONTAINERS OR THEY MIGHT SHATTER. The flavor will deepen over that time, developing sourdough characteristics.

The next day when you pull the dough out of the refrigerator you will notice that it has collapsed and this is totally normal for our dough. It will never rise up again in the container.

Dust the surface of the dough with a little flour, just enough to prevent it from sticking to your hands when you reach in to pull a piece out.

You should notice that the dough has a lot of stretch once it has rested. (If your dough breaks off instead of stretching like this your dough is probably too dry and you can just add a few tablespoons of water and let it sit again until the dough absorbs the additional water.)

Cut off a 1-pound piece of dough using kitchen shears* and form it into a ball. This video shows the technique for shaping this very wet dough.
Place the ball on a sheet of parchment paper… (or rest it on a generous layer of corn meal on top of a pizza peel.)
*Sewing Shears can be nice because of the long blade. I just dedicated a pair to the kitchen.

Let the dough rest for at least 40 minutes, (although letting it go 60 or even 90 minutes will give you a more open hole structure in the interior of the loaf. This may also improve the look of your loaf and prevent it from splitting on the bottom.) You will notice that the loaf does not rise much during this rest, in fact it may just spread sideways, this is normal for our dough.
You can also try our “refrigerator rise trick,” shaping the loaves and then immediately refrigerating them overnight. By morning, they’ll have risen and are ready for the oven after a brief room-temp rest while the oven preheats (click for instructions).
Preheat the oven to 450 degrees F. with a Baking Stone* on the center rack, with a metal broiler tray on the bottom (never use a glass vessel for this or it will shatter), which will be used to produce steam. (The tray needs to be at least 4 or 5 inches away from your stone to prevent it from cracking.)
*(or Cast Iron Pizza Pan– which will never crack and conducts heat really well. Be careful to dry it after rinsing with water or it will rust)

Cut the loaf with 1/4-inch deep slashes using a serrated bread knife. (If your slashes are too shallow you will end up with an oddly shaped loaf and also prevent it from splitting on the bottom.) If your dough is collapsing when you make the slashes, it may be that the dough has overproofed or your knife it dull and dragging the dough too much.

Slide the loaf into the oven onto a preheated stone (the one pictured below is cast iron) and add a cup of hot water to the broiler tray. Bake the bread for 30-35 minutes or until a deep brown color. As the bread bakes you should notice a nice oven spring in the dough. This is where the dough rises. To insure that you get the best results it is crucial to have an Oven Thermometer to make sure your oven is accurate.

If you used parchment paper you will want to remove it after about 20-25 minutes to crisp up the bottom crust. Continue baking the loaf directly on the stone for the last 5-10 minutes.

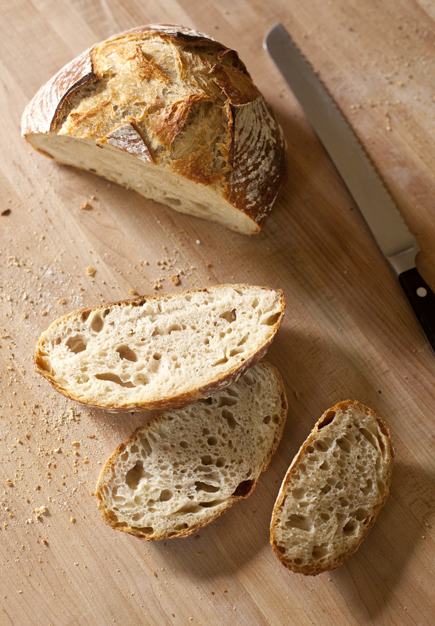
Allow the loaf to cool on a rack until it is room temperature. If you cut into a loaf before it is cooled you will have a tough crust and a gummy interior. It is hard to wait, but you will be happy you did! Make sure you have a sharp serrated bread knife that will not crush the bread as you cut.

If you have any leftover bread just let it sit, uncovered on the cutting board or counter with the cut side down. If you cover a bread that has a crust it will get soggy.
Enjoy, have fun baking, and check out the FAQs page if you’re having trouble getting the bread to turn out the way you’d like.
Note: BreadIn5.com is reader supported–when you buy through links on the site, BreadIn5 LLC earns commissions.
Im reading your book (2007 edition), thank you for explaining things well.I made the Boule, but my dough didn’t rise well can i add more yeast? i think my yeast was not that fresh ! I bought quick yeast , but i don’t know how much should be the proportion used , since its written that I have to add it in flour.please give me your advice , thank you again
It’s very hard to add yeast to already-mixed dough. There’s nothing in the 2007 book about mixing the flour and yeast. How did the dough bake off? I’d try that first–you may be fine.
This is the first time I made bread, it turned out way to dense , maybe it was under proofed, I left it the refrigerator for two hours for it’s second rise .
Any idea where I went wrong ?
Which of our recipes are you using, from which of our books, and what page number?
Hi there, could I bake this in a dutch oven instead of the stone and pan?
Sure, type “Dutch Oven” in our Search Bar above, and lots more on this in our books.
I am in love with the Continuous Sourdough Refrigerator Method. I keep both my starter and a small dough in the fridge all the time. And, bake as needed. I learned the basics from a friend. But, am just researching the possibilities of doing the same thing, only gluten free. I would love to have a book though. I was referred to you from a sourdough group on facebook. Can you help? Sincerely, Rhonda U.
Our book, The New Healthy Bread in Five Minutes a Day, has a whole chapter on sourdough creation, maintenance, and use in finished dough. It uses wheat flour, so you’d have to do some experimentation. GF doughs tend to be dense, and natural leavening tends to be less active, so you may find this denser than you might like. We haven’t tested this ourselves.
Hello,
Can I bake after the 2hrs proofing? Thanks
Sure–but you have to wait again after shaping, as in the recipe.
Ok. Thank you….looks like the experiment is on….
How can I care for the leftover dough in the tub? I used a pound for the bread that is rising now for 60 minutes, but can I leave the other dough in the fridge for the following days and add flour to it as I go?
Which of our recipes are you using, from which of our books, and page number?
The recipe is on this page, scroll up.
Hunter: assuming you are now posting for the comment just above here, from Carley…
The idea is to use the dough gradually, dusting with flour each time so you can shape it without it sticking to everything. We also have instructions in The New Artisan Bread in Five Minutes a Day (https://amzn.to/17Rw23Y) for using aged dough as the basis for a new batch (see page 62)
My question is about the new Artisan Bread in Five Minutes a Day Master Recipe. May I shape the bread as a baguette instead of a boule? Would that need different baking directions from what you have published?
Sure–much more on that in our book, “The New Artisan Bread in Five Minutes a Day” (https://amzn.to/39aLlth), in that book’s baguette variation in Chapter 5. You also can type “baguette” into our Search Bar above for more limited information we have here on the website. Do understand: our publisher would be very upset with us if we put all our books’ content here on the website!
Hi there! In the age of quarantine, it’s fun to be able to try lots of new things at home! Thankfully you have lots of fun things to try on line. Is there any thought about using a ‘baking steel’ to make the bread on in the oven? They were all out of stones at KAF (King Arthur Flour) and we had to accept a steel in it’s place.
Yes! Type “equipment” into our Search Bar above, and go to that post, scroll down to the various metal implements you can use for this, the baking steel, or a cast iron pizza pan. Some people actually prefer the steel or iron as being unbreakable–stones eventually crack, though I love them.
Hi Jeff,
I am interested to purchase your book. I would like to know if you have recipe for brioche doughnut on your book of
The New Artisan Bread in Five Minutes a Day: The Discovery That Revolutionizes Home Baking
As I am really interested in making doughnuts and i have seen some shop use a brioche typenof doughnut.
Thank you and looking forward to hear from you.
Francis
That particular book has a recipe for Beignets, which are fried doughnuts without the hole (or a chocolate or jam-filled version of that). Our Holiday and Celebration book (click on https://artisanbreadinfive.com/holiday) has a whole chapter of doughnuts.
I’ve always been unclear on this point: do you dust and slash the bread directly before you slide it into the oven, or do you dust and slash the bread right after you form it and lay it out to rest? Based on this post, it sounds like you do it right before baking.
Right before!
Can you please give a recommendation for alternative baking strategies if we don’t have a baking stone? Can I use a regular baking sheet or a cast iron skillet? Thank you in advance
You can swap, especially with the cast-iron–that’s pretty much a baking stone and works nicely.
Hi Jeff, I have been making bread for 5 years now. I love the master recipe. My question is how do I get larger custard bubbles? Over the years I seem to have lost the knack for that. When resting the dough prior to baking my times vary from 40-60-90 mins, based to outside temp, how busy I am etc. The result always seems the same. i love big custard bubbles but it seems hit and miss. Cheers
Which of our books are you working from, and what recipe and page number?
Can you bake this in a regular cookie sheet?
Sure–but need to grease it well or use parchment. Crust won’t be as good.
For the master recipe, can I cut the recipe in half? I’m nervous about using so much of my precious flour and somehow messing it up, resulting in a lot of wasteage.
Absolutely!
Hi! The link for the refrigerator rise trick that you mentioned above is not working for me. Could you please explain? I’d love try it on the basic artisan loaf recipe.
Which of our recipes are you using, from which of our books and page number?
Hi Jeff,
Can we also use a Dutch ovenproof cook the boule for this master recipe?
Sure, type “Dutch Oven” into our Search Bar above. Make sure the knob is heatproof as well, otherwise remove it and stuff the hole with aluminum foil.
My first loaf is in the oven now. Looking forward to tasting it although the dough a bit wet.
I’m already planning to bake more in the coming weeks. How do I feed the dough? I have the 2009 edition of the book. Thank you!
Sounds like you want to use sourdough (“levain”), and we’ve posted on this. Just type “sourdough” into our Search Bar above. I think you’ll find it helpful.
Thank you Jeff. I do want to make sourdough and this looks great. My question is when I’m close to finish the master batch, What do I do to make more? Start a batch or add flour and water to the batch in the fridge?
Also, by reading the comments here I think I would benefit from getting the new version of the Healthy Bread in Five book, yes?
You can do it either way, but if you’re doing purely sourdough-risen bread, there’s no particular advantage to building onto the old batch, since pre-fermented “levain” is already the basis of the flavor. Also, you might find that building on the old batch is giving too much sour taste (though I like it).
The New Healthy has a chapter on this, but it’s focused on whole grain flours, so if that’s not what you want, might not be a fit. Also, keep in mind we use vital wheat gluten in most of the recipes in that book.
Ok. I’m back at making bread after many years of being “too busy”, haha. Question. Do I need to wash the dough container between mixing new batches of dough? I think I remember reading in the cookbook, which a friend has at the moment, that unless it was a dough mixed with egg I can just add the ingredients to the current container, which will start to give it a sourdough taste. Am I remembering correctly?
You are! So long as it’s not made with spoil-able ingredients (eg., eggs, butter, dairy), you can do this indefinitely.
Thanks for the quick reply! I actually found our clog of the book shortly after posting the question. Apparently our friend did return our copy
Just mixed another batch! Thanks!
Another question though: we tried to make pizza the other night and failed miserably. The dough was way too wet and sticky to be manageable. Thoughts? Just keep adding flour while shaping?
Which dough did you use, from what page of the book?
I followed the master recipe above and tried to form it into a round pizza dough shape.
I’m guessing you mis-measured… you can work in extra flour now though, so that you can work with it. Or just keep the flour on the surface, don’t work it in–depends on how far off your measurement was.
Is it ok to use Bread/Strong flour? That’s all I could get at the moment
Yes but adjust the water per instructions on our FAQs page above, click on “Flour varieties…”
At a loss. Asked a question (about your brioche dough) several times. I KNOW you answered — you always do. But I don’t know where or how to find the answer. I also know you don’t answer directly to e-mail, which leaves me with a Catch-22 situation. Desperate for the answer but need a message about how to find it. I fear I’ll never solve the problem…
Last try, because now I know I can come back to this page for the answer. Apologies because you’ve probably answered already on another page. The problem is with the Healthy Bread in 5 brioche. The result is disastrously loose — a pourable mess. Twice. I managed to make a decent bread by plopping it onto a baking mat and forming a blobby mass, into the oven really quickly. But I wanted to make a cinnamon ring or just a better shaped brioche. I use oil instead of butter (it’s in the recipe). Could the extra liquid in the oil be the problem? Should I throw caution to the wind and just add more flour to get to the same consistency as the master recipe? But a thousand, million thanks.
Here’s the answer I’d posted:
Assume you mean the WW brioche in The New Healthy Bread? I know that recipe works well. Any chance you measured wrong? What brands of flour? Did you use vital wheat gluten (without that, it’s much too loose). Extra-large eggs?
Finally, the recipe calls for butter or oil, but if you use oil, it’s looser. The butter, when it chills, firms up the whole dough, while oil stays liquid even when chilled.
Go ahead and add more flour, let it ferment on the counter for two hours, chill, and try again.
Yes, the WW brioche. I know I measured correctly because it happened twice (not that I couldn’t have made the same mistake twice but I am always very careful and I weigh.) Anyway, I suspected it might iin part be because of the oil.. I’m not giving up. I will have a coach standing by to check my measurements 🙂 I’ll also try it with the butter, because, well, butter! ,And I’ll add flour. If the final consistency is what the master recipe produces, I have a good sense of how to correct it. And, your incredible, thoughtful, kind, generous and PATIENT! attention is so very much appreciated. Stay safe.
Sure Rosalind! The more I hear about this, the more I think you’ll prefer the butter version. Or even just a little more flour may make the difference. 2 tablespoons in the full recipe?
I am using a recipe on this page. Everything happens with a dough as discribed, it did rise well in the initial 2 hours, it did fall in the fridge, it did spread to the sides in the 40-60 minutes of resting before baking, the bread was tasty in the end but there was no spring in the oven. I ordered a thermometer but is there anything else you would recommend checking?
Hmm. How was the hole structure in the baked loaf? The other thing to try is a 90-min rest, but if it’s already spreading, could try using a little less water. 5%? 10%?
Hi, its me again 🙂 I am determined to get this right, so…
Ok, I’m on my second batch of dough/bread. The first batch I followed the directions as listed in the master recipe above (the one in the post dated 10/22/13). The dough was very sticky, not stretchy at all, and the bread came out very dense and even moist. I did some Googling and it looks like the original version of the recipe may have asked for 1.5tbsp of yeast instead of the 1tbsp as listed in the current recipe. I decided to give the 1.5tbsp of yeast a try and my second batch came out much, much better. My only gripe is I feel like I’m not getting the hole structure as pictured in the post above. Don’t get me wrong, this batch gave me much better results than my first, but still mostly small holes. The flavor overall is great, but again just mostly small, but uniform, holes throughout. If it matters I gave it two slashes with a knife before baking. I can send a picture if possible. Any suggestions? More or deeper cuts/slashes? Does that matter?
I know exactly what you’re talking about. You’ll get bigger holes if you age the dough longer. I think about 7 days is optimum, and you can stagger batches so you are always using older stuff.
Hello. Made your new artisan bread in five recipe original post 10/22/2013.
We made it with all instructions except used 1.5 tablespoons of yeast and 1 teaspoon of salt.
Everything turned out exactly as stated. Perfect crunchy crust. Nice inside.
The taste of ours was bland though. Would more salt have helped? Also, I was concerned that the 1 cup of hot water evaporated quickly and the pan was going to burn. I did open the oven a couple of times but fortunately it didn’t effect the bread. Could I have added more water?
Thanks for any ideas.
The steam’s only needed at the beginning, so you’re good with the steam. The broiler pans for water do take a beating, so if you have an old one, that’s better.
About bland: the taste strikingly improves with dough-storage–I love it best at about 7 days. If you do that, you might not need the salt to bring up the flavor, but you can go as high as 1.5T of coarse salt (if you’re using table salt, it’s different).
Thank you! Would it worthwhile throwing rosemary, cheese, or garlic butter on top before baking? I was going to try another one today. Thanks again!
Hi! I used this recipe for my 2nd time of baking bread ever and I am pretty happy with it. I watched Zoe make it on Instagram tv last week. It was really helpful. I am wondering if I can move my refrigerated dough to another container? I have it in a soup pot, because that was the biggest vessel we had, but now it is smaller I’d like to move it into a smaller tupperware container. Is that going to cause any issues?
No prob, go for it!
Doesn’t matter, so long as it’s not truly airtight. You have to let it be so that a little air can escape, at least for the first three or four days, then you can snap a plastic lead shot. But never use a glass vessel with a screw-top this way, they can shatter
A general question for most of your recipes I’m looking at trying…Is the oven preheating time included in the dough rest time or added on after? If my dough needs to rest for 90 minutes and the oven needs to preheat for 30, can I start the oven heating when the dough has been resting for 60 minutes and then bake at the 90 minute rest mark? OR do I let the dough rest for 90 minutes, then preheat, then essentially bake after 120 minutes of resting?
Start the preheat during the resting time. It’s included, overlapping with the resting time.
Only flour in the stores is bleached all-purpose. How should I (or can I??) adapt the master recipe so it isn’t too wet?
Hi! My friends rave about this recipe, so I thought I would give it a go. When I made it with the 3 cups of water and 6.5 cups of flour, the dough turned out very flakey. Should i just add some more water to the dough when this happens? Also, should I refrigerate immediately after 2 hours? Or can I let the dough rise for longer (i.e. overnight)?
yes, you can add more water. Are you using different kinds of flour than what we call for?
Hi Zöe and Jeff, thanks so much for everything you are doing in this moment and for the IG LIVE <3.
I think I need some help I was doing the 5 min dough recipe (this one) everything was fine the dough rise after the first 2hrs (had it in a metal bowl cover with a plastic film) then I put it on the freezer and by the next day I remove the plastic film put some flour on top and grab a piece of the dough and cut it with scissors, it deflated plus the dought was to wet and sticky even when I put it on the table, how can I fix this? It was hard to form the ball, I had to use a lot of flour to try to handle it. After I baked it didn’t rise too much I don’t have a stone or special tray for the bread I just use the metal one that comes with the oven with the fan option, don’t know if this is the right option to it. Doesn’t taste bad but the texture inside is a littler bit gummy? I really want to try to do it better, I don't know what I'm doing wrong.
Try it without freezing… also, your dough sounds too wet–what brand of flour are you using, and how are you measuring it?
Hi jeff! Thank you for respond, can I let it rest the night without freezing then?
Im from spain, Im using a white brand from a market “Hacendado”, I can’t find the information about it in english but it has: 10,3g of protein, 3g of fiber, 72g carbs and 1,3g of fats.
I used a digital scale: 340gr of water and 453gr of flour.
I wouldn’t. I’m betting your flour’s relatively low in protein. Just decrease the water 5% to 10%.
I’ve followed the instructions step by step, flavor is good but the crust is too hard. What can I do to make it softer?
Skip the steam, brush top with oil or melted butter…
Any reason why you use half a tablespoon less yeast in this recipe compared to the book?
Sure, we found it was just as reliable, and some people preferred the taste
Using a dutch oven or cast iron pan?
You can… what’s the question?
I am in the process of making rye rolls, using the the Master bread basic recipe. The dough has risen beautifully. I have a few questions. Can you please tell me what I do, next, to actually form the rolls. Also, I want to make salted rye rolls. How/When do I add the salt to the tops of the rolls. Do I let the formed rolls rest, prior to placing in oven? How long in oven and what temp? (I have made Artisan Bread in the past, so am familiar with the actual baking process, but have never made rolls.)
I very much appreciate your help…………….with VirusQuarantine, I have resolved to learn to make Salted Rye Rolls.
Thank you……………..
Start by typing “German-Style Rolls” into our Search Bar above. Also go through our FAQs page under the Questions tab above, lots more info there, and of course in our books (click on the book-images above).
Hi, I enjoy your books/recipes, so thanks for ‘democratizing’ bread baking!
I’ve been using the master recipe successfully for years, but for the first time tried the sour dough starter. Somehow when I incorporated it I must have gotten the dough too wet and didn’t realize it. It went through the counter rise then spent the night in the fridge. I just separated a 1 lb piece to shape a loaf, and it’s really sticky and when shaped and laid to rest it oozes into an almost flat blob. Is there any way to salvage the rest? Can i mix more flour into the remaining dough and let it rise again? Thanks.
You sure can– do it, and let it sit at room temperature until it rises again–recovering from having that flour worked into it.
Hi guys, ive been making this bread quite a lot and im having a few problems with it, I would appreciate your help!
1) whenever im letting the dough rest for 40-60 minutes after being shaped, its really spreading in the pan. I know that a bit of horizontal expansion is fine but mine is really expanding as the dough is really wet! Shall I just add more flour while making the recipe (I live in the desert + humid weather)? I use a scale for weight measurement.
2) The longer the dough is staying in the fridge, the wetter its becoming and the lower the rise achieved in the oven 🙁 not sure why…
3) The dough is developing a crust after around 3 days in the fridge and I think (??) some mold. I’m having to scrape that before I can shape the dough.
My yeast is instant yeast and its not old at all, opened this packet around 2 months ago and the initial rise in the bowl is great and big so I dont think its the yeast acting up. I’m covering it with cling film while its in the fridge and at around day 3-4 in the fridge I see water pooling on the surface of the dough.
I love the flavor of this bread but I’m being discouraged by these issues. I’ve made the dough over 4 times and its these 3 things every time.
Make it a little drier and you’ll be happier, sounds like. 5-10% less water. Our stuff does become denser with longer refrigeration, but the flavor improves, so I think it’s a great trade-off. You may also find this is less of an issue with drier dough. About mold? Doubt it, but go to our FAQ page and go down the list, we address this there.
Any recommendations on using high gluten pizza dough flour? It’s all I’ve got. Adjustments?
Sure– go to our FAQs page on types of flour (or more in this in our books, can direct you to which one).
Can your “master recipe“ back to basics be used as cinnamon bun dough? Also, when I made this dough it was no where near as wet as the photos. It was more like regular, “kneadable” bread dough. The first loaf turned out fine but I wonder whether the rest of the dough in the fridge will fare as well in a week or so. We live in a very dry climate in a higher altitude so I wonder if I need to make adjustments. Anyone else had this issue?
Hmm, could be a measurement issue, did you weigh the ingredients, or use cup-measures? Did you use a very high-gluten flour? You can use this dough for cinnamon buns, but of course the result will be completely different– less sweet, and not enriched with egg or butter. But since those rolls get doused with caramel, you compensate. Type “cinnamon” into our Search Bar above for our recipes–there are many, and many more in our books (Click on the links to “New Artisan…” or “Holiday and Celebration…” above, but be aware that only Barnes and Noble has copies of “New Artisan…” at the moment.
Same issues here. I think if I lessen the amount of yeast to less than a tablespoon, these can be avoided. I’m thinking that on the 3rd day in the ref the yeast has finished all the work on the flour so maybe less will correct it? My dough is good till day 2.
Olive, you may like our version with low-yeast– go to the FAQs page above, and click on the “Yeast” link.
Hi, I have some organic buckwheat flour. How should I incorporate it into the Master recipe? Straight or mixed with AP flour? Any change to H2O ratio? Ok to use with a sourdough starter? Thanks in advance!
Which of our Master recipes are you using, from which of our books and what page number?
I usually use the one on pg 53 of the new artisan bread in 5, but I also have the healthy bread in 5 and could use the one on page 54 if it works better with buckwheat.
Seems like the best choice would be the Buckwheat Bread on page 127 of Healthy Bread in Five Minutes a day (it’s on page 186 of the updated edition of that book).
The link for the “refrigerator rise trick” isn’t working in the master recipe above. If I shape my loaves at night and then refrigerate, what is the process before baking the next morning?
Thank you!
You’ll have to tell me a little more– what part of this isn’t working?
When I click on the link for the refrigerator rise trick, I receive an error that the page can’t be found on your website. Just don’t know what to do with the loaves I made last night. I put them in fridge and want to make today. How long do I let them sit on the counter before baking? Are there any other steps?
Here’s the link, just checked it and it works, after I typed “refrigerator rise trick” into our Search Bar above.
https://artisanbreadinfive.com/2013/11/22/the-refrigerator-rise-trick-on-crazy-busy-thanksgiving-morning-fresh-rolls-kurbiskernbrot-from-the-german-alps/ You can do the same thing with loaf-breads.
Help! I’m using the Master recipe and unfortunately my sweet, 9-year-old daughter thought she was helping me by putting the dough in the refrigerator while I was at the store. Therefore it did not rise:( Is there any way to save it? It took a 2 weeks just to get flour at the store I can’t believe I’ve wasted 6.5 cups of it now…
Just let it sit on the counter and it’ll wake up eventually. May take overnight.
I have your book Gluten free art bread 5 min and have used it and love. I would like to use a gluten free sourdough starter instead of yeast, where can I find a recipe??? Thank you
We don’t have a specific GF starter, but folks are swapping GF flours into our wheat starter, which you can find by typing “easy sourdough starter” into our Search Bar above. You’ll have to do some experimentation though…
Hey Jeff! I’ve been staring at this recipe for a week and my yeast finally arrived. I tried to bake bread years ago and it always came out horribly wrong. I decided to follow this recipe because it looked so simple. I didn’t have all of the same baking tools but I used what I had and followed it exactly, expecting it to fail me every step of the way. But every step came out exactly as it should! I didn’t wait to refrigerate it and just went straight to taking a piece of the dough to bake. I even forgot to score the loaf before I put it in the oven and it still came out perfectly and tasted great (I also had no parchment paper or anything to set the loaf on aside from my baking pan and the bottom came out nice and crispy and didn’t stick). And it was so obnoxiously easy, I felt like it couldn’t possibly work with how little effort I put into this. Thanks so much! I have been doing my best to stay home and not go to the grocery store and I was really missing the taste of bread that didn’t come in plastic wrapping.
So glad Elle, thanks for the kind words!
My family has been using your master recipe and pizza dough recipe for years now and couldn’t be happier! We so love you and Zoe for bringing this to us! Just want to say THANK YOU SO MUCH!
Thanks for the kind words, Susan, stop back if you have questions.
My sister and I both make this bread and love it. I have a question though. Our dough only ever makes 3 loaves. (The total dough is about 3 pounds and few ounces.) Are we doing something wrong?
It should weigh 3.6 pounds (3 pounds 10 ounces), if you add up all the weights of the ingredients, which would give you four loaves that weigh 0.9 pounds each. Not sure why you’re getting less.
Hi there, I just switched from your original artesian bread to the healthy bread in five minute book. You mentioned below that you have a whole chapter on sourdough but I am not finding a whole chapter on sourdough. Even the index only has it listed on page 39 and 51. I have a whole wheat sourdough starter as well as a white bread sourdough starter. The question I have is, can I add that to the master recipes for whole wheat or white bread? If so, does it change the recipe ingredients at all or is there a certain time to add it such as in the beginning with the all the other ingredients?
Second question: I have now baked four loaves of whole wheat bread and all of them are coming out way too wet in the center. The first ones I did were one pounders the second two were a pound and a half. I baked them for upwards of fifty minutes but they’re still coming out very wet in the middle. the first batch I used the ingredients as specified and based on the troubleshooting part in your book I added a quarter of a cup waterfor the next batch thinking I had not had enough water. The next batch was very wet and I literally had to throw those loavess away after I baked them. if you can answer both of those questions, the sourdough question and give me some guidance as to what I’m doing wrong with the whole wheat bread, I would appreciate it. The book doesn’t really elaborate on things like how much cooking time to increase if you’re going to cook a pound-and-a-half verse 1 pound or if the dough is wetter than normal. Thanks.
Chrissdough, that chapter is only in the 2nd edition of that book, The New Healthy Bread in Five Minutes a Day (2016, https://artisanbreadinfive.com/healthy). Short of getting that book, we have a post that summarizes how to use sourdough in our recipes– Type “easy sourdough” into our Search Bar above.
About the over-wet results:
1) are you omitting or reducing vital wheat gluten?
2) what brands of flour are you using?
3) are you making any changes or swaps in the recipe?
4) if measuring by volume, are you using our method? https://artisanbreadinfive.com/2010/04/28/how-we-measure-our-flour-using-the-scoop-and-sweep-method
5) which exact recipe are you using (what page)
Finally: don’t venture into sourdough-only leavening until you’ve gotten the hang of our method with whole grain dough and yeast as a leavener. It’s definitely more tricky.
Hi Jeff,
I am following the recipe exactly as listed in the book (wheat gluten and all). I am using whole wheat flour – I bought it bulk from a mennonite shop so not sure what the brand is. I thought I was sweeping and scooping okay, but after reading a bit on your site today, may have been pressing the cup into the flour too much. I will make sure to correct for that on the next batch. I think it may be easier for me to use scale for measurements since it looks like there is a drastic difference in the two methods. I am using the master whole wheat bread recipe.
As mentioned earlier, I did add a bit more water to this last batch and that did not help. With the last two pounds of that batch I am trying (today – let it sit for longer than 90 minutes) (tomorrow – I have formed and put in bowl in refrigerator overnight). If these do not work – I may go back to white bread and buy my whole wheat sourdough.
Oh, I must admit that I have forgotten to dust and slash on a loaf or two but that doesn’t seem to matter in terms of the end result.
Chrisdough: This is helpful. Non-standardized, bulk flours like the one you describe can have highly variable properties with respect to how much hydration they require. I love bulk flours, and use an organic co-op bulk whole wheat for my family’s bread, but because every bulk purchase can be different, when we tested tested our books’ recipes, we used standard supermarket flours like Gold Medal Whole Wheat (disclaimer: we used to have a sponsorship arrangement with Gold Medal/General Mills, but not for several years).
Scales are definitely a better way than cup-measures, if you go that way. Otherwise be careful with your scoop-and-sweep method.
Sounds like your dough was too wet, not too dry. The slash isn’t the problem, that’s just an aesthetic! Also, if dough is problematic when used as a tall domed loaf, it’ll still work great as flatbread or pizza (chapter 8 in your book). I love using sourdough for those.
I will like to incorporate whole wheat flour and or spelt into the olive oil dough in page 214 of your book. Could u advise me how much water do I adjust. I am trying on 30 percent (wheat/spelt) and 50 percent (wheat/spelt) looking forward for your reply ☺️
as I’m sure you found, when you added those whole grain flours, you need to increase the water. Everything depends on the spelt I think, which is a very non-standardized flour. So I can’t specifically advise you… you’re going to need to adjust the water upwards, so that the dough looks like what you’re used to, and you should succeed. As you increase the proportion of spelt, the dough is going to get dense, and just be warned.. you may prefer the lower level of whole grains that you described.
Hi again! Quick question. We have the The New Healthy Bread in Five Minutes a Day, but since we can not get our hands on anything other than AP Flour, we’ve been using the original master recipe. Do you think swapping out the original master recipe (AP Flour) for the Whole Wheat version is ok in most recipes or do I need take some adaptations into consideration?
The general rule is that WW takes more water than AP in our recipes. If you follow baker’s percentages, the easiest way to think of it is that while the recipe in this post, with AP, is 0.75 hydration ratio (the weight of water is .75 of the weight of the flour), if this were Whole Wheat, and we weren’t using vital wheat gluten, the ratio that works well is 0.80 to 0.83 or so. Does that make sense?
I just made my second loaf from this round of dough. This loaf came out quite flat. It was pretty flat when I put it in, but that’s happened to me before and it still came out fine. Thoughts?
Oh, it also came out less crusty…
Rakel: Many possibilities here, go to our FAQs page above. Measurement problem? (weighing is better than volume, and if you use cup-measures, use our method for that, at https://artisanbreadinfive.com/2010/04/28/how-we-measure-our-flour-using-the-scoop-and-sweep-method/)
Flour brand? Low protein flour?
Poor gluten-cloaking? See our video on that at https://www.youtube.com/watch?v=bIb8fC9BdWs&t=125s
Much more detail in https://artisanbreadinfive.com/artisan
Do you have a recipe for a sourdough starter? And direction on how to do.
Sure, it’s in our book, The New Healthy Bread in Five Minutes a Day, which you can buy at https://artisanbreadinfive.com/healthy. A summary of that material is here on the website; type “easy sourdough starter” into our Search Bar above.
Love your recipes!
Bought some new Red Star Platinum Instant Sourdough yeast. How should I adjust ingredients/amounts in this recipe to use this yeast? I’ve successfully made their recipe for sourdough boule but want to have sufficient prepared dough on hand so I can bake off a loaf at a time like this recipe allows.
Thanks,
Claudia
Type “instant sourdough brioche” in our Search Bar above for guidelines on how to use this product–you’ll have to experiment a bit.
Hi Jeff,
I have been using/trying the master recipe from The New Artisan Bread in Five Minutes a Day for about a year.
In the beginning I used AP flour and the scoop method. The loaves were usually dense.
Now I have switched to bread flour. When I googled, a cup of flour = 4.4oz which I used for the recipe (1 lb 12.6oz). The first two loaves of bread turned out beautiful. But the dough became stickier and wetter in the fridge after a few days, and subsequent loaves from the same batch were flat.
My latest batch is so wet and sticky it is simply impossible to shape, resulting in a flat shapeless loaf. I basically just threw the dough on the baking sheet!
I realize you stated 2 pounds of flour in the master recipe. I’m going to try that instead for the next one. My question is- how much extra flour do we actually use to dust during the shaping process? Just lightly or as much as needed for the dough to not stick at all? My shaped dough has never looked as nicely full and rounded as shown in your pictures. Most of the time, even when I was doing the scoop method, I’m struggling to get it off my hands.
Also, if I leave the dough out for too long at the last rising, would that be reason for it to turn out flat?
I didn’t want to accidentally incorporate too much extra flour when shaping, but ignore the dough is wet and sticky, is that just indication that I can use as much flour as needed to shape a smooth and full loaf?
Correction * if the dough is wet and sticky
First off, use our weight equivalents in the book, on page 53 of the book, not the one you listed above. Sounds like your measurements were off, but once you switch to weights, you’ll be fine, and you won’t need the bread flour. And dust liberally, taking care not to incorporate the flour into the loaf as you shape it. But use as much as you need.
I like to weigh my flour. Can you please tell me how many grams 6 -1/2 cups should equal? I have the original copy of Artisam Bread in Five Minutes a Day and your Holiday and Celebration Bread in 5 Minutes a Day. The first book seems to use 142 grams of flour per cup while the second book uses 125 grams per cup. Thank you.
Check out our FAQs page above, choosing “Weighing your ingredients…” If you use cup-meausures (like most of us did when the 1st book came out), it’s prone to variations. You have to measure using scoop and sweep (see video at https://artisanbreadinfive.com/2010/04/28/how-we-measure-our-flour-using-the-scoop-and-sweep-method). If you do that, each cup is the higher gram-weight you quote.
My baked dough is very “doughy”… I don’t like that. I always take inside temp. I follow instructions, but it is always too doughy. Should I make baquettes or smaller, flatter loaves?
Hi Joanne,
You certainly can make smaller loaves. To get the bread to bake through you may need to let it rest a bit longer before baking and be sure your oven isn’t running a bit cool or it will take longer for the bread to reach 205°F. You have to let it cool for a full hour before slicing or it will be gummy.
Thanks, Zoë
I have read about the health benefits of sourdough bread due to it’s fermentation such as: probiotics, lactic acid which creates a PH level needed for nutrient absorption and the fermentation process giving the carbs a lower glycemic index. I wonder if the longer fermentation of your recipe in the refrigerator has the same kind of benefits. It would be nice to know!
Mike, I just did a whole post on this, type “health questions” into our Search Bar above, or just go to our home page, where it’ll sit for a while. It’s also in our FAQs page (above), scroll down to number 33, Health Questions.